


Mega Menu
Overview
Whenever you have a large number of menu items it is best to use mega menus. The mega menu will help you categorise the menu items and also lets you add images to the menu and give a visual clue about each section.
How to use the mega menu?
Enfold comes with the ability to make your main menu into a Mega Menu which allows your sub menu dropdowns to support images, html and columns. For example, you may have noticed this menu on the theme demo:
Create submenu rows and columns
To activate the mega menu expand the menu item and select the “Use as Mega Menu” option.

Add submenu items under the menu item which has been selected to use as a Mega Menu.
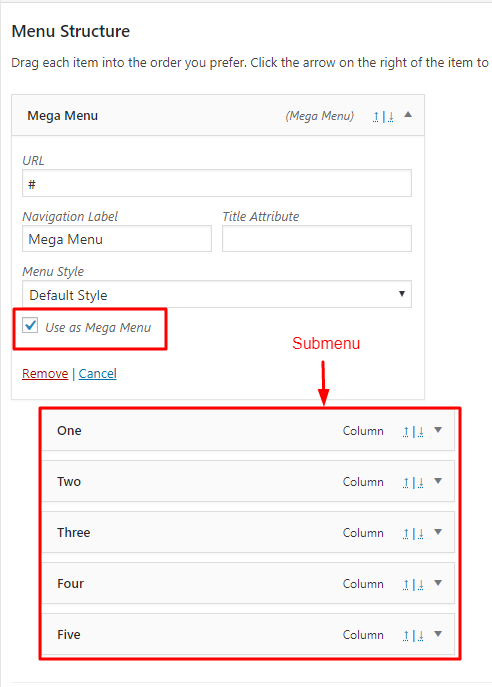
This should give you a basic Mega Menu as seen below.

Let’s display the submenu items in two rows say 1 – 3 in the first row and 4 – 6 in the second. To do so expand the submenu item which need’s to start in a new row and select the option “This column should start in a new row”. We will do that for the fourth menu item.

This will start a new row as seen below:

Let’s add more menu items for each of submenu to create a true Mega Menu.

Adding more menu items under the submenu items will give us the result below:

To create a vertical mega menu simply select “This column should start in a new row” for 2nd and 3rd menu items. The result will be as seen below:

Code Snippets
CSS Reference
/* Mega menu title */
#top #header #avia-menu li .mega_menu_title {}

/* Mega menu parent link background*/
#top #header #avia-menu li.menu-item-mega-parent{}

/* Mega menu parent link text*/
#top #header #avia-menu li.menu-item-mega-parent > a .avia-menu-text {}

/* Active mega menu parent */
#top #header #avia-menu li.active-parent-item > a .avia-menu-text {}

/* Mega menu background color */
#top #header #avia-menu ul.sub-menu {}

/* Mega menu sub links */
#top #header #avia-menu .avia_mega_div ul.sub-menu > li a {}

/* Mega menu sub link text */
#top #header #avia-menu .avia_mega_div ul.sub-menu > li a .avia-menu-text {}

/* Active mega menu sub link  */
#top #header #avia-menu .avia_mega_div ul .current-menu-item > a {}

/* Mega menu sub link description*/
#top #header #avia-menu ul.sub-menu .avia_mega_text_block {}

/* Mega menu bullets */
#top #header #avia-menu ul.sub-menu .avia-bullet {}
Customization
Scroll mega menu dropdown
To make the mega menu dropdown scrollable please use the CSS below.
/* Scrollable mega menu dropdown */
#header .avia_mega_div {
    overflow: auto!important;
    max-height: calc(100vh - 200px);
}
Add Images to mega menu
In the below example we will select a blog page and make it a mega menu with different sections and images to visually represent each section.
Go to Appearance > Menu Editor.
First, let’s add a menu item by selecting an existing page/post or you can even add a “Custom Links” and tick the “Use as Mega Menu” option.

Next step is to add another menu item from the “Custom Link” section and drag it slightly to the right of the “Blog” menu item above it. This will create a hierarchy or a parent-child relationship. Any menu item added under a parent menu item becomes a child menu and automatically appears in the drop-down section.
To add a clickable image edit the child menu URL and Navigation Label. Change the “URL” to a prefered link and in place of the “Link Text” add the HTML code for the image.
<img src="http://domain.com/image.jpg" alt="" />
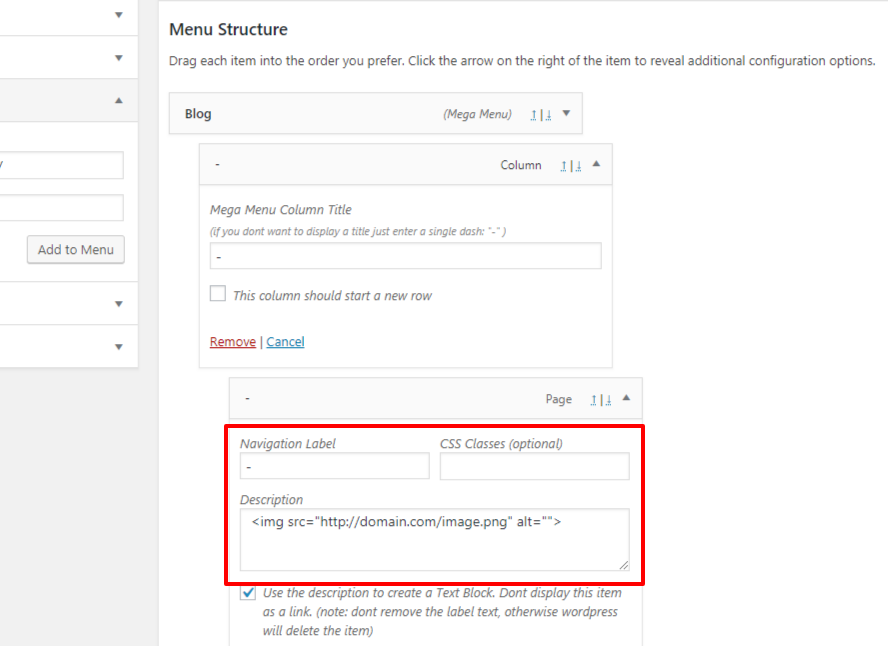
To add an image that is not clickable we need to repeat the previous step so we can make use of the submenu description field to add our image. Add another menu item from the “Custom Link” section and drag it slightly to the right of the previous child menu we added. Add a “-” in the “Link text” area and the HTML image code in the description area as shown in the below image. (A “-” is necessary if not WordPress will delete menu items with empty labels).
Lastly, you need to check the “Use the description to create a Text Block. Don’t display this item as a link. (note: don’t remove the label text, otherwise, wordpress will delete the item)” option.
Replace mega menu arrows with custom icon
To replace the default mega menu arrow with a custom icon, please change the Icon Unicode and add this code to the Quick CSS section under Enfold > General Styling or to your child theme’s style.css file:

/* Mega menu arrows */

#top .avia-bullet {
  border: none!important;
  background:red!important;
    padding:0;
    margin: 0 10px 0 0!important;
}
#top .avia-bullet:before {
    content: "e812";
    font-family: 'entypo-fontello';
    font-size:11px;
    line-height:1em;
    position:absolute;
    top:10px;
    left:-3px;
}
Troubleshoot
Mega menu appears as a normal menu
Having trouble with the mega menu options or the way it appears on the frontend? The first thing to check is if any plugin is having a conflict. We have had issues with plugins like Popup Maker.
For testing purpose deactivate all the plugin and see if the issue persist. If the problem exists only when the plugin is active please perform the below steps.
Go to the Popup Maker plugin’s Settings > Misc panel then tick the “Disable Popups Menu Editor” option.
And lastly, add the below code at the end of the functions.php file.
add_action( 'wp_nav_menu_item_custom_fields', '_my_custom_nav_menu_fields', 10, 4 );
function _my_custom_nav_menu_fields( $item_id, $item, $depth, $args ) {
  wp_nonce_field( 'pum-menu-editor-nonce', 'pum-menu-editor-nonce' ); ?>
<p class="field-popup_id  description  description-wide">

    <label for="edit-menu-item-popup_id-<?php echo $item->ID; ?>">
      <?php _e( 'Trigger a Popup', 'popup-maker' ); ?>
<select name="menu-item-pum[<?php echo $item->ID; ?>][popup_id]" id="edit-menu-item-popup_id-<?php echo $item->ID; ?>" class="widefat  edit-menu-item-popup_id">
<option value=""></option>
        <?php foreach ( PUM_Modules_Menu::popup_list() as $option => $label ) : ?>
<option value="<?php echo $option; ?>" <?php selected( $option, $item->popup_id ); ?>>
            <?php echo esc_html( $label ); ?>
          </option>
        <?php endforeach; ?>
</select>

      <span class="description"><?php _e( 'Choose a popup to trigger when this item is clicked.', 'popup-maker' ); ?></span>
    </label>

<?php
}
Resource
UberMenu integration
You can find the integration guide for using UberMenu with the Enfold theme here: http://sevenspark.com/docs/ubermenu-enfold
Contributed video: