


Intro to Layout Builder
Overview and Settings
The Advanced Layout Editor is a robust page builder with a simple drag and drop interface, it lets you create different page layouts in no time. Advanced Layout Builder (ALB) comprises of web elements like newsletters, tabs, background images/videos, sliders, forms, maps, media elements, social icons, grid layouts, columns and a lot more.
Settings for Advanced Layout Builder can be accessed from Enfold > Layout Builder

Enfold is built on the avia framework which is a very easy to use and powerful editor. Hence we do get a lot of question if users can buy the Advanced Layout Builder as a separate plugin to use it on other themes. The answer is at the moment we do not sell it as a separate plugin but it comes bundled with the Enfold theme.
Build a web page with Advanced Layout Builder
Drag and drop web elements can be accessed by clicking on the “Advanced Layout Editor” button on any page or post. Web elements are sorted into 3 main categories called the Layout elements, Content Elements and Media Elements.

Things to note:
- Color Sections, LayerSliders, and Masonry elements will always be full width and it will push the sidebar to the bottom.
- Full-width elements like Color Sections, LayerSliders, and Masonry elements cannot be placed inside column elements.
- The default visual editor and the Advanced Layout Builder use two different sets of data so you aren’t able to switch back and forth between them.
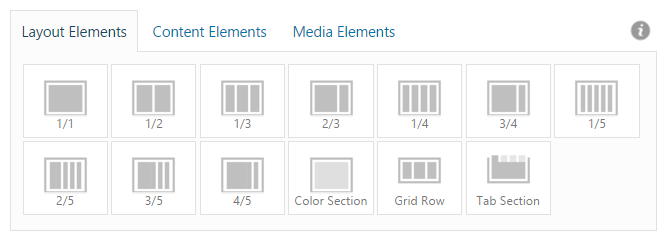
Layout Elements
Layout Elements section consist of Columns, Color Section, Grid Row and Tab Section. Layout elements can be used to define the base layout of your web page. In the Layout Elements section, we will take a detailed look and create different page layouts.
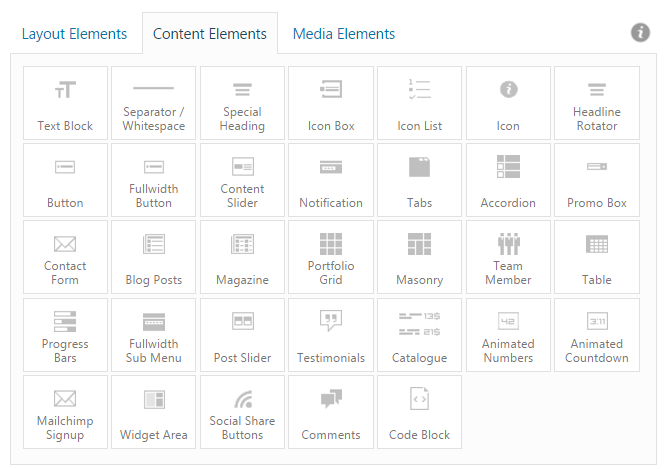
Content Elements
Elements that make up the content of your web page such as Text Block, Headings, Buttons, Portfolio and many more can be accessed from the Content Elements tab. Most of the content elements can be placed inside the Layout Elements to position them on a webpage to suit your design.
Media Elements
Images, Sliders, Videos and other media elements can be accessed from the Media Elements tab. Using media elements on a web page can create a visually rich and interactive experience.

Templates
In some cases, you may have to create the same layout for many pages. The templates feature makes it easy and saves a lot of time to re-produce the layouts. Creating templates and loading the template of your choice is very straightforward.
- To create a template which you can later re-use on other pages, click on template on top right of the advanced layout builder and save the template by giving a custom name.
- To load a template click on the template option and select any of the saved template from the list.

Shortcode
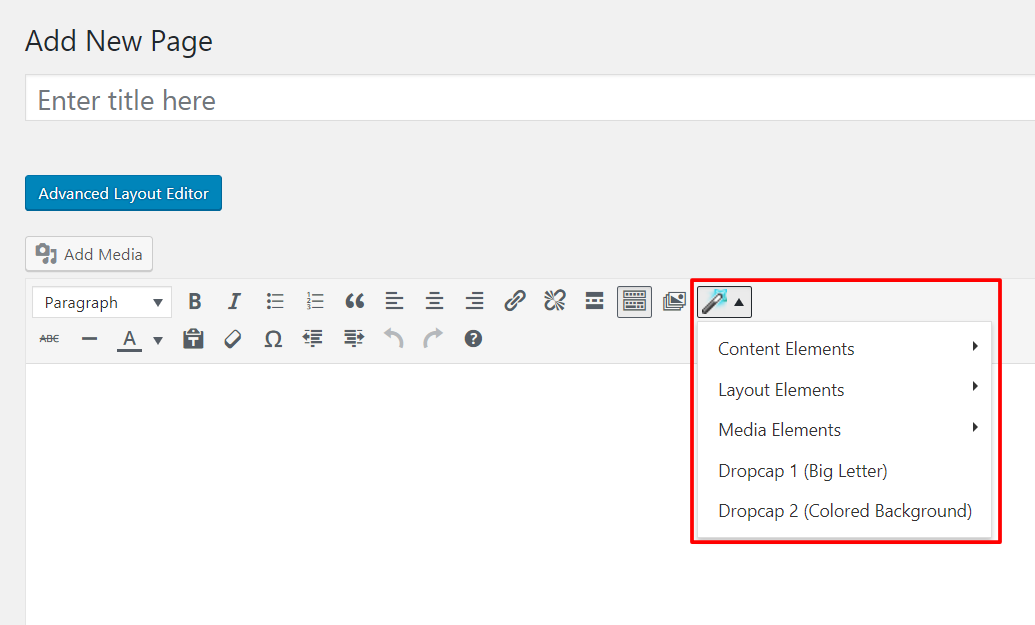
Shortcode for elements
Shortcode for Advanced Layout Builder elements can also be accessed from the Magic wand tool found in the text editor. To access any shortcode simply on the Magic wand tool and select the necessary element.
Debug mode
If you would like to view the shortcode of a page or elements of the page. The Debug mode allows you to view the shortcode for the page and it’s elements. You can copy and paste the shortcode to re-produce the page and elements or something more advanced like nesting elements.
To do this, you need to enable the debug field for the Advanced Layout Builder. Adding the following to your child theme functions.php will do that:
//set builder mode to debug
add_action('avia_builder_mode', "builder_set_debug");
function builder_set_debug()
{
  return "debug";
}
You should now see a new field under the Advanced Layout Builder with the live output of the elements as you add them using the drag and drop interface. Just be careful of editing things in that field as there are no checks or automatic corrections for missing punctuation or code.
If you are not using a child theme you need to add the above function after this line in the theme functions.php:
if(isset($avia_config['use_child_theme_functions_only'])) return;
Developer options
How to use developer options?
Enfold theme is developer friendly, you can add a unique CSS class name or ID to target using custom code to enhance the theme elements.
To access the developer options, please go to Enfold theme options > Layout Builder > General Builder Options and Turn on or off the developer options.

Add Custom Classes to your Elements

Now you can add a custom class name of your choice so that you can easily style that element either through the Quick CSS field, custom.css file or your child theme’s style.css file. Just make sure to use unique class names so there are no conflicts with other plugins or the theme’s CSS.
Keep Class Names Unique
A good practice is to prefix the class with your initials. For example, Kermit The Frog would use the following to add a border to something:
ktf-darkborder
Then in the Quick CSS filed in the theme’s Styling options:
#top .ktf-darkborder {
  border: 1px solid #333;
}
If you are using a version of Enfold older than version 4.1, and wish to enable the custom CSS class name field, add a function in the functions.php file using the code below.
add_theme_support('avia_template_builder_custom_css');
Custom heading tags for ALB elements
For SEO purpose you can change the heading tags for certain theme elements. Please check the link Change the heading tags of the theme elements for SEO purpose
Aria Label
ARIA (Accessible Rich Internet Applications) is a set of attributes added to your HTML to help assistive technologies, such as screen readers for the blind, make sense of certain things that are not native to HTML.
To enable custom ARIA labels please use the below code in your functions.php file of your Child theme.
/*
 * Returns option settings for developer options.
 * Allows to distinguish settings for individual input fields.
 * This implementation was used prior 4.6.4 where each input field had an own option
 *
 * @since 4.5.7.2
 * @param string $value
 * @param string $setting
 * @param string $option_value		'show' | 'hide'
 * @return string|false				'deactivate' = hide and ignore input values  (is removed from options)
 *									'hide'       = hide input fields but use values
 *									'developer_options' | 'developer_id_attribute' | 'developer_seo_heading_tags' | 'developer_aria_label'
 *									              = show input fields and use values
 */
function custom_alb_get_developer_settings( $value, $setting, $option_value )
{

	switch( $setting )
	{
		case 'custom_css':
			/**
			 * allowed return values
			 */
//			$value = 'developer_options';
//			$value = 'hide';
//			$value = 'deactivate';

			break;
		case 'custom_id':
			/**
			 * allowed return values
			 */
//			$value = 'developer_id_attribute';
//			$value = 'hide';
//			$value = 'deactivate';

			break;
		case 'heading_tags':
			/**
			 * allowed return values
			 */
//			$value = 'developer_seo_heading_tags';
//			$value = 'hide';
//			$value = 'deactivate';

			break;
		case 'aria_label':
			/**
			 * allowed return values
			 */
//			$value = 'developer_aria_label';
//			$value = 'hide';
//			$value = 'deactivate';

			break;
		case 'alb_desc_id':
			/**
			 * allowed return values
			 */
//			$value = 'developer_alb_desc_id';
//			$value = 'hide';
//			$value = 'deactivate';

			break;
		default:
			$value = false;
	}

	return $value;
}

add_filter( 'avf_alb_get_developer_settings', 'custom_alb_get_developer_settings', 10, 3 );
Force ALB on a CPT
You can use this filter to force usage of ALB for a specific post type. This will also hide the switch button with CSS. Also works for Block Editor. When true, gets class avia-force-alb.
If you do not want to force all posts of a post type to use ALB (e.g. because you have old posts using classic editor) you must use a more specific logic.
Please use the below code in your functions.php file of your Child theme.
function custom_avf_force_alb_usage( $force_alb, $post )
{
	//	security check
	if( ! $post instanceof WP_Post )
	{
		return $force_alb;
	}

	/**
	 * e.g. force all posts with posttype post to use ALB
	 */
	if( 'post' == $post->post_type )
	{
		$force_alb = true;
	}

	return $force_alb;
}

add_filter( 'avf_force_alb_usage', 'custom_avf_force_alb_usage', 10, 2 );
Customization
Add Elements to ALB
From within your child theme, you may want to add or edit an Advanced Layout Builder element. To do so, first add the following function to your child theme’s functions.php:
add_filter('avia_load_shortcodes', 'avia_include_shortcode_template', 15, 1);
function avia_include_shortcode_template($paths)
{
  $template_url = get_stylesheet_directory();
      array_unshift($paths, $template_url.'/shortcodes/');

  return $paths;
}
Now add a new folder in your child theme directory called shortcodes. If you copy an element from enfold>config-templatebuilder>avia-shortcodes to this folder it will replace the one in the parent and be used instead. You can also add new ones using the other shortcode elements as examples.
Activate the Shop Overview Page
Once you open the WooCommerce default Page, the “Home Page of your shop” so to speak, you will notice that the advanced layout editor is disabled by default (See image). This is because Woocommerce overwrites the contents of this pages and executes a custom query for your products. This does not play well with the way the Advanced Layout editor works.

So if you want to build a fancy shop overview with the advanced layout editor you got 2 options:
- The easier option is to simply create a new Page and add a “Product Grid” template builder element, along with all the other stuff you want to show and simply don’t use the default shop page at all. This should be sufficient in most cases.
- The more “complicated” option is to activate a beta feature of ours, that disables the WooCommerce Custom Query.
If thats the way you want to go, you will need to add the following snippet to either your themes or child themes function.php file:
add_theme_support( 'avia_custom_shop_page' );
This will enable the Layout Builder for the default Shop page but also remove the default WooCommerce Products that would usually be displayed on that page. You then have to add them with a template builder element, just as in solution #1
Please keep in mind that solution #2 is a Beta feature and is still tested.
Activate the WooCommerce Product page
Activating the Advanced Layout Builder on single product page will override all the default WooCommerce features to provide you with the complete flexibility to design a custom product page. Only elements/shortcodes that is added by the user will be displayed on this page because ALB uses different set of loops and data. The elements in the “Plugin Additions” tab of the layout builder options can be used to build the product info page in combination with the shortcodes provided by WooCommerce in a codeblock element, http://docs.woothemes.com/document/woocommerce-shortcodes/.
To get access to WooCommerce features, we recommend using the default editor. If you use the layout builder then you’ll need to build the product information manually using the layout builder elements.
ALB for any post type
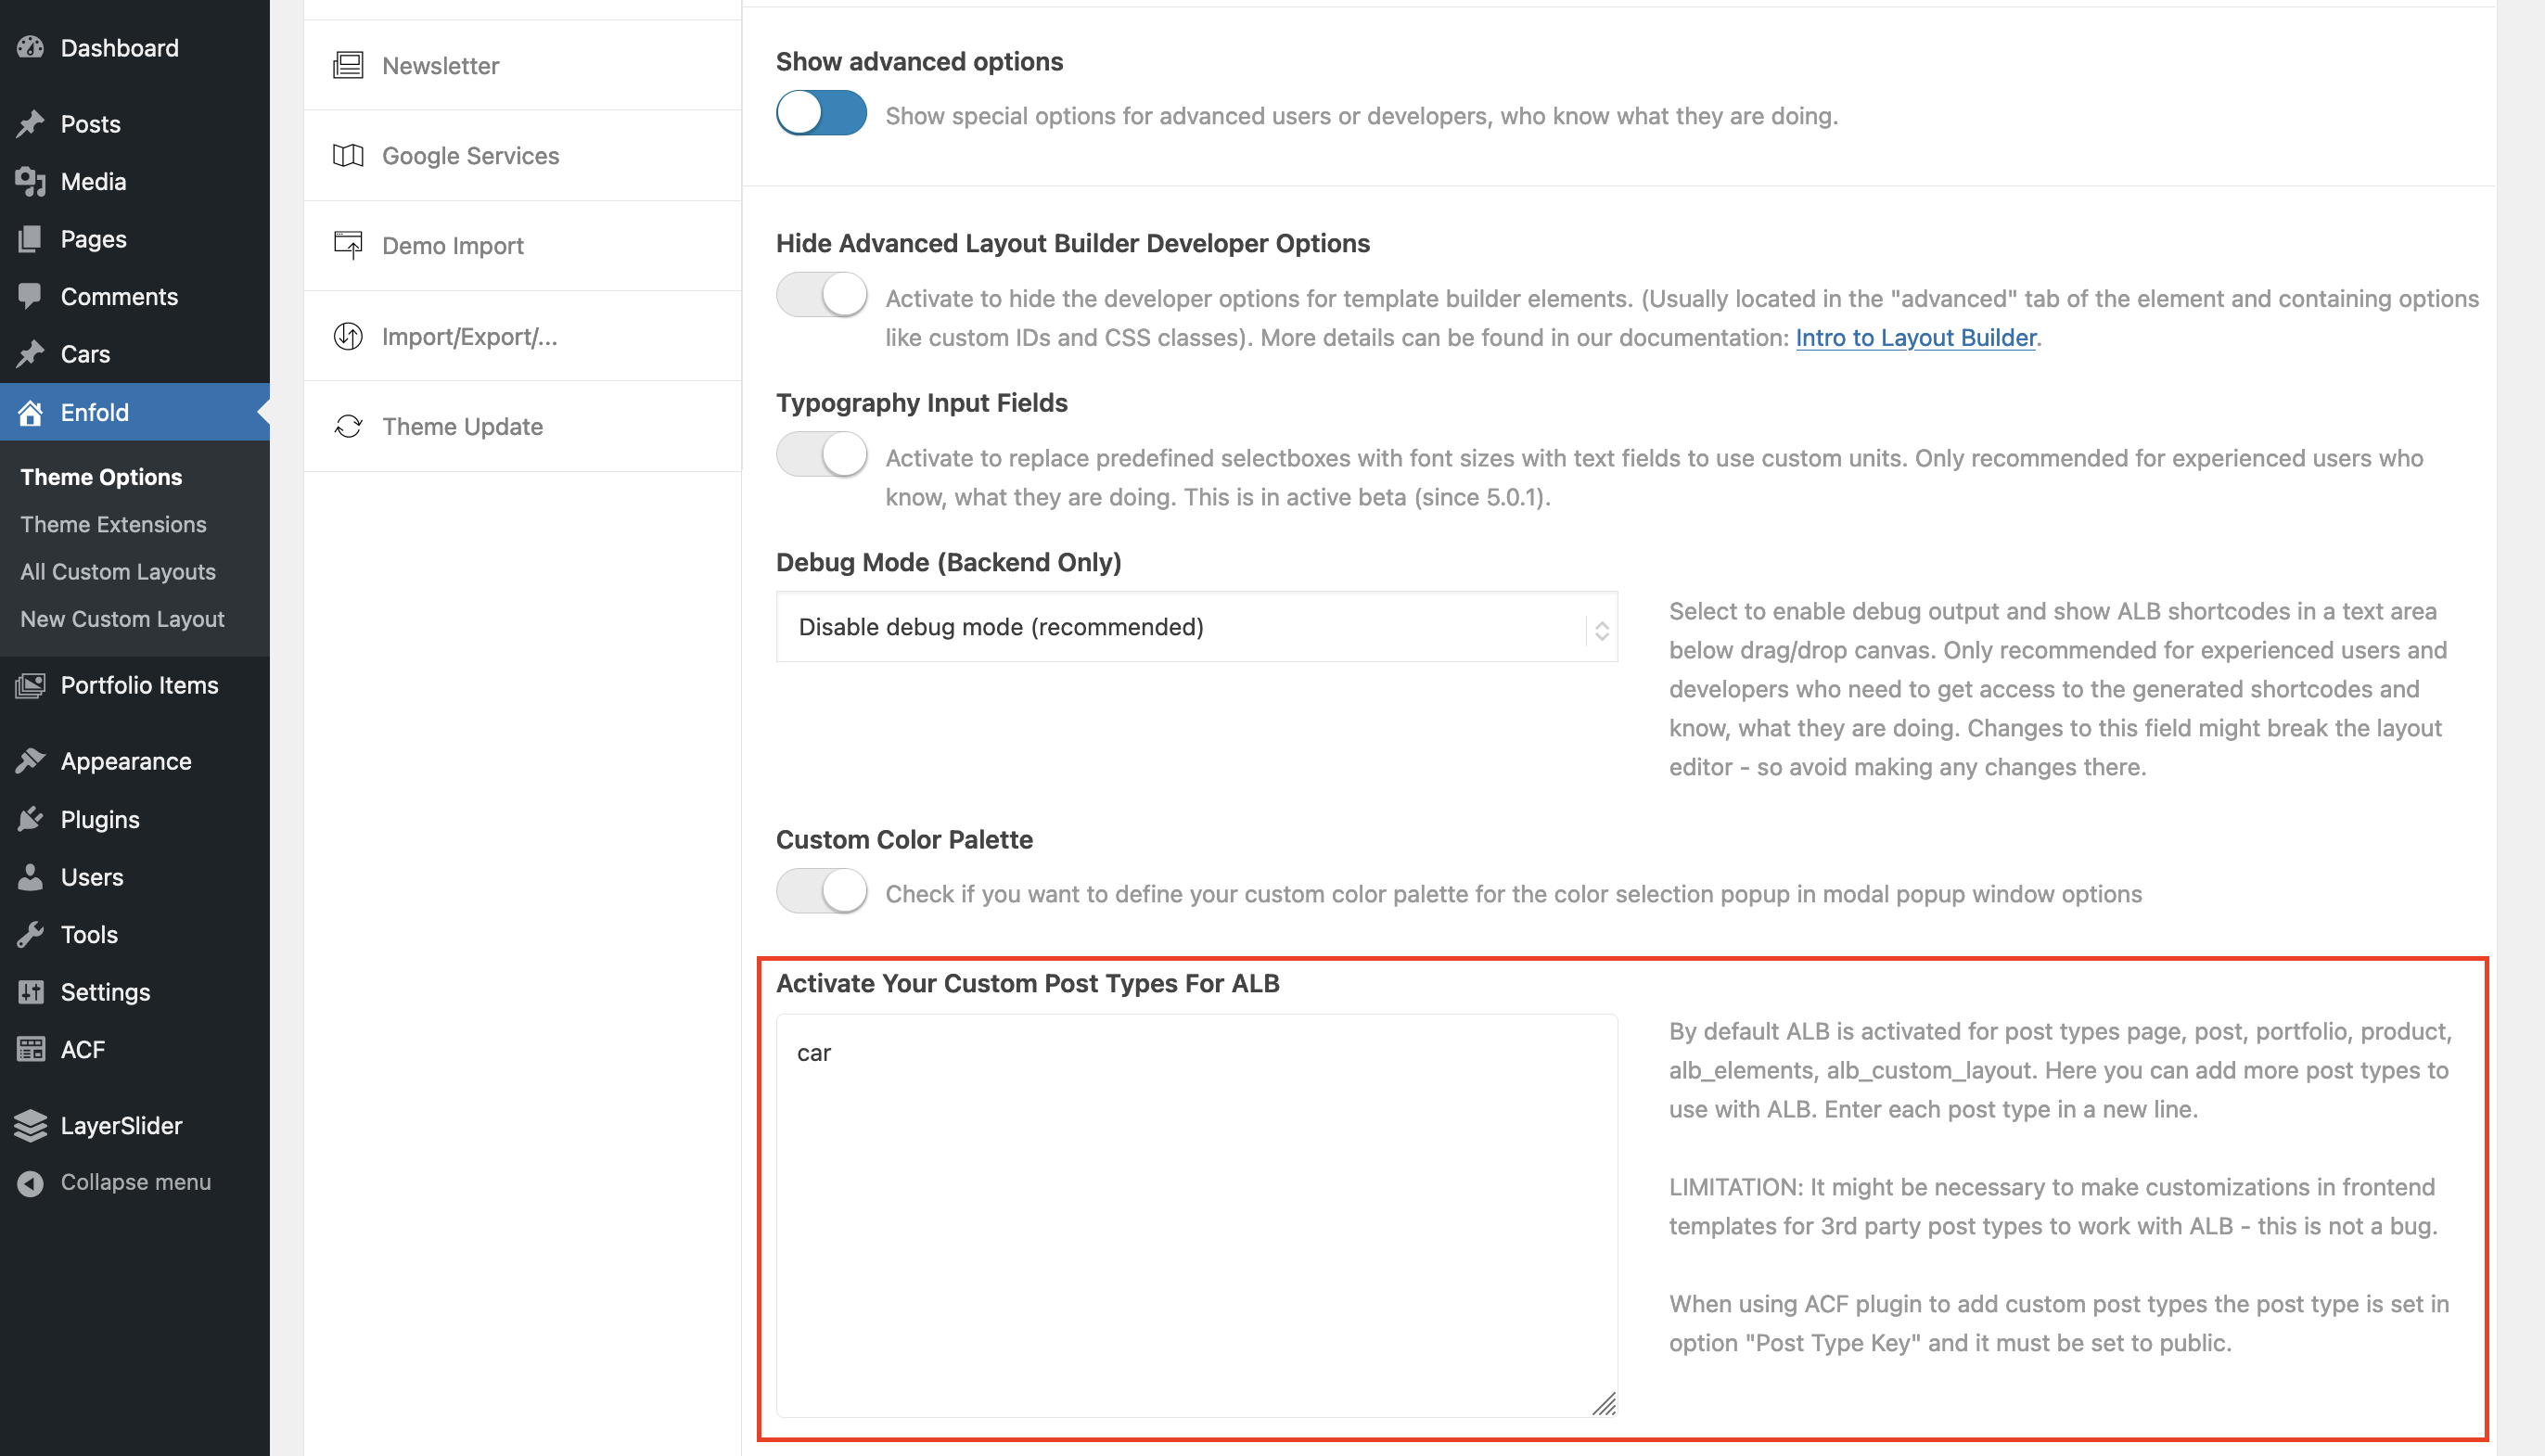
To activate ALB on your custom post type, you can go to the Enfold theme options > Layout Builder, enable the Show Advanced Options toggle, scroll down, and insert your CPT name into the Activate Your Custom Post Types For ALB field.
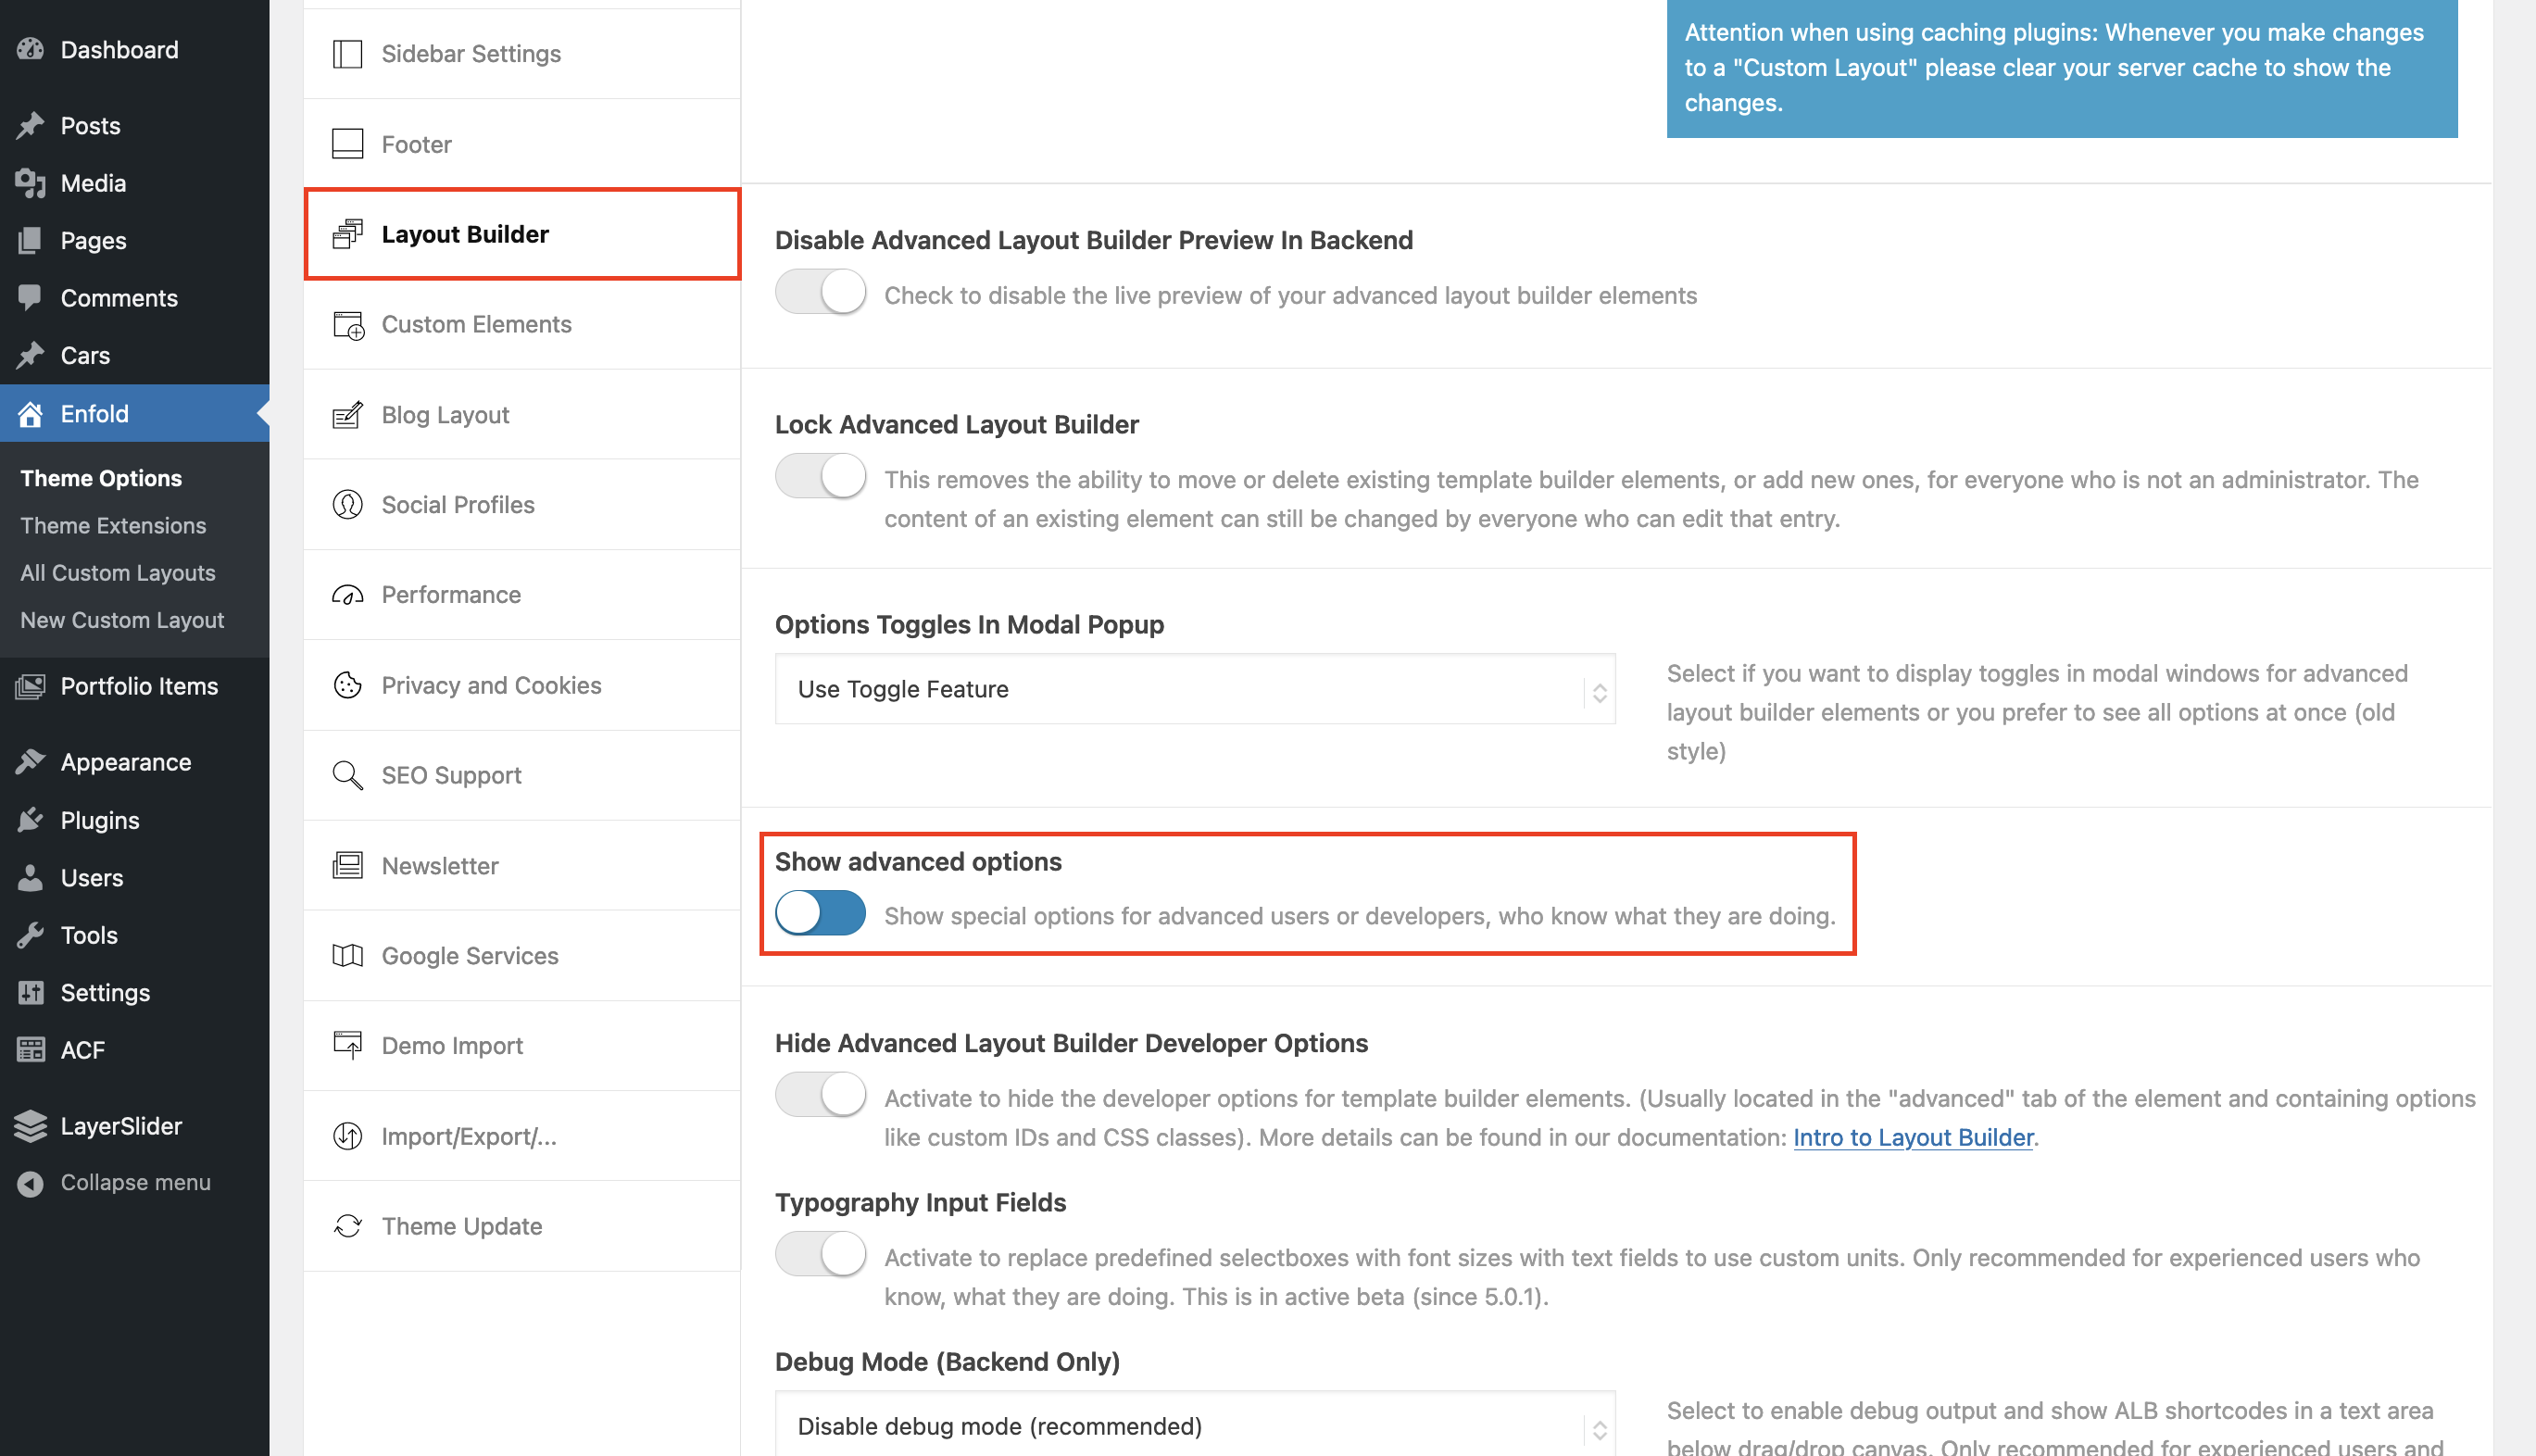
The Show advanced options toggle
To use the old/manual way of activating ALB for CPTs, please read on.
The Advanced Layout Builder is by default only active for Pages and Portfolio items. If you want to use it with other post types (which are added by plugins for example) you can use the following code snippet to do so:
function avf_alb_supported_post_types_mod( array $supported_post_types )
{
  $supported_post_types[] = 'YOUR CUSTOM POST NAME';
  $supported_post_types[] = 'YOUR CUSTOM POST NAME';
  return $supported_post_types;
}
add_filter('avf_alb_supported_post_types', 'avf_alb_supported_post_types_mod', 10, 1);
For layout meta box please use the below function:
function avf_metabox_layout_post_types_mod( array $supported_post_types )
{
 $supported_post_types[] = 'YOUR CUSTOM POST TYPE';
 return $supported_post_types;
}
add_filter('avf_metabox_layout_post_types', 'avf_metabox_layout_post_types_mod', 10, 1);- We recommend to use a child theme and paste the snippet in your child themes functions.php file.
- Make sure to replace the word ‘CUSTOM_POST_NAME’ with your custom post type.
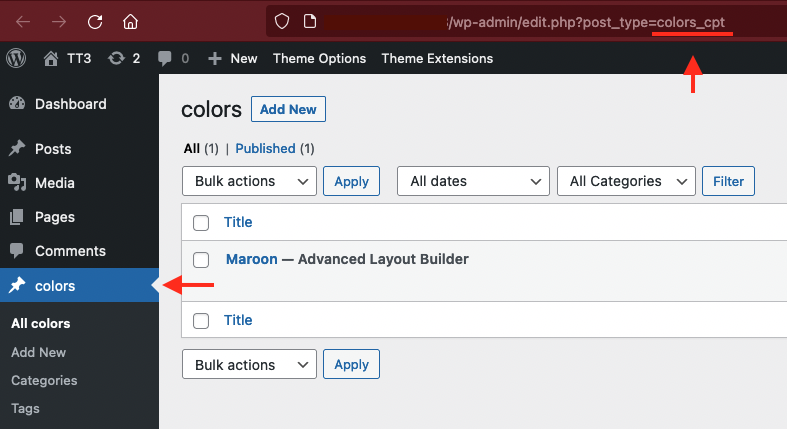
You can click on your custom post type to find the custom post type name
Please be aware that this only works well for custom post types that do not use “overview pages” with multiple entries displayed (eg: although this works nicely on single blog entries when used with the post type “post” the blog feed could easily be messed up because of fullwidth elements.)
Displaying Metadata of your Custom Post Type
After enabling ALB on your CPTs, you can simply add Post Metada element under Content Elements tab of ALB to your custom posts to display metadata.
Remove editor name from page/post title
To remove the editor name from the page or post title in the admin area please add the below code to your functions.php file.
// Hide editor info

add_filter('display_post_states','remove_ALB_post_state',999,2);
function remove_ALB_post_state( $post_states, $post ) {
	if("! has_blocks( $post->ID )") {
		unset($post_states['wp_editor']);
	}
	if("!= Avia_Builder()->get_alb_builder_status($post->ID)") {
		unset($post_states['avia_alb']);
	}
return $post_states;
}
How to bring shortcode attributes to frontend JS
<?php
/**
 * Example Snippet
 * ===============
 *
 * Scenario:
 * ---------
 *
 * Get responsive Cell Padding Settings of a gridrow and add them to a global json array
 * that can be accessed in frontend via jQuery
 *
 * Can be used for any ALB element.
 *
 * @added_by Günter
 * @since 5.3
 */

/**
 * Get the attributes from the element
 *
 * $args is passed by reference => all changes applied are returned
 * @param array $args
 *					0 => string $out
 *					1 => aviaShortcodeTemplate $this
 *					2 => array $atts
 *					3 => string $content
 *					4 => string $shortcodename
 *					5 => boolean $fake
 *					6 => array $meta
 *
 */
function custom_get_shortcode_atts_for_js( array &$args )
{
	global $grid_json;

	if( 'av_layout_row' != $args[4] )
	{
		return;
	}

	if( ! isset( $args[2]['id'] ) || $args[2]['id'] != 'my-custom-grid' )
	{
		return;
	}

	$grid_id = $args[2]['id'];

	if( ! is_array( $grid_json ) )
	{
		$grid_json = [];
	}

	$cells = ShortcodeHelper::shortcode2array( $args[3] );

	$cells_atts = [];

	foreach( $cells as $cell )
	{
		$cell_atts = [];

		$atts = $cell['attr'];
		$cell_class = $atts['custom_class'];		//	add a unique custom class to every cell

		$cell_atts['padding'] = AviaHelper::multi_value_result_lockable( $atts['padding'] )['fill_with_0_val'];
		$cell_atts['av-desktop-padding'] = AviaHelper::multi_value_result_lockable( $atts['av-desktop-padding'] )['fill_with_0_val'];
		$cell_atts['av-medium-padding'] = AviaHelper::multi_value_result_lockable( $atts['av-medium-padding'] )['fill_with_0_val'];
		$cell_atts['av-small-padding'] = AviaHelper::multi_value_result_lockable( $atts['av-small-padding'] )['fill_with_0_val'];
		$cell_atts['av-mini-padding'] = AviaHelper::multi_value_result_lockable( $atts['av-mini-padding'] )['fill_with_0_val'];

		$cells_atts[ $cell_class ] = $cell_atts;
	}

	$grid_json[ $grid_id ] = $cells_atts;
}

/**
 * Add to HTML and a js snippet to access data
 *
 * @global type $grid_json
 */
function custom_handle_shortcode_atts()
{
	global $grid_json;

	if( empty( $grid_json ) || ! is_array( $grid_json ) )
	{
		return;
	}

	$json = json_encode( $grid_json );

	$output = "
<script type='text/javascript' id='av-script-custom-shortcode-atts' data-custom-shortcode-atts='{$json}'>

	(function($)
	{
		var container = $('#av-script-custom-shortcode-atts'),
			data = container.data('custom-shortcode-atts');

		console.log( 'data-object:', data );

		$.each( data, function( gridrow_id, gridrow_cells )
		{
			console.log( 'gridrow_id: ' + gridrow_id, gridrow_cells );

			$.each( gridrow_cells, function( cell_id, cell_atts )
			{
				console.log( 'cell_id: ' + cell_id, cell_atts );

				//	do something with cell_atts ......
			});
		});
	}(jQuery));

</script>
";

	echo $output;
}


add_filter( 'avf_in_shortcode_handler_prepare_content', 'custom_get_shortcode_atts_for_js', 10, 1 );
add_action( 'wp_footer', 'custom_handle_shortcode_atts' );
How to duplicate a page or a post without using a plugin
You can use this WP code duplication script to duplicate posts or pages without using third-party plugins. Third-party plugins usually cause unexpected issues when duplicating content created with ALB so we recommend using this script.
Please also see Templates.
Troubleshoot
Using special characters
There are some special characters you cannot use in Textblock and input fields because they break the internal structure – this is a known limitation in our builder.
Download the Special Character Translation plugin that helps to solve the problem.
And here is the list of characters and their replacement:
< = ###lt### >    =    ###gt###
[    =    ###91###
]    =    ###93###
Whenever you want to use one of the above special characters please replace the character with its hash value.
Usage example:
Replace > with ###gt###
Note: If you would like to add tags to run code in your page, you do not need to use the plugin. Your code would run, that is expected behaviour. You would need the plugin if you would like to have button with “Click here >” title, for example.
Layout Builder is not loading properly
Troubleshoot: Advanced Layout Builder not loading
Sometimes Advanced Layout Builder may stop loading due to different factors like browser caching, server issues or plugin conflicts. Here are a few things you could try to fix it:
- First of all, make sure that you are running the latest version of the theme – you can find out what the latest version is here
- Clear your browser cache and restart – Guide to clearing your browser cache
- Try a different browser to verify if you are getting cached results or not – preferably a browser you have never used to log into the WordPress installation in question with before. If it works as expected in this browser, then you are getting cached results in the first one.
- Disable all plugins to see if there is a conflict with any of them – if there is a conflict, you can reactivate them one by one to find out which one is causing the problem.
- Increase the WordPress memory limit.
- If none of the above should work, then try to overwrite your theme files with a fresh copy from your Themeforest account – Please make sure to properly back your site up prior to attempting this. Refer to this guide for further instruction on updating via FTP.
- Still not working? Please open a new ticket in the support forum with admin login details for your installation supplied in private, and we’ll have a closer look at it for you.
Troubleshoot: Text Block element not loading
This is a rare case but if typing certain words, such as “get“,”include“, “select” or “head” in Text Block element breaks it after saving, there might be a modsec rule in firewall settings causing this issue.
This is a security measure taken by hosting providers and it is not a theme issue. You can contact your hosting providers and ask them to whitelist those words and that should fix the issue.
Shortcode parser
Building websites sometimes require using theme shortcode and third-party plugins. Some plugins may require you to use shortcode provided by the plugin authors. If not used correctly shortcodes can sometimes break the layout for this purpose we have built a new feature called “Enfold shortcode Parser “.

To enable it:
- Enable ALB debug mode
- Below ALB debug window you have a section Enfold Shortcode parser with a select box
- You have to update the page to check the content
Intended for:
- normal pages to help users to validate the used shortcodes
- on ALB pages to find possible problems that might cause a broken layout
Result page also shows the generated shortcode tree
Frontend media uploader or lightbox when CDN enabled not working
If you are using a 3rd party plugin that uses a frontend media uploader and noticed that media button is not working or lightbox is not working when CDN enabled, please go to Enfold theme options > Performance > Disable Features and set “Self hosted videos and audio features (WP-Mediaelement scripts)” to “Always load media features (= WP default behaviour)”.
By default the theme will load wp-mediaelement scripts only if needed on your posts and pages. You can disable the feature or force loading these elements if you run into troubles – some plugins require these elements and rely on the WP default behaviour loading these scripts.