


Image
Overview
The image element can be animated and has various different style settings that can be applied, like border-radius, overlay, hover effects, etc. Images can be linked to any files or pages, and the captions text, and background, can also be styled.
View examples of the image element.
Mask Overlay

Image overlay

Linear gradient overlay

Radial gradient overlay
Responsive Images
Since Enfold 4.7.6 support for responsive images was added built on core WP implementation and based on pure HTML attributes scrset and sizes that provide native browser support.
How does WP recognise responsive image sizes
When adding an image to content (or you select an image for an ALB element) you select a size for this image, e.g. you choose WP default size “medium” (300*300px). This would be an aspect ratio of 1:1.
Now WP looks for defined thumb sizes that have an aspect ratio of 1:1 ( +/- 1 px is considered to fit ) and uses these thumbs (e.g. 36*36px, 80*80px, 180*180px etc.).
If no thumbs are found, then this image is considered as “not responsive” and no attributes are added.
To assist you Enfold shows a list of all registered thumb sizes grouped by aspect ration in Theme Options Page -> Performance -> Responsive Images -> Image Thumbnails Info.
Add more thumb sizes
Depending on your image sizes you upload it might be necessary to add more thumb sizes. There is no limit for that, but keep in mind that for each defined thumb size an image file is created.
You can use a plugin like Simple Image Sizes to manage your custom sizes. Advanced users can use a filter – see an example in our Enfold Code Snippet Library.
If you change thumbnail sizes do not forget to run a plugin like Regenerate Thumbnails to synchronize already uploaded images (create/remove thumbs files and adjust database).
Lazy loading of images
Starting with WP 5.5 there is WP core support for lazy loading of images using the pure HTML attribute loading=”Lazy”. This attribute is supported by many modern browsers (currently not by Safari – state summer 2020). Older browsers ignore this attribute.
Currently lazy loading and animation on images when loading the page might not work as expected – especially for ALB elements but it could also happen for other pages.
Therefore we decided to offer a way to enable/disable this feature completly or decide for each ALB element separately.
Enfold theme options page -> Performance -> Responsive Images And Lazy Loading -> Lazy Loading
If you select “Disable lazy loading” Enfold hooks into the standard WP API for lazy loading (filter wp_lazy_loading_enabled) and removes the attribute. As long as 3rd party plugins use standard WP API to create images this should leave your site HTML as up to WP 5.4.2 without the attribute.
Changing this option does not make any changes to other settings (e.g. in ALB elements) for this feature. So it is safe to change to check for functionality of your site and for performance checks.
ALB Element Modal Popup -> Advanced -> Animation -> Lazy Loading Of Images
You can decide for each element to activate or deactivate lazy loading. For most elements it is deactivated by default to make sure that existing sites are not broken. If you activate it, please check your frontend and make sure that everything works as you expect.
Advanced Users:
Use filter avf_init_no_lazy_loading_ids to disable lazy loading for certain images. As filter wp_lazy_loading_enabled does not have a reference to the attachment id (state WP 5.5-beta-2) this might not always work.
Code Snippet
Shortcode
[av_image src='http://localhost/enfold/documentation/wp-content/themes/enfold/config-templatebuilder/avia-template-builder/images/placeholder.jpg' align='center' styling='' hover='' link='' target='' caption='' font_size='' appearance='' overlay_opacity='0.4' overlay_color='#000000' overlay_text_color='#ffffff' animation='no-animation' av-desktop-hide='' av-medium-hide='' av-small-hide='' av-mini-hide='' av_uid='av-5bzohe'][/av_image]
Customization
Display Image caption below the image
Add your caption text to the image element from the caption tab and use the custom CSS to display the caption text below the image.

/*----------------------------------------
// CSS - Image element
//--------------------------------------*/

#top .av-image-caption-overlay {
    height: auto;
    width: auto;
    left: 0px;
    bottom: 0px;
    transform: translateY(100%);
}
#top .av-image-caption-overlay-center {
  padding: 0;
}
#top .avia_image  {
  margin-bottom: 50px;
}
Image swap on hover
To swap an image with another on hover please use the below CSS and change the image URL in the code to your own image. In the image element option select the option “Always display caption” for the code to work.

/*----------------------------------------
// CSS - Image Swap
//--------------------------------------*/

.av-image-caption-overlay {
  background-position: 50% 50%;
}
.av-image-caption-overlay:hover {
  background-size: contain;
  background-image: url(https://kriesi.at/wp-content/themes/kriesi/images/logo.png);
  background-color: rgba(255,255,255,0.5);
  background-repeat: no-repeat;
  background-position: 50% 50%;
  transform: all .0s;
}
Image border
Add a custom border to image element using the CSS below.
/*----------------------------------------
// CSS - Image border
//--------------------------------------*/
.avia-image-container img {
 border: 1px solid gray;
 padding: 5px;
}
Image border on hover
The below CSS will help you add a border effect to the image element when a user hovers the mouse over the image.
/*----------------------------------------
// CSS - Image border on hover
//--------------------------------------*/

.avia-image-container img:hover {
    border: 2px solid red;
    -webkit-transition: all 0.1s;
    transition: all 0.1s;
}
Remove image alt title on hover
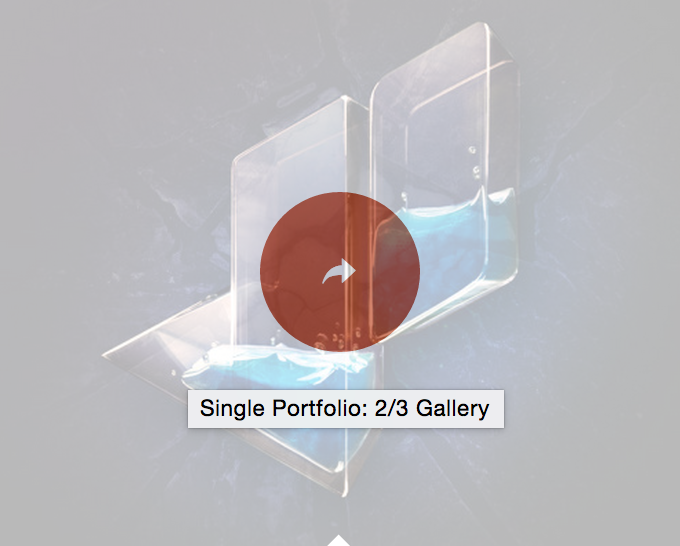
When you hover over images, their title (“Single Portfolio: 2/3 Gallery” in the example below) would show up.
It is a browser feature but it is possible to hide them by adding following code to Functions.php file of your child theme in Appearance > Editor
function remove_title_attr(){
?>
 <script>
jQuery(window).on('load', function(){
jQuery('#wrap_all a').removeAttr('title');
jQuery('#wrap_all img').removeAttr('title');
});
 </script>
<?php
}
add_action('wp_footer', 'remove_title_attr');
Remove the image overlay (circle and arrow )on hover
You can go to Enfold theme options > Advanced Styling and edit “Linked Image Overlays” to disable them.
To remove the image overlay with the circle and arrow on hover only on certain image, please edit your element and give it a custom CSS class (“your-custom-class” for example) in Advanced > Developer Settings and add following code to Enfold theme options > General Styling > Quick CSS
/* Remove image overlay with circle and arrow */
.your-custom-class .image-overlay {
display: none !important;
opacity: 0 !important;
}
Prevent image or link from opening in a Lightbox
The theme has a script in place to automatically pick up video and image links and open them in a lightbox. This isn’t a one-size-fits-all solution so there is a simple way in place to prevent any single item from opening in a lightbox: adding the noLightbox class to a link will tell the script not to open the link in a lightbox no matter what it is.
For example:
YoutubeAdd title attribute to new inserted image via “Add Media” button
In WordPress core, when adding an image to standard WP tinyMCE editor with the “Add Media” button the title tag is skipped and no longer supported:
“For both accessibility and search engine optimization (SEO), alt text is more important than title text. This is why we strongly recommend including alt text for all your images.”
Following snippet adds the title attribute to new added images.
/**
 * Add title attribute to new inserted image via "Add Media" button
 *
 * @since 4.8.2
 * @param string $html
 * @param int $id
 * @param string $caption
 * @param string $title				is always empty because removed by WP
 * @param string $align
 * @param string $url
 * @param string $size
 * @param string $alt
 * @return string
 */
function handler_image_send_to_editor( $html, $id, $caption, $title, $align, $url, $size, $alt )
{
	//	if title attr already exist, return unmodified
	if( false === strpos( '<img ', $html ) || false !== strpos( 'title=', $html ) )
	{
		return $html;
	}

	$html = str_replace( '<img ', '<img title="' . esc_attr( get_the_title( $id ) ) . '" ' , $html );
	return $html;
}

add_filter( 'image_send_to_editor', 'html_insert_image', 10, 8 );
Resource
Contributed video: