


Blog Post
Overview
As described in the WordPress codex “Blog” is an abbreviated version of “weblog,” which is a term used to describe websites that maintain an ongoing chronicle of information.
Examples of Enfold demos showcasing the blog posts elements.
Basic blog setup
By default, WordPress will display your “Posts” for others to view on the home page of your site. When using it as a Content Management system (CMS) you may want to change where you want the posts to be shown, and what page is shown for the Frontpage. You can set both of these right from the main Theme Options. To display blog posts on the Frontpage or on a separate blog page, create a new page and drop the blog posts element from the Advanced Layout Builder.

Go to “Theme Options” and use the drop-down and select the previously created page with the blog posts element as the frontpage or a blog page to suit your website requirements.

Blog Style
To set up a Blog style drag and drop the Blog Post element from Advanced Layout Builder and select the blog style in the edit options.
Code Snippets
Shortcode
[av_blog blog_type='posts' link='category' blog_style='blog-grid' columns='3' contents='excerpt' content_length='excerpt' preview_mode='custom' image_size='featured_large' items='6' offset='0' paginate='yes' conditional='' custom_class='' av_uid='av-jwdc3x']
Blog post single
Remove Post Navigation
To remove the post navigation, simply add this function to your functions.php file:
/* Remove Post navigation */
function custom_disable_avia_post_nav( $settings ) {
	return $settings['skip_output'] = true;
}
add_filter( 'avf_post_nav_settings', 'custom_disable_avia_post_nav', 10, 1 );
Remove Post Navigation for a post type
To remove the post navigation from a specific post type add this function to your functions.php:
Now when viewing the *portfolio* custom post type (which comes with the theme) there will be no floating navigation to the next or previous portfolio items.
Code snippets:
/* Remove Post navigation for CPT */
function custom_disable_avia_post_nav_for_cpt( $settings ) {
	if ( is_singular( 'portfolio' )) {
		$settings['skip_output'] = true;
	}
	return $settings;
}

add_filter( 'avf_post_nav_settings', 'custom_disable_avia_post_nav_for_cpt', 10, 1 );
Different post style for each category
All posts added to a specific category can be styled to look different from other posts using custom CSS code. A unique CSS class name in the format “category-xyz” is added to all of the post articles. To view the category class name right click and inspect the post article.

We can use this unique class name to style the blog articles. The “category-xyz” class consists of post content like title, featured image, description etc. hence we can only style the content of the post article but not other page content like the header, footer or sidebar area. For example, post titles of category-1 can be styled differently compared to post titles of category-2.
Let us look at the custom CSS to style post titles of two different categories named “personal” and “news”.
Code snippets:
Shortcode
[av_masonry_entries link='category,7,9' wc_prod_visible='' prod_order_by='' prod_order='' sort='yes' items='4' columns='2' paginate='none' query_orderby='date' query_order='DESC' size='fixed' orientation='av-orientation-square' gap='large' overlay_fx='active' id='' caption_elements='title' caption_styling='overlay' caption_display='always' color='' custom_bg='' av-medium-columns='' av-small-columns='' av-mini-columns='' av_uid='av-jhezoniq' custom_class='av-masonry-category-style']CSS
/*--------------------------------------------
// CSS - Using category to style masonry grid
//-------------------------------------------*/

/* excerpt background color */

#top .av-masonry-category-style .category-news figcaption {
  border: 5px solid #ffdd00;
}

#top .av-masonry-category-style .category-personal figcaption {
  border: 5px solid #3be8b0;
}

/* Blog title*/
#top .av-masonry-category-style .category-news figcaption .entry-title,
#top .av-masonry-category-style .category-personal figcaption .entry-title
{
  padding:5px 10px;
}
#top .av-masonry-category-style .category-news figcaption .entry-title {
	color:#ffdd00;
	font-weight:bolder;
}
#top .av-masonry-category-style .category-personal figcaption .entry-title {
   color: #3be8b0;
   font-weight:bolder;
}

/* Blog meta*/
#top .av-masonry-category-style .category-news figcaption .meta-color,
#top .av-masonry-category-style .category-personal figcaption .meta-color
{
  color: #f3f4f7;
  background: rgba(25,25,25,.5);
  padding:5px 10px;
}
Featured image size on single post
Featured image size: On a single post, to reduce the size of the featured image adjust the value in the code below and add it to your custom CSS.
Code snippets:
CSS
/*-----------------------------------------
// CSS - Featured image size
//----------------------------------------*/

#top.single-post .big-preview {
  max-width: 550px !important;
  margin: 0 auto;
}
Full-width featured image: On any single post, remove the paddings and stretch the image to 100% width of the browser. It is recommended to use this code to change the single posts without sidebar.
Code snippets:
CSS
/*-----------------------------------------
// CSS - Full-width Featured image
//----------------------------------------*/

#top.single .container {
  padding: 0 !important;
  width: 100% !important;
  max-width: 100% !important;
}
#top.single .entry-content-wrapper {
        max-width:100%!important;
        margin:0 auto;
        padding:0 50px;
        background:gold;
}
#top.single .entry-content {
        max-width:100%!important;
        margin:0 auto;
}
#top.single .content {
  padding-top: 0 !important;
}
Remove featured image on all posts
To hide the featured image on selected posts, check the option “Don’t display image on single post” under the featured image for each post.
Adding the below code to functions.php will remove featured image on all posts. The featured image will only be displayed on the blog index page.
Code snippets:
Function
//--------------------------------------------------------
// PHP function - Remove featured image on all post page
//--------------------------------------------------------

function wordpress_hide_feature_image( $html, $post_id, $post_image_id ) {
  return is_single() ? '' : $html;
}
// add the filter
add_filter( 'post_thumbnail_html', 'wordpress_hide_feature_image', 10, 3);
Full-width single post
To make a single post page full-width add the below CSS to your custom styles.
Code snippets:
CSS
/*-----------------------------------------
// CSS - Full-width Single Post
//----------------------------------------*/
#top.single .post .blog-meta {
    margin: 0 30px 10px 30px;
    }
#top.single .post .post-title {
    text-align: left;
    width: 100%;
}
#top.single .post .post-meta-infos {
  text-align: left!important;
}
#top.single .post .entry-content-wrapper,
#top.single .post .entry-content-header,
#top.single .post .entry-content,
#top.single .post .post-title,
#top.single .post .entry-footer  {
  min-width: 100%!important;
}
Add custom link to post title
To open an external link or a page on the same site when a post title is clicked. Select the post format as Link and add your text and link in the post.

In case you do not see the post format options, you have to enable it from the screen option.

Remove featured image link from single post
To remove featured image link on single post, please add following code to bottom of Functions.php file of your child theme in Appearance > Editor
add_filter('avf_post_featured_image_link','av_remove_featured_image_link');
function av_remove_featured_image_link(){
	if(is_single()){
		echo get_the_post_thumbnail( $current_post['the_id'], 'featured' );
	}
}
Blog archive
How to create a custom blog page
Enfold allows you to set your blog page from the theme settings and to choose a default layout from the theme’s General Settings. You may however, want to have a unique layout for your blog page than the rest of the automatically generated pages.
1) Set the blog page
2) Re-Create the Blog
Now you have a page for your blog posts, but you need to add a blog element to this page. Go to your previously empty Blog page through the WordPress admin and, using the Advanced Layout Editor view, open up the Content Elements tab. Then drag an instance of the Blog Posts element into the builder:
3) Choose your layout
Go to Enfold > Theme Options > Blog Layout and change the “Blog Style” drop-down option to “Use the advanced layout editor to build your own blog layout (simply edit the page you have chosen in Enfold->Theme Options as a blog page)”. Then save the settings and Enfold will use your page as the blog page.
Display post from specific category, tag or custom taxonomy
Posts from a specific category, tags or a custom taxonomy can be easily displayed using the blog element. In the blog element settings, select “Display entries from a custom taxonomy” then select which entries you would like to display, as shown in the picture below.

Remove sidebar on blog category page
The below CSS will remove the sidebar and make the content fit the width of the category page.
Code snippets:
CSS
/*-----------------------------------------
// CSS - Remove sidebar on blog category
//----------------------------------------*/

 #top.archive.category .sidebar {
  display: none!important;
  border: none!important;
 }

 #top.archive.category .content{
  width: 100%;
  border: none !important;
 }
Change archive (category/tag) blog style
Change the default layout of category and tag pages by using the “avf_blog_style filter”.
For category pages, add the following code to the functions.php file:
Code snippets:
Function
add_filter('avf_blog_style','avia_change_category_blog_layout', 10, 2);
function avia_change_category_blog_layout($layout, $context){
if($context == 'archive') $layout = 'single-small';
return $layout;
}
For tag pages, use the following:
Code snippets:
Function
add_filter('avf_blog_style','avia_change_tag_blog_layout', 10, 2);
function avia_change_tag_blog_layout($layout, $context){
if($context == 'tag') $layout = 'single-small';
return $layout;
}
Available layouts are single-small, single-big, blog-grid and multi-big.
Post title alignment on the archive page
To align the post titles left, center or right on the blog archive page add the CSS below to your custom CSS file.
Code snippets:
CSS
/*-----------------------------------------
// CSS - Blog title alignment
//----------------------------------------*/

/* Align Blog Title */
#top.page .entry-title {
text-align: right !important;
}
Hide Post Timeline
Hide the timeline from Multi-Author and Single-Author blog style.
Code snippets:
CSS
/*-----------------------------------------
// CSS - Hide Post Timeline
//----------------------------------------*/
#top.page .blog-meta,#top.page .post_author_timeline {
  display: none !important;
}
Using categories to style masonry blog grid
All posts in a masonry grid added to a specific category can be styled to look different from other posts using custom CSS code.
Example of using category to style masonry blog grid.

A unique CSS class name in the format “category-xyz” is added to all the post. To view the category class name right click and inspect the post article.

We can use this unique class name to style the posts in the blog grid. Let us look at the custom CSS to style posts in a specific category to look different.
Code snippets:
CSS
/*--------------------------------------------
// CSS - Using category to style masonry grid
//-------------------------------------------*/

/* excerpt background color */
#top .category-one figcaption {
  background: #c1d82f;
}

#top .category-two figcaption {
  background: #7d3f98;
}

#top .category-three figcaption {
  background: #fd5c63;
}

#top .category-four figcaption {
  background: #3be8b0;
}

/* Blog title*/
#top .category-one figcaption .entry-title ,
#top .category-two figcaption .entry-title ,
#top .category-three figcaption .entry-title ,
#top .category-four figcaption .entry-title
{
  color: #FFF;
}

/* Blog meta*/
#top .category-one figcaption .meta-color ,
#top .category-two figcaption .meta-color ,
#top .category-three figcaption .meta-color ,
#top .category-four figcaption .meta-color
{
  color: #000;
}
NOTE: The same technique can be used to style the masonry blog grid using the CSS class names for tags.
Replace the default “Blog – Latest News” title
By default, the blog single page title will be “Blog – Latest News”. You can use the following function to change that to reflect the page title instead:
Code snippets:
Function
add_filter('avf_title_args', 'fix_single_post_title', 10, 2);
function fix_single_post_title($args,$id)
{
if ( $args['title'] == 'Blog - Latest News' )
{
$args['title'] = get_the_title($id);
$args['link'] = get_permalink($id);
$args['heading'] = 'h1';
}

return $args;
}
P.S.: If you are using WordPress in another language, replace “Blog – Latest News” in the code above to your own language.
Meta elements
Display post tags on Blog Posts element
You can add following code to bottom of functions.php file of your child theme in Appearance > Theme Editor to display tags on Blog Posts element
add_filter('avf_show_tags_meta', 'show_tags_on_blog_posts');
function show_tags_on_blog_posts(){
	return true;
}
If you are using Blog Grid style, please use following code instead
function new_avf_postslider_posts_meta_data_show(){
	return true;
}
add_filter('avf_postslider_posts_meta_data_show', 'new_avf_postslider_posts_meta_data_show');
Note: Filter was added in Enfold 5.4.
Post excerpt alignment on the archive page
To align the post excerpt left, center or right on the blog archive page add the CSS below to your custom CSS file.
Code snippets:
CSS
/*-----------------------------------------

// CSS - Blog excerpt alignment

//----------------------------------------*/
#top.page .slide-content *,
#top.page .entry-content-wrapper * {
text-align: right !important;
}
Hide separator between meta info
Remove slash separator “/” between comments and time in blog grid meta.
Code snippets:
CSS
/*-----------------------------------------
// CSS - Remove slash in blog grid meta
//----------------------------------------*/

.slide-meta .slide-meta-del {
    display: none !important;
}
.slide-meta div{
  margin-right: 5px;
}
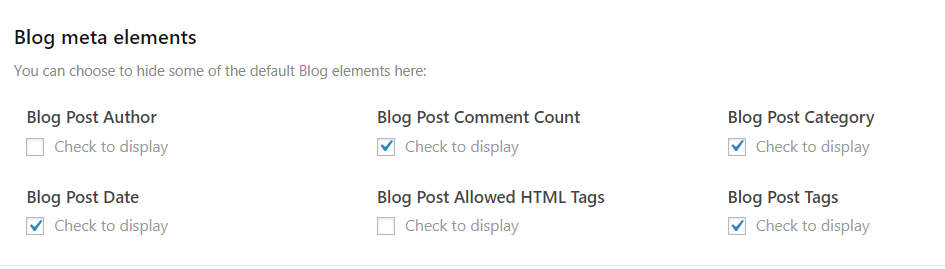
Show/Hide blog post meta elements
To control the display of the meta elements like Date, Author, Comments, etc on the blog post go to Enfold > Blog Layout > Blog meta elements
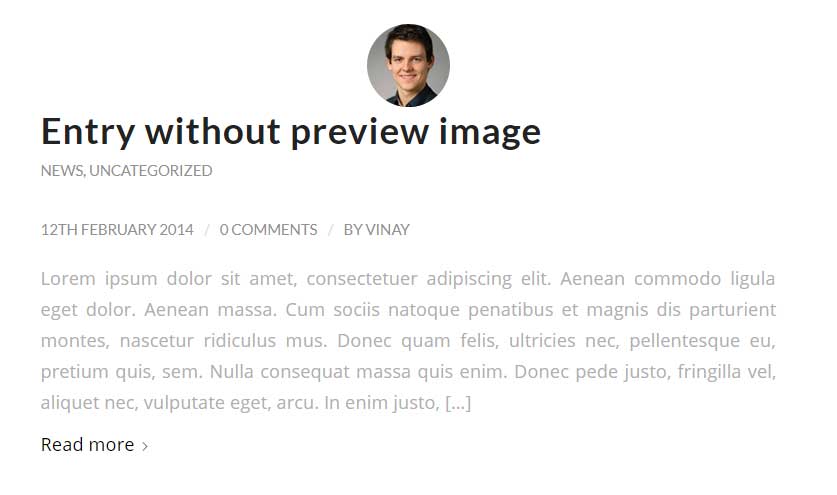
Display author box after each post
Let’s look at 3 different methods to display the author info on the post page.
- Theme options
- Custom code
- Plugins
Theme options: To display the author image (with a link to the author page) beside the feature image of the post. Go to Enfold > Blog Layout > Single post Option > Single post style > Multi Author Blog.
Custom code: Using custom code for a simple author box like the below example:

Code snippets:
Function
//------------------------------
// php -  Author Bio After Post
//------------------------------

function author_box( $content ) {

global $post;
if ( is_single() && isset( $post->post_author ) ) {
    $display_name = get_the_author_meta( 'display_name', $post->post_author );
    $user_description .= '
<div class="author_info">' .get_the_author_meta( 'user_description', $post->post_author ). '</div>
';
    $user_avatar .= get_avatar( get_the_author_meta('user_email'));
    if ( empty( $display_name ) )
    $display_name = get_the_author_meta( 'nickname', $post->post_author );
    if ( ! empty( $display_name ) )
    $author_details .= '
<div class="author_name"> About ' . $display_name . '</div>
';
    if ( ! empty( $user_description ) )
    $author_details .=  ( $user_avatar ) . ( $user_description );
    $content = $content . '<footer class="author_box" >' . $author_details . '</footer>';

    }
    return $content;
}
add_action( 'the_content', 'author_box' );
remove_filter('pre_user_description', 'wp_filter_kses');
CSS
/*-----------------------------------------
// CSS - Author bio box
//----------------------------------------*/

.author_box {
font-family: 'Montserrat', sans-serif;
padding: 15px;
border: 1px solid #D8D8D8;
background: #f6f6f5;
}
.author_box:after {
   content: "";
  display: table;
  clear: both;
}
.author_name {
font-size: 1.85rem;
font-weight: bold;
margin-bottom: 15px;
color:#000;
}
.author_box img{
border-radius: 50%;
min-width: 90px;
margin-right: 10px;
}
.author_info {
font-size: 1rem;
font-weight: 300;
width: calc(100% - 110px);
float: right;
}
Plugins: There are many author bio plugins available with advanced options and social media integration. Some of them you can try are listed below.
Post with meta data below title
We have had several requests to move the meta info with the date under the post title so here it is.
Code snippets:
Function
//-------------------------
// JS - Meta after title
// ------------------------

function metaAfterTitle(){
?>
 <script>
 jQuery(".template-blog .post-entry").each(function(i) {
        var postTitle = jQuery(this).find('.blog-categories.minor-meta');
        var metaInfo =  jQuery(this).find('.post-meta-infos');
        jQuery(metaInfo).insertAfter(postTitle);
       });
 </script>
<?php
}
add_action('wp_footer', 'metaAfterTitle');
CSS
/*-----------------------------------------
// CSS - Blog meta after post title
//----------------------------------------*/
 #top .post-meta-infos {
    margin-top: 0!important;
  }
Excerpts
Excerpts text option missing from post page
In case you are trying to add the excerpt text and cannot find the option to enter the blog excerpt text.

Check if the “Excerpt” option is selected in the “Screen options” on the top right of the page. Once you select the “Excerpt” option, you should be able to view the option to enter the excerpt text.

Change Post Slider excerpt length
This is a function to change the length of the excerpts on the Post Slider element:
Code snippets:
Function
add_filter('avf_postgrid_excerpt_length','avf_increase_postgrid_excerpt_length', 10, 1);

function avf_increase_postgrid_excerpt_length($prepare_excerpt) {
  $prepare_excerpt = 300;
  return $prepare_excerpt;
}
Replace read more link with an icon
![]()
Code snippets:
CSS
/*-----------------------------------------
// CSS - replace readmore link with an icon
//----------------------------------------*/
#top .read-more-link {
  top: -5px;
  display: inline-block;
  margin-left: 10px;
}
#top .read-more-link a.more-link {
  font-size: 0;
  width: 20px;
  height: 20px;
  background: #dfdfdf;
}

#top .read-more-link a.more-link:hover, #top .read-more-link a.more-link:hover .more-link-arrow::after {
background: #000;
color:#FFF;
}
.more-link-arrow::after {
content: 'E875';
  font-family: 'entypo-fontello';
  font-size: 12px;
}
#top .slide-meta {
    margin-top: -10px;
  }
Sort Filters
Change the sort order of Blog Posts Elements by Last updated, Post Name, etc
By default, the blog post elements that display the post items will show them sorted by date created. What if you want to change the order of the items alphabetically? It’s easy. Use this filter in your functions.php:
Code snippets:
Function
add_filter('avia_blog_post_query', 'avia_modify_post_grid_query_desc');

function avia_modify_post_grid_query_desc( $query ) {
$query['orderby'] = 'title';
$query['order'] = 'DESC';
return $query;
}
You can see all of the Order and Orderby parameters for additional options here: http://codex.wordpress.org/Class_Reference/WP_Query#Order_.26_Orderby_Parameters
For example, to reverse the above it would be:
Code snippets:
Function
add_filter('avia_blog_post_query', 'avia_modify_post_grid_query_asc');

function avia_modify_post_grid_query_asc( $query ) {
$query['orderby'] = 'title';
$query['order'] = 'ASC';
return $query;
}
Or to just sort the visible items randomly on page load:
Code snippets:
Function
add_filter('avia_blog_post_query', 'avia_modify_post_grid_query_rand');

function avia_modify_post_grid_query_rand( $query ) {
$query['orderby'] = 'rand';
return $query;
}
Aside from adding these filters, you can also activate the order/orderby option on the masonry element options panel which we will discuss below 🙂
How to add an order/orderby option to the blog/post slider/portfolio/masonry grid element
Some users asked us how they can set a different order for their blog/post slider/portfolio/masonry grid elements. The filter solution here: https://www.kriesi.at/documentation/enfold/change-the-sort-order-of-portfolio-elements/ is not flexible because it affects all elements and all custom queries. Since Enfold 2.7.1 it’s possible to add some custom order/orderby options to the blog/post slider/portfolio/masonry grid settings which enable you to change the sort order for each element independently. Insert the code below into the child theme functions.php file and save the file. Then go to the blog/post slider/portfolio/masonry grid element settings screen, scroll to the bottom of the options window and configure the order/orderby settings. Then save the template and page and the posts should be displayed based on the new sort order.
Attention – if you use the “Random” sort option, do not use it in combination with the “pagination” setting. Otherwise, you risk that the user just sees the same posts over and over again because WordPress doesn’t know which posts were used on the other pages.
Code snippets:
Function
if(!function_exists('avia_custom_query_extension'))
{
    function avia_custom_query_extension($query, $params)
    {
        global $avia_config;
        if(!empty($avia_config['avia_custom_query_options']['order']))
        {
            $query['order'] = $avia_config['avia_custom_query_options']['order'];
        }

        if(!empty($avia_config['avia_custom_query_options']['orderby']))
        {
            $query['orderby'] = $avia_config['avia_custom_query_options']['orderby'];
        }

        unset($avia_config['avia_custom_query_options']);

        return $query;
    }

    add_filter('avia_masonry_entries_query', 'avia_custom_query_extension', 10, 2);
    add_filter('avia_post_grid_query', 'avia_custom_query_extension', 10, 2);
    add_filter('avia_post_slide_query', 'avia_custom_query_extension', 10, 2);
    add_filter('avia_blog_post_query', 'avia_custom_query_extension', 10, 2);
    add_filter('avf_magazine_entries_query', 'avia_custom_query_extension', 10, 2);

    add_filter('avf_template_builder_shortcode_elements','avia_custom_query_options', 10, 1);
    function avia_custom_query_options($elements)
    {
        $allowed_elements = array('av_blog','av_masonry_entries','av_postslider','av_portfolio','av_magazine');

        if(isset($_POST['params']['allowed']) && in_array($_POST['params']['allowed'], $allowed_elements))
        {
            $elements[] = array(
                "name" => __("Custom Query Orderby",'avia_framework' ),
                "desc" => __("Set a custom query orderby value",'avia_framework' ),
                "id"   => "orderby",
                "type" 	=> "select",
                "std" 	=> "",
                "subtype" => array(
                    __('Default Order',  'avia_framework' ) =>'',
                    __('Title',  'avia_framework' ) =>'title',
                    __('Random',  'avia_framework' ) =>'rand',
                    __('Date',  'avia_framework' ) =>'date',
                    __('Author',  'avia_framework' ) =>'author',
                    __('Name (Post Slug)',  'avia_framework' ) =>'name',
                    __('Modified',  'avia_framework' ) =>'modified',
                    __('Comment Count',  'avia_framework' ) =>'comment_count',
                    __('Page Order',  'avia_framework' ) =>'menu_order')
            );

            $elements[] = array(
                "name" => __("Custom Query Order",'avia_framework' ),
                "desc" => __("Set a custom query order",'avia_framework' ),
                "id"   => "order",
                "type" 	=> "select",
                "std" 	=> "",
                "subtype" => array(
                    __('Default Order',  'avia_framework' ) =>'',
                    __('Ascending Order',  'avia_framework' ) =>'ASC',
                    __('Descending Order',  'avia_framework' ) =>'DESC'));
        }

        return $elements;
    }

    add_filter('avf_template_builder_shortcode_meta', 'avia_custom_query_add_query_params_to_config', 10, 4);
    function avia_custom_query_add_query_params_to_config($meta, $atts, $content, $shortcodename)
    {
        global $avia_config;
        if(empty($avia_config['avia_custom_query_options'])) $avia_config['avia_custom_query_options'] = array();

        if(!empty($atts['order']))
        {
            $avia_config['avia_custom_query_options']['order'] = $atts['order'];
        }

        if(!empty($atts['orderby']))
        {
            $avia_config['avia_custom_query_options']['orderby'] = $atts['orderby'];
        }

        return $meta;
    }
}
Sort filter style
Masonry sort filter can be styled using custom CSS
Code snippets:
CSS
/*-----------------------------------------
// CSS - Sort options styles
//----------------------------------------*/

/* Sort option background*/
#top .av-masonry-sort {
background: #222!important;
padding:0!important;
}
/* All sort link */
#top .all_sort_button  {
display:none;
}
/* Active sort filter */
#top a.active_sort {
background: #3369e7!important;
color:#FFF!important;
}
/* Sort options*/
#top .avia_show_sort, #top .all_sort_button {
padding: 15px 20px!important;
}
/* separator */
#top .text-sep {
display: none;
}
Troubleshoot
My blog looks different from enfold demo
Importing demos is the easiest way to get started with your new site. However sometimes depending on the website and server settings it may require some small steps to set everything up like the demo.
- Go to Settings > Reading and check if a static homepage is set as Frontpage – if yes please deselect the static page option.
- If you haven’t created a menu and assigned it to display as your main menu then all the pages your site will be listed, please try creating your own menu and assign it in Appearance > menu.
- The dummy content won’t reproduce the demo pages exactly because of license reasons with images, etc.
- Lastly because of the importer script limitations – i.e. dynamic templates aren’t supported by the dummy content importer.
Title and author’s name is missing
Using Advanced Layout Builder to create a blog post will remove the default elements like post meta info, featured image, title, etc. You need to add the required elements manually from the advanced layout builder.
Comments don’t display on posts
If you are using the WordPress default editor and do not see comments. Open the “Screen options” on the top right corner, and select “Discussion” and then scroll below ALB and enable discussion on your page.
Comments do not work on any page/post that uses Advanced Layout Builder. For page/post with ALB you can add the comment element from the Layout Builder.
Resource
Contributed video: