Import theme demos
Overview
Enfold theme can be easily customized to look unique and beautiful, check out some of the Enfold demos. The demo sites can be installed with just one click and it is easy to add your content and build upon it.
Import demos
Backup theme settings
Your WordPress theme can be customized to look and feel different from other sites by changing the default theme styles and settings. It may be a time-consuming process, but once you are happy with the changes it is recommended to back up and save your theme settings from Enfold > Import/Export tab.
How to import a theme demo
Importing a demo site and customizing it is a great way to save you some development time. The demo sites can be imported from Enfold > Import Demo.
NOTE: Most of the demos can be imported with all the demo contents. However, for some demos due to copyrights issue, you may have to add replacement images.
Also, note that importing demo sites will reset the theme settings.
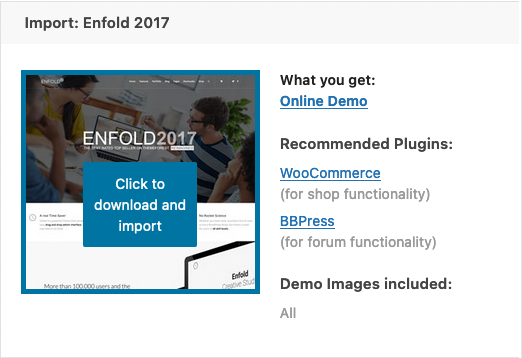
You can simply hover on the demo you would like to import and click “Click to download and import” button and demo will be imported within a few minutes.
By default, clicking the button downloads the demo file, imports it and then deletes the file. If you would like to handle the process manually, you can add following code to Functions.php file of your child theme and turn it into 3 step process with buttons to download, to import and to delete.
add_theme_support( 'avia_demo_store_downloaded_files' ); How to manually import a theme demo
- Please add following line to Functions.php file in Appearance > Editor
add_theme_support( 'avia_demo_store_downloaded_files' );
- Download the zip file of the demo you would like to import from https://github.com/KriesiMedia/enfold-library/tree/master/demos
- Extract it in \uploads\avia_demo_files\ folder. If you are importing Enfold 2017 demo, files should be extracted inside \enfold-2017\ so it should look as \uploads\avia_demo_files\enfold-2017\
- Go to Enfold theme options > Demo Import and import the demo
How to import demos without losing the theme settings.
To import new demos without losing your current theme settings please try one of the below methods:
Export/ Import theme settings.
- First, export the theme settings from Enfold > Import/Export tab.
- Import the demo theme of your choice.
- Overwrite the new settings with your old setting by importing back the settings file we saved in step 1.
Import only the demo content using XML files.
- Import the demos manually using the XML files provided in the theme. This ensures that only the demo pages and posts are imported and not the theme settings.
How to import content from other demos
Enfold comes with several demos but only one demo can be imported at a time. If you are looking for a way to import specific content or pages from other demos here is how to do it:
- It is recommended not to perform this on a live site instead create a staging site or setup a localhost site.
- Import the required demo on your localhost or staging site.
- Edit and personalize the demo content or the page on your staging site to suit your live site.
- Enable debug mode on the staging site.
- Copy the element shortcode from the page.
- Add the shortcode to your live site.
- Update the image or videos links if required.
How to remove the Demo Import tab from theme options
To remove the “Import Demo” tab from the theme options panel add the below function to your child theme functions.php file
// hide theme options
add_action('admin_head', 'hide_theme_options');

function hide_theme_options() {
  echo '<style>

    #avia_options_page .goto_demo {
		display: none !important;
		}

  </style>';
}
Remove Demo Data
Sometimes after importing the demo data, you may wish to reset your WordPress site and start with a new Demo. Since the demo data is stored in the database, it is very easy to remove the demo data completely from the database by using a plugin like WordPress Database Reset
Shortcodes of demo pages
If you need shortcodes of a certain page of Enfold demos, you can start a thread on our support forum and list those pages and we’ll provide the shortcodes.
Alternatively, you can go to Enfold GitHub Library, download the xml of that demo, and search for the page ID ( page_id=123 ). You can find the avia shortcodes in between CDATA as content:encoded.
This alternative was suggested by Guenni007.
Creating demos
Theme Support for creating the demo files
Enfold offers support to help you create demo files and get feedback about errors. You can add constants define( 'AVIA_XXX', true ); to wp-config.php or e.g. functions.php to activate this support.
IMPORTANT INFORMATION: When importing a demo and an ID in database table e.g. WP_Post already exists, then WP creates a new ID for this post. This can break your layout for e.g. ALB element id’s that point to images. To avoid this we recommend the following (https://mariadb.com/kb/en/auto_increment/): Use ALTER TABLE statement to assign a new value to the auto_increment table option for at least the WP_Post table, we would recommend 200 or higher before you start creating your demo.
ALTER TABLE your_table_name AUTO_INCREMENT=200;
This reduces the risk for a conflict when other plugins are needed. But check this value at least with the plugins you need. The SQL server always checks for the highest AUTO_INCREMENT value when inserting new posts later.
- Best start is to make a clean install
- Only activate plugins you need for your demo to keep it small
- Create your demo
Export demos
- add
define( 'AVIA_GENERATE_DEMO_PHP_FILE', true );to create php settings file for demo instead of regular theme settings txt file - Goto Theme Options Page -> Import/Export/.. -> Button Export Theme Settings File to create the php file
- Goto Dashboard -> Tools -> Export -> Export “All Content” to create the xml file
- add demo information to register-demo-import.php
- Bundle both files in a zip, name all files with ‘demo_name’ used in register-demo-import.php
- Make a preview image, name it with ‘demo_img’ used in register-demo-import.php
- Use plugin Download Monitor to host the zip files
- Important: For images only a link is exported – so your export server must be online during import, otherwise images cannot be imported. See https://mytechguy.co.nz/wordpress/how-to-export-posts/
In case you do not want use define( 'AVIA_GENERATE_DEMO_PHP_FILE', true ); or you need to export a LayerSlider you can call the following URL directly in your browser (you must be logged in):
http://your_server/wp-admin/admin.php?page=avia&avia_export=1
or
http://your_server/wp-admin/admin.php?page=avia&avia_export=1&layerslider=enfold_2017_slider
Troubleshoot
Imported demo site don’t look similar to live demos
After importing the demos if your site is not displaying the demo site please check if a static homepage is set in WordPress Dashboard > Settings > Reading – if yes please deselect the static page option and select the correct homepage in Enfold > Frontpage Settings.
Importing the demo content won’t reproduce the demo page exactly, but it imports the pages. Some of the content like images, etc, might not be imported due to license requirements and limitations of the import script, such as dynamic templates aren’t supported by the demo content importer.
Everything on the demo site is a combination of Advanced layout builder elements like Headings, Product Slider, Horizontal Ruler and much more.
Importing a demo on a live site, where you have already set up pages, may cause issues and overwrite your current changes/settings so it isn’t recommended. The best way to see how things are set up in the demo is to create a test installation of WordPress, install the theme and then import the demos. This will install basic pages, posts, products and change all the settings to what the demo has.
Demo import don’t work or demo data install error
If the demo files fail to import, please set a higher memory limit in WordPress config file and if possible increasing the memory on the hosting server.
Access wp-config.php file in the root directory and add the below line to increase the WordPress memory limit. For a detailed explanation please check WordPress Codex.
define('WP_MEMORY_LIMIT', '256M');
Failed to import
If you notice an error message “Failed to Import media” or ” Media already exists” basically the theme is saying that the files you are trying to import already exist so it is not able to import again.
Please remove the old demo files by using a plugin like Database Reset (warning all content will be deleted from your site). We recommend trying this only on new installation without any content.
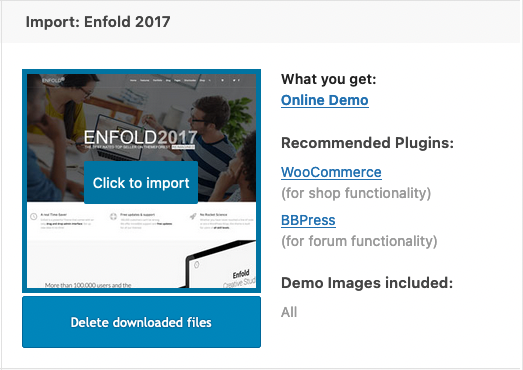
Demo file exists
In case a demo file exists (e.g. delete did not work for any reason), the logic switches back to show the Delete button and Import instead “Download and import” button.
In that case, you can simply click “Click to import” button to import the demo and after that use “Delete downloaded files” to delete demo files.