Forum Replies Created
-
AuthorPosts
-
What is initially noticeable is not only the different display in the post slider, but also that slightly different sources are used in the single posts.
Both times the image is opened in the lightbox, and by default the large image is used as the source.
In the one image, however, this is: 1024X683 in the other image (new), however, it is: 1030×687.
This could then of course lead to the fact that the calculation based on this the images in the post slider are also different.PS: I still do not see why in the single post with you such nearly 4:3 images are shown, because actually the entry_with_sidebar format is 845×321 so rather a narrow image.
Therefore, the actual error is more likely to be found in the choice of images for the lightbox of the single posts.
PS: for testing purpose it would be nice if both posts ( with image 39 and 39new ) are in the same category – to see if there could be an impact.
-
This reply was modified 3 years ago by
Guenni007.
the SVG separators are not tricky and you even have a nice preview of what the settings will do.
click to see full resolution:

but you do have the option to choose the source image file on magazine element options dialog.
To synchronize the sources – you only had to choose here the image-size which is used in your single post .
( guess that is entry_with_sidebar )

Is there a page where normal users can also look at the matter?
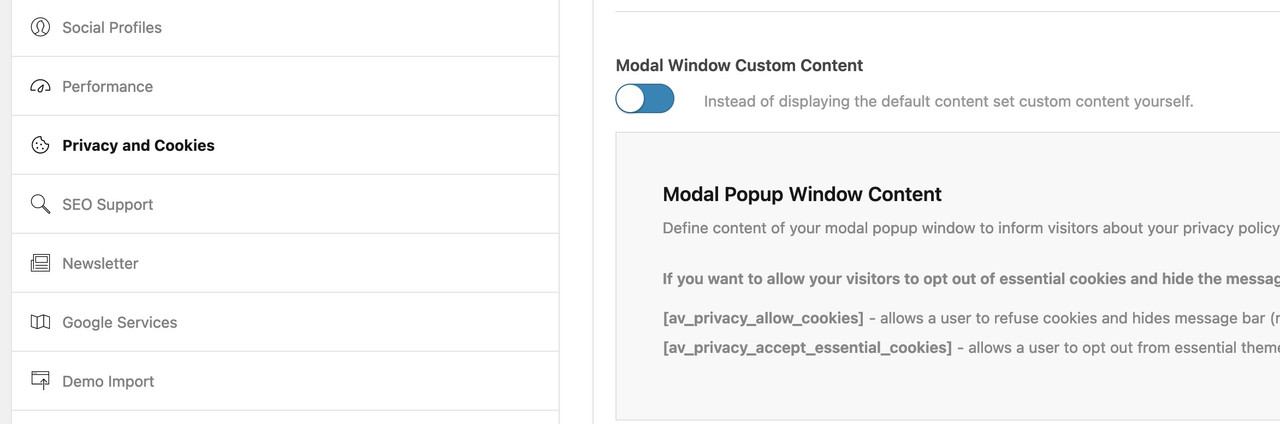
sorry – this was the fact allready before – and does not correlate with the “Modal Window Custom Content”
I checked your page to get the correct selectors for your consent buttons – that’s how I recognised it.
there are 3 images loading from http path and the open-sans font. My recommendation is that you delete these files – and upload them again.
logo-mitglied-im-BWP.jpg / innbb.jpg and j.svg –I would try the Open Sans first, as you don’t have to search the content to load the new instance. If you do this, include the woff2 variants of the Open-Sans in your zip file. Every modern browser can handle this, and loads these much smaller files faster.
If there is a section that is above the section where you want the divider, you can set up a bottom divider for that section.
Another option would be to give the color section a custom class, and all of these will have the top divider mirrored up.
See here – my snippet for a divider between a slider and the next color section. Since the slider doesn’t have this option, we need this trick here.
https://webers-testseite.de/divider-on-sliders/you are concerning to the svg dividers ? or have you done it with the slant option? – i would always prefer the svg dividers.
on performance – “Disabling Of Template Builder Elements” – what option do you use there?
i can not see how you have set the gradient for the first button – it is not via quick css – it shows it is an inline style – so you have to look where this rule is:
.avia-cookie-consent-button-1{
	/* Permalink - use to edit and share this gradient: https://colorzilla.com/gradient-editor/#8fc800+0,63aa00+100 */
background: #8fc800 !important; /* Old browsers */
background: -moz-linear-gradient(45deg,  #8fc800 0%, #63aa00 100%) !important; /* FF3.6-15 */
background: -webkit-linear-gradient(45deg,  #8fc800 0%,#63aa00 100%) !important; /* Chrome10-25,Safari5.1-6 */
background: linear-gradient(45deg,  #8fc800 0%,#63aa00 100%) !important; /* W3C, IE10+, FF16+, Chrome26+, Opera12+, Safari7+ */
filter: progid:DXImageTransform.Microsoft.gradient( startColorstr='#8fc800', endColorstr='#63aa00',GradientType=1 ); /* IE6-9 fallback on horizontal gradient */
border: none !important;
	color: #ffffff !important;
}
delete the rule for the button-2 and add the selectors for the other button to that rule above:
.avia-cookie-consent-button-1, .avia-cookie-consent-button-2, .avia-cookie-consent-button-3 { /* Permalink - use to edit and share this gradient: https://colorzilla.com/gradient-editor/#8fc800+0,63aa00+100 */ background: #8fc800 !important; /* Old browsers */ background: -moz-linear-gradient(45deg, #8fc800 0%, #63aa00 100%) !important; /* FF3.6-15 */ background: -webkit-linear-gradient(45deg, #8fc800 0%,#63aa00 100%) !important; /* Chrome10-25,Safari5.1-6 */ background: linear-gradient(45deg, #8fc800 0%,#63aa00 100%) !important; /* W3C, IE10+, FF16+, Chrome26+, Opera12+, Safari7+ */ filter: progid:DXImageTransform.Microsoft.gradient( startColorstr='#8fc800', endColorstr='#63aa00',GradientType=1 ); /* IE6-9 fallback on horizontal gradient */ border: none !important; color: #ffffff !important; }if it is not open – see if there is “Modal Window Custom Content”
activate the switch – then scroll down and find your “5” on the window right bottom there is a “X” to get rid of it.
Was ich mir vorstellen könnte, ist das du die Besucher deiner Seite bittest aktiv ihre Herkunft offen zu legen; indem du das entsprechende Bundesland abfragst.
Ich denke aber es wird wahrscheinlich leichter sein, die Telefonanlage dementsprechend zu programmieren, das eine auf deiner Seite angegebene Zentrale Nummer – je nach Vorwahl des Anrufers zu der entsprechenden Stelle weitergeleitet wird. Hier ist eine Herkunft leichte zu bestimmen.Es über die Besucher IP ( Geolocation IP etc. pp ) zu machen ist höchst wahrscheinlich nicht DSGVO konform.
maybe it is an older version of enfold – i remember that there are versions with no option to choose 1 column. So you had to update your version to newer ones.
a very nice and GDPR ( DSGVO on german spoken Countries ) konform Tool / Plugin is the Shariff Wrapper
Placed links only will do the job if you click on them! – contrary to the practice that seems to be common otherwise ( facebook pixel et. al. ) to send information when page is opening.
On options dialog of the plugin you can decide if you like to show on default after/before every post/portfolio your general set social links.
But i like the shortcode solution because on the help tab of the options you can see how to influence the shortcode what and how to show – f.e.:[shariff services=facebook|twitter theme=wcag borderradius=10 buttonsize=medium]February 25, 2023 at 2:21 pm in reply to: Translation Post Slider “Read more Link” from German to englisch #1399253i’m participant as you – so i do not see private content messages.
But you can inspect your page in developer tools of your browser – if on html tag the languages are present for each of your translated pages

then the enfold lang files will be taken to this corresponding setting. I work with WPML a long time – and i do know that they will place it in that manner.
And you are shure that this read more link comes from enfold – and not from a third party plugin?So sorry – then you had to wait til a mod looks into your page.
And btw. from GDPR ( DSGVO ) reasons it is better to remove all font loading from third party plugins.
Maybe there is an option too on the plugin to hamper this. ( as on the embedded Layerslider Plugin )PPS : es hätte gereicht nur diese unsägliche Regel aus dieser css zu löschen !
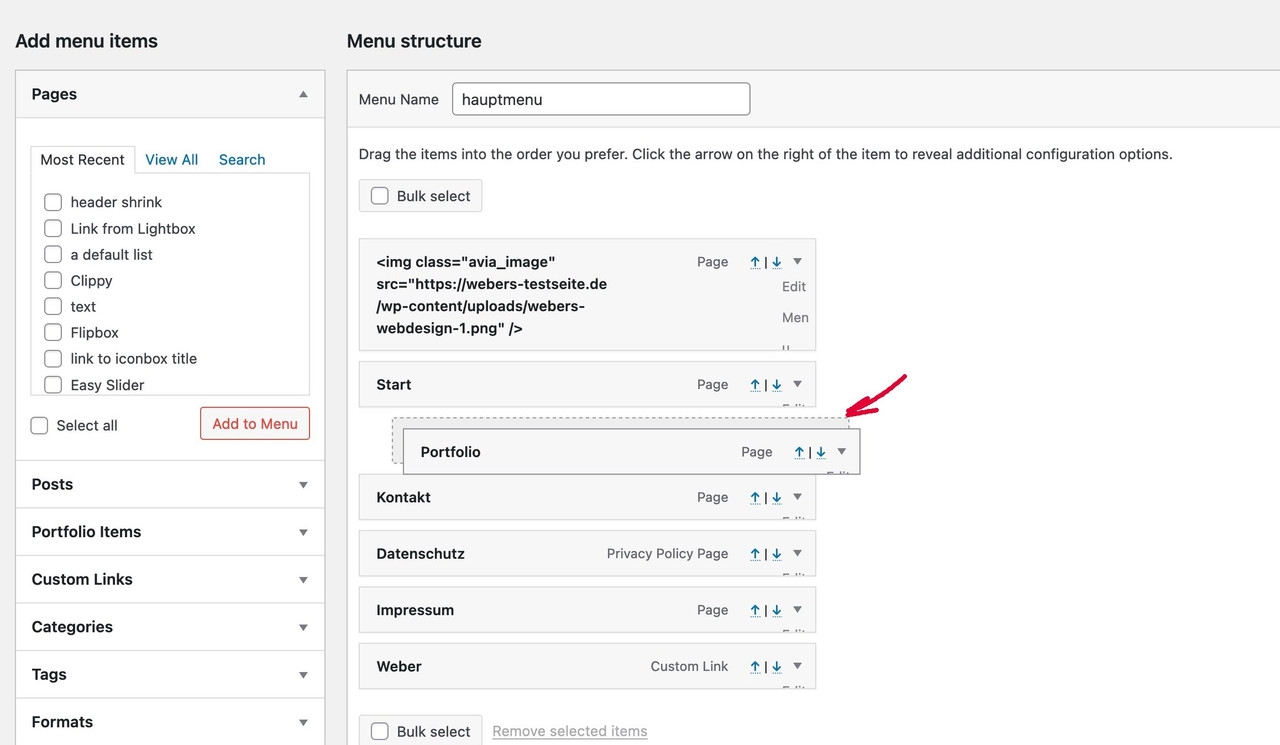
if you do not declare a menu as “enfold main menu” or for using a child theme : “enfold child main menu” – the automatically generated WordPress menu will be shown. And this is a menu with ( i hope only ) first level pages. – never tested it.
So to have influence on the menu items – you had to make your own menu.
Create a new menu – name it as you like and declare it as main menu.
Adding items to that menu – you can drag and drop those items to a position. If you pull them under a different page and a little more to the right – there will be shown a place where you can drop them. From now on this will be a second-level item in your menu. etc. pp.
Drag them back to the left side will set them as 1st level Menu-item.
Enfold got another option – this is called “use as mega menu” – you can see that – if you are opening the menu-item on the right side by clicking that littel triangle.
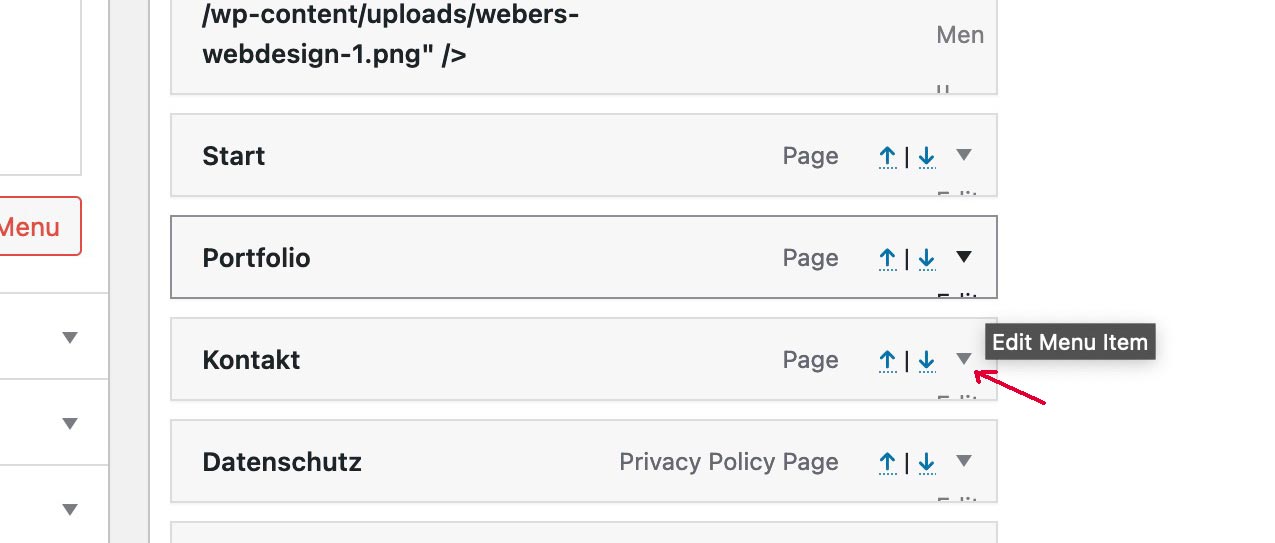
All info to that menu-item is here – BUTon top-right of that menu options page there is a fly-out menu
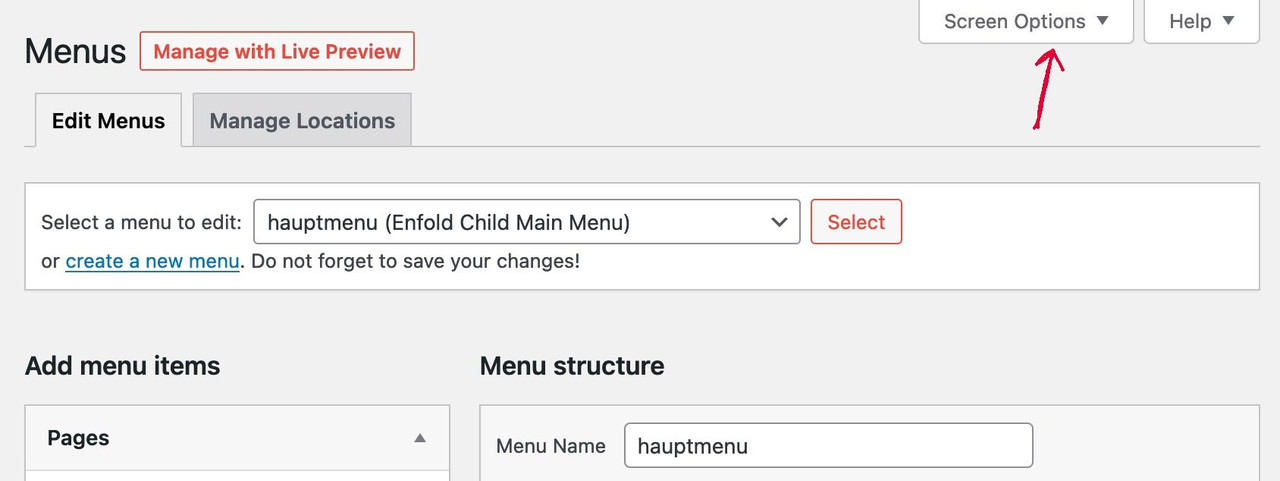
this flyout window will offer you all possiblilities to set for menu options page –
including the items you can add to menu – and for menu-items f.e. to give each item a class – and f.e. a targetFebruary 25, 2023 at 12:28 pm in reply to: Translation Post Slider “Read more Link” from German to englisch #1399245What do you mean by: can’t find in the post slider.
the place in postslider.php is set as :__( 'Read more', 'avia_framework' )
and this indicates that the string is translatable via lang files.
All translations are in the lang files (po/mo) in enfold/lang/ folder – on German there are two versions one with formal “Sie” the other informal “Du”I know the WPML is setting the lang attribute on html the correct way. So – if you change the language there is on html the lang mentioned:
lang=”en-US” or lang=”en-GB” – lang=”de-DE” etc.
if these are set – Enfold will use the corresponding lang file from lang folder.Can you please describe in more detail what you want to achieve. What do you mean by linking to the footer ?
Do you want to have a link to your instagram account in a footer widget? Is that it ?Aha – the method to switch of the css one by one in developer tools. It must be the events-caledar-for-google-public.css
it is this very globaly set rule :
*, *:before, *:after {
  -webkit-box-sizing: inherit;
  -moz-box-sizing: inherit;
  box-sizing: inherit;
}
this is actually an impertinence from whoever is including this css. It has nothing at all specific for eventscalendar in this rule.
It knocks out ( even if not with !important ) for ALL elements a rule that has influence everywhere. Please write to the plugin manufacturer. And remove this rule from that css.
_________________
das ist eigentlich eine Frechheit von demjenigen der diese css mit einschleust. Es hat überhaupt nichts spezifisches für eventscalendar in dieser Regel.
Es haut ( wenn auch nicht mit !important ) für ALLE Elemente eine Regel raus, die überall Einfluss hat. Bitte mal den Pluginhersteller anschreiben. Bitte lösche also diese Regel.February 25, 2023 at 2:39 am in reply to: How to add custom font for a testimonials element #1399202install your font. – Give a custom-class to your testimonial ALB ( this custom class will be on the testimonial wrapper container) .
Choose the selector that fits for you.
means decide if you like to have that font only for the avia-testimonial-content or for the whole avia-testimonial_inner etc.f.e.:
#top .avia-testimonial-wrapper.custom-class .avia-testimonial-markup-entry-content {
  font-family: "brush script mt" !important;   /*** see what your bespoke font is named ***/
}
see ( a different font only for the testimonial ( not meta etc. ): https://webers-testseite.de/testimonial-styling/
The code on that page is only for that specific styling thereich kann es nicht finden. Eventuell solltest du mal schauen, erstmal alle plugin zu deaktivieren – in Enfold dann die Cache/Merging geschichten zu resetten.
Dann schauen ob sich das Problem zwischen 768 und 989 px löst. ( denn selbst der Hamburger ist in der Spanne nicht zu sehen)
Falls ja – dann mal ein Plugin nach dem Anderen wieder reaktivieren und schauen ob es an einem der Plugins liegt.these rules here are added after the quick css entries :
remove please the last rule in your quick css:
.responsive .container {
  max-width: 1130px;
}
this is better done on Enfold – General Layout – Dimensions done:

but on some reasons the grid.css rule and layout.css rules for container width do not take effect.
There must be an error on a rule concerning to @media only screen and (min-width: 768px) and (max-width: 989px) {
Guess a mod hat o login to your page to see where it comes from.because you haven’t merged the files i checked it allready. There is no error on that.
Did you paste in elsewhere some css code ? Or does a plugin inject a wrong code –what makes me wonder is that the fallback width is working
.responsive .container {
  max-width: 1130px;
}
and that the .container width is set to 100% on pages with sidebar even on non responsive case …
this is commonly a sign that a rule inside your css is wrong set : missing closing brackets or comma instead of semicolon – or vice versa on selectors using semicolon to separte them.
the idea is good but add to your rule above:
#footer .container {
  display: flex;
  align-items: flex-end;
  flex-flow: row wrap;
  justify-content: space-between;
}
BUT you have to proove your settings – because content on the right side is cropped on smaller screens like ipad :
 February 24, 2023 at 11:58 am in reply to: Icon/Flipbox Grid does not work properly after update to version 5.4.1 #1399138
so maybe he has a customisation to get frontside background-image. On former times i do have a script for that too.
so now i know that this is the fact. – Remove your custom script – And those extraimages on the flipbox content. All is now possible in the ALB itself.
You can even change the order of showing. You can decide to show first backside and on hover the front is shown.here are some possibilities – very nice is the tooltip now: https://enfold.webers-webdesign.de/gridflip/
span will work if there is a class specified.
<span class="not-bold"> … </span>Ok – i use for generating the webfonts the transfonter: https://transfonter.org/
Fontsquirrel downloaded zip is not the one to upload ( inside that zip there is a folder specimen_files ) etc. pp.
you had to open that zip – and extract only the needed fonts ( woff, woff2, ttf etc. pp.) and nothing else ( no folders nor css ) – put them in a meaningfull folder ( see nomenklatura hint above ) and zip that folder for uploading it to enfold.
Guess you are working on Mac Devices – and zip files with the system integrated option or a third party app.
First to mention is – compress without those little extra files OSX provides with meta data on desktop etc.
Better Zip f.e. got an option called zip for PC.But apart from that, if you had prepared the fonts correctly, only one more glyphic font would have been included – (Enfold just tries to interpret these extra files).
Next Info: The naming in that Enfold Font Manger is the name of the folder before zip it. ( green underline )
The font-family name is independent on that – and will be generated by the font-file names ( red underline )
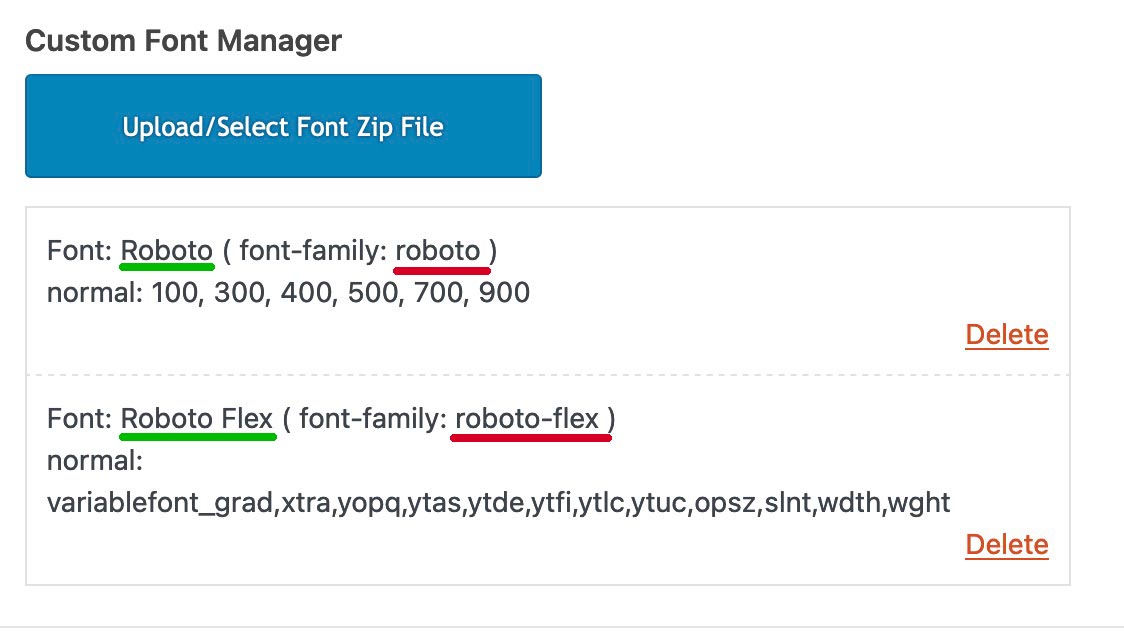
So my assumption is that you did something wrong when preparing the folder and zipping it.
February 24, 2023 at 9:12 am in reply to: Icon/Flipbox Grid does not work properly after update to version 5.4.1 #1399106i do not remember – did we have allready on 4.9 the front background images option?
you are welcome. by the way Günter main developer here on enfold is planing an input field for shrink amount.
So it will be easier on future versions. -
This reply was modified 3 years ago by
-
AuthorPosts