Forum Replies Created
-
AuthorPosts
-
December 16, 2024 at 7:52 am in reply to: noindex tag in showing Google Search Console when Enfold is activated #1473732
can you test if the setting on : SEO Support – Search Engine Optimization Support – Meta Tag “robots” : Use Enfold default settings.
clear cache and merging and look if it is still there. If not then your SEO external Plugin is causing it.thats nice – and if we set those “buttons” to display : none. – we can make a light box from that masonry to show first the images – with a button link in the bottom bar:
see: https://webers-testseite.de/portfolio-raster/
the trick is in the magnific popup script inside callback :
elementParse: function(item) {
	var bgImage = item.el.find('.av-masonry-image-container').css('background-image').replace(/^url\(['"]?/,'').replace(/['"]?\)$/,'');
	item.src = bgImage;
},
that i look for the background-image of that image container – and get the url – and declare it to the item to open in lightbox.
because by that snippet of ismael – there is now additional info on the masonry item – this href i use for an avia button in the lightbox (just a little bit upgraded by some custom css )December 15, 2024 at 3:36 pm in reply to: noindex tag in showing Google Search Console when Enfold is activated #1473678The new robots tag, indexifembedded, works in combination with the noindex tag only when the page with noindex is embedded into another page through an iframe or similar HTML tag, like object. For example, if podcast.host.example/playpage?podcast=12345 has both the noindex and indexifembedded tag, it means Google can embed the content hosted on that page in recipe.site.example/my-recipes.html during indexing.
But as menitioned above – i do not have that on any enfold page. This is something that might come from a plugin.
the one and only place where Enfold places a noindex is in function-set-avia-frontend.php lines 466ff in the function: function avia_set_follow()
and this is just for the <meta name=”robots” …/> for is_searcha indexifembedded is completely not found in enfold folder ! if this setting comes from enfold it has to be mentioned in the source code.
Better you insert on logo input field the original size! – or at least a file that has a min height of 90px (your header starts at 88px height)
in this case ( your logo goes right to the outer borders of the png ) only a littel padding is needed:.logo a img { padding: 2% 0; }i guess it is because you have inserted a recalculated format (300px x 50px) that is not bigger than the min-height of your setting.
If you put in a logo img that has a height of 100px – it will be o.k. from the beginning.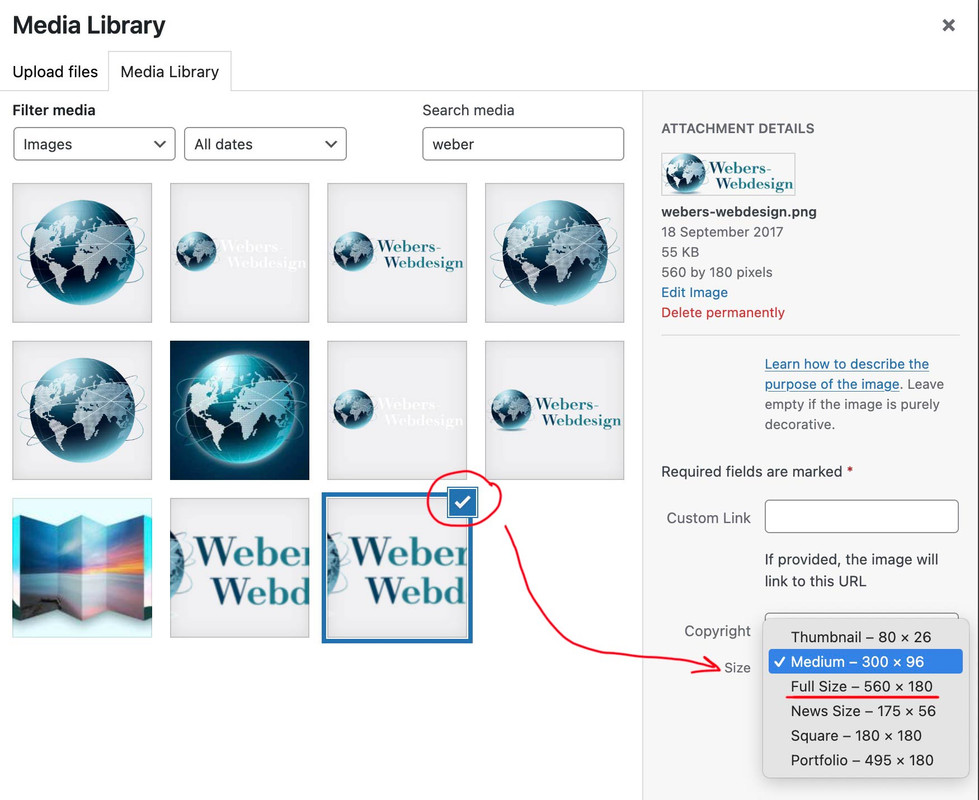
then you do not have to use this:
.logo a img {
  position: relative;
  top: 50%;
  transform: translateY(-50%);
  padding: 3px 0
}
December 15, 2024 at 9:09 am in reply to: Images uploaded to media libray are corrupted with yellow tint #1473663Can you test please:
put this to your child-theme functions.php:
add_theme_support('avia_show_alb_responsive_image_option');after that open your masonry element and look to advanced tab – performance : do not use responsive images.
This i hope will end in showing the original image instead of the smaller calculated images.On styling tab choose (just for testing purposes) “no scaling (original width…)” now see if the uploaded images are yellowish too.
If not then there went something wrong on recalculating the smaller (for responsive purpos) image formats.maybe put this to child-theme functions.php to show original images in lightbox:
function custom_alb_lightbox_image_size( $size, $context ){
  if( $context == ('av_gallery' || 'avia_masonry') ){
    return 'original';
  }
  return $size;
}
add_filter( 'avf_alb_lightbox_image_size', 'custom_alb_lightbox_image_size', 10, 2 );
If this shows now in masonry and on lightbox the well saturated images – then you can use once the plugin : https://wordpress.org/plugins/force-regenerate-thumbnails/ and recalculate all images. This i hope will correct the mismatch. After recalculation you can delete that plugiin from your installation.
put this to your quick css – if you do not like to set custom classes or remove min-height option etc.
i address them by different selectors.
You can decide when the columns will break on change of that 900px / 899px values@media only screen and (min-width: 900px) { #top.home #av_section_1 .entry-content-wrapper { display: grid !important; grid-auto-flow: row; grid-template-columns: 1fr 1fr; } } @media only screen and (max-width: 899px) { #top.home #av_section_1 .entry-content-wrapper { grid-template-columns: 1fr; } } #top.home #av_section_1 .entry-content-wrapper:before, #top.home #av_section_1 .entry-content-wrapper:after { display: none; } #top.home #av_section_1 .container { height: unset !important; } #top.home #av_section_1 .entry-content-wrapper .flex_column { width: unset !important; min-height: unset !important; } #top.home #av_section_1 .entry-content-wrapper .flex_column:nth-of-type(2) { align-self: end; margin: 30px 0 0 !important; } #top.home #av_section_1 .entry-content-wrapper .flex_column:nth-of-type(1){ align-self: start; } #top.home #av_section_1 .content { padding: 0 !important; }did you really read my post and followed the link i offered?
December 14, 2024 at 6:07 pm in reply to: Images uploaded to media libray are corrupted with yellow tint #1473639Do you use any plugin that transforms your jpg to webp – and then uses these webp instead.
see :
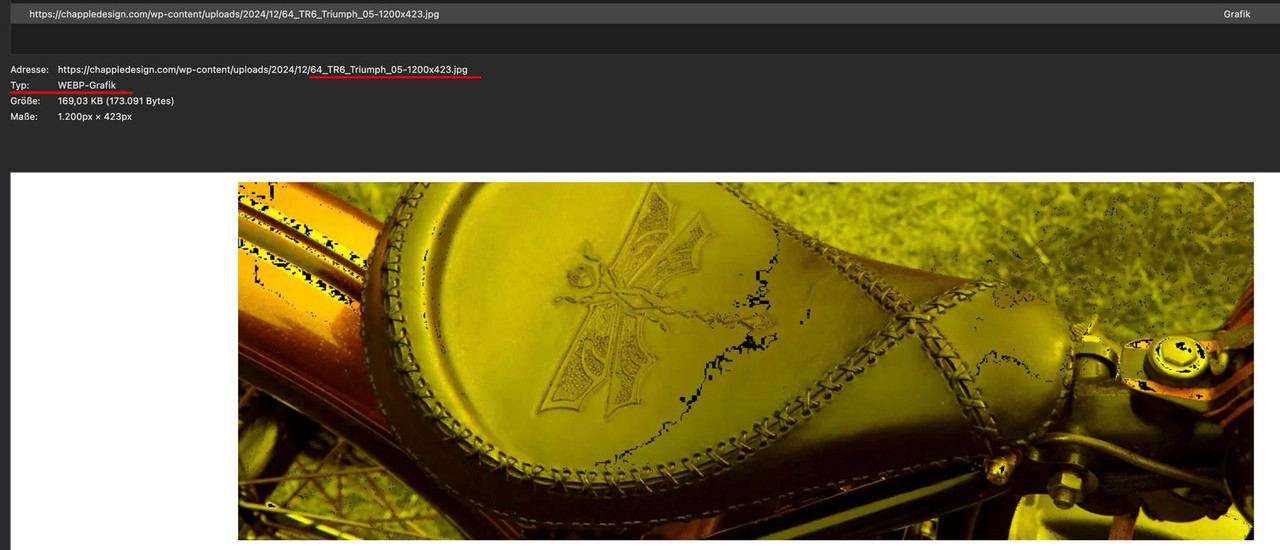
supposedly it is a jpg according to the file extension – in fact it is a webp. The conversion may be the reason for the color shift.Inspecting your original “jpg” : https://chappledesign.com/wp-content/uploads/2024/12/64_TR6_Triumph_05.jpg
photoshop does not open it as jpg – renaming it to webp – opens in Photoshop!
December 14, 2024 at 2:38 pm in reply to: noindex tag in showing Google Search Console when Enfold is activated #1473632@mike – it is as mentioned just before head tag is closing. But i do not have it on any of my enfold installations even on those which are in combination with Yoast SEO.
but nevertheless in combination with that “new” indexifembedded it is ok :
https://developers.google.com/search/blog/2022/01/robots-meta-tag-indexifembeddedDecember 14, 2024 at 12:03 pm in reply to: Images uploaded to media libray are corrupted with yellow tint #1473622But can you please link to an image that shows the unwanted effect.
nice to see the page now – then it is much easier to give advice.
First – why do you use the image as background? – use it as image element inside that column.
Best would be to give a custom class to that flex-column with your image.to see an interims result – that could be done:
@media only screen and (min-width: 768px) { .flex_column.av-cvo-a82f70a62f8490e3b0b75af0c90996f9 { position: absolute; bottom: 0 } }But: i guess we can have better results if you do not use the equal height option! because in responsive case the height of those containers are too big.
So can you please give to the flex-column with that image a custom class and remove the equal height option – then i check if there is a better solution for every screen width.See example with css code : https://webers-testseite.de/greg/
if you got different content height the arrows will adjust because of 50% position – maybe it is best to have an absolute value for the top position.
Next i think they should not lay over content
Because the demo ( Link ) only got smallarrow setting and no headings – this is a interims solution:#top .avia-smallarrow-slider-heading { height: 100%; position: absolute; } #top .avia-smallarrow-slider .avia-slideshow-arrows { position: absolute; width: 100%; top: 50%; transform: translateY(-50%); z-index: 3 } #top .avia-smallarrow-slider .avia-slideshow-arrows .prev-slide { left: -35px } #top .avia-smallarrow-slider .avia-slideshow-arrows .next-slide { right: -35px }i guess – as the frames – it will be better for positioning to choose display : fixed
I don’t know how the vw unit reacts to the scroll bar thickness. However, it seems to be the case that this must unfortunately be taken into account. For this reason alone, it is important to align all four pseudo containers to the top left.
for the mentioned Demo this works in all browser i do have on my Mac (FF dev, FF, Safari, Chrome).av-frame:before, .av-frame:after { pointer-events: none; display:block !important; } .av-frame.av-frame-top.av-frame-vert:before { content: ''; left: 30px; top: 30px; height: calc(50vh - 30px); width: calc(50vw - 38px); border-top: 1px solid #102f5d !important; border-left: 1px solid #102f5d !important; position: fixed; } .av-frame.av-frame-right.av-frame-hor:before { content: ''; left: calc(50vw - 8px); top: 30px; height: calc(50vh - 30px); width: calc(50vw - 38px); border-right: 1px solid #102f5d !important; border-top: 1px solid #102f5d !important; position: fixed; } .av-frame.av-frame-bottom.av-frame-vert:before { content: ''; left: calc(50vw - 8px); top: 50vh; height: calc(50vh - 30px); width: calc(50vw - 38px); border-right: 1px solid #102f5d !important; border-bottom: 1px solid #102f5d !important; position: fixed; } .av-frame.av-frame-left.av-frame-hor:before { content: ''; left: 30px; top: 50vh; height: calc(50vh - 30px); width: calc(50vw - 38px); border-left: 1px solid #102f5d !important; border-bottom: 1px solid #102f5d !important; position: fixed; }if you got a different frame width than 10px we had to adjust some settings.
add to your css of first post :
.av-frame:before,
.av-frame:after {
  pointer-events: none;
}
i do not see your site – but with the demo : “Enfold Hotel” i made some tests in dev tools.
There is always a shift of bottom lines. Some browsers have that border/height 1px difference – so mybe it would be better to position all in relation to the top position.Guenni007 so great for your fast help!
Arrr … i don’t usede the code tag …. :(
Sorry total!
Bist Du Deutscher?Ja – der andere Beitrag ist schon zu.
btw. if you use on your landing page the advanced layer slider element – it is hard to get good loadiing times.
not least because the slider needs to be time-controlled to load the content. That’s the point behind it. So if you see my test page, the slider is set to show the entire content after approx. 7 seconds.if you got an advanced layerslider on your landing page – then it might be usefull to play a bit with the advanced layerslider performance settings:
there is on “layerslider first window” on top right a gear icon which opens the settings dialog for gloabl settings of layerslider.
If you have opend one slider – you got on the top left “Project Settings” here are the performance settings for the specified slider.i answered to the other topic: https://kriesi.at/support/topic/adding-google-tag-manager-in-enfold/
the signs of
<!-- Google Tag Manager -->are not right – and you used instead of two single quotes on one place one double Quote
(here after that part : …'dataLayer'?'&l='+l:)
or try this ( replacing your GTM-IDs ) with copy&paste:
i think it is ok to have both in head section
function ava_g_tag_custom_script() {
?>
<!-- Google Tag Manager -->
<script>
  (function(w,d,s,l,i){w[l]=w[l]||[];w[l].push({'gtm.start':
  new Date().getTime(),event:'gtm.js'});var f=d.getElementsByTagName(s)[0],
  j=d.createElement(s),dl=l!='dataLayer'?'&l='+l:'';j.async=true;j.src=
  'https://www.googletagmanager.com/gtm.js?id='+i+dl;f.parentNode.insertBefore(j,f);
  })(window,document,'script','dataLayer','GTM-XXXXX');
</script>
<!-- End Google Tag Manager -->

<!-- Google Tag Manager (noscript) -->
<noscript>
  <iframe src="https://www.googletagmanager.com/ns.html?id=GTM-XXXXX"
  height="0" width="0" style="display:none;visibility:hidden"></iframe>
</noscript>
<!-- End Google Tag Manager (noscript) -->
<?php
}
add_action('wp_head', 'ava_g_tag_custom_script');
but if you like to have the noscript in body tag:
function ava_g_tag_custom_script() { ?> <!-- Google Tag Manager --> <script> (function(w,d,s,l,i){w[l]=w[l]||[];w[l].push({'gtm.start': new Date().getTime(),event:'gtm.js'});var f=d.getElementsByTagName(s)[0], j=d.createElement(s),dl=l!='dataLayer'?'&l='+l:'';j.async=true;j.src= 'https://www.googletagmanager.com/gtm.js?id='+i+dl;f.parentNode.insertBefore(j,f); })(window,document,'script','dataLayer','GTM-XXXXX'); </script> <!-- End Google Tag Manager --> <!-- Google Tag Manager (noscript) --> <noscript> <iframe src="https://www.googletagmanager.com/ns.html?id=GTM-XXXXX" height="0" width="0" style="display:none;visibility:hidden"></iframe> </noscript> <!-- End Google Tag Manager (noscript) --> <?php } add_action('wp_head', 'ava_g_tag_custom_script');it is very hard to check your codes – if you do not use here the code tag
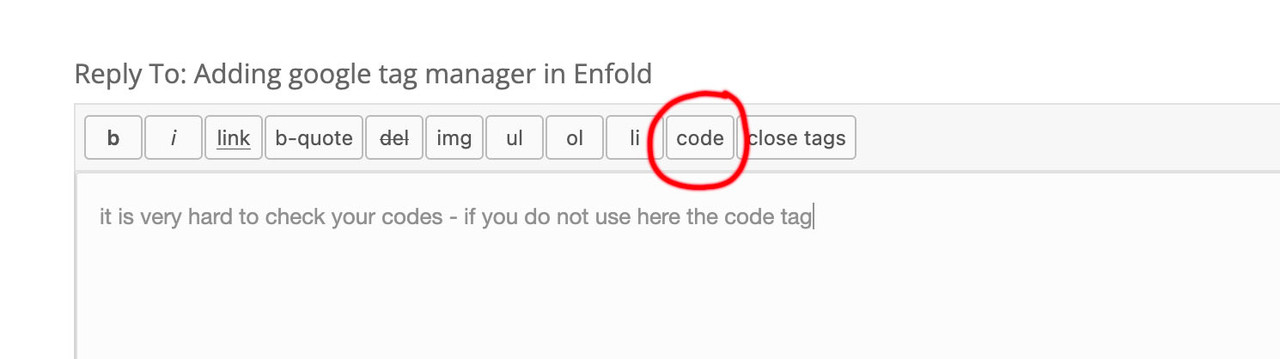
easiest way is to click once the code tag button – enter your code – click again the /code button
because sometimes it is only the use of uncorrect quotation marks. etc.did you compare the htaccess files – if there are differences between those who work and those which do not work?
espacially look for :
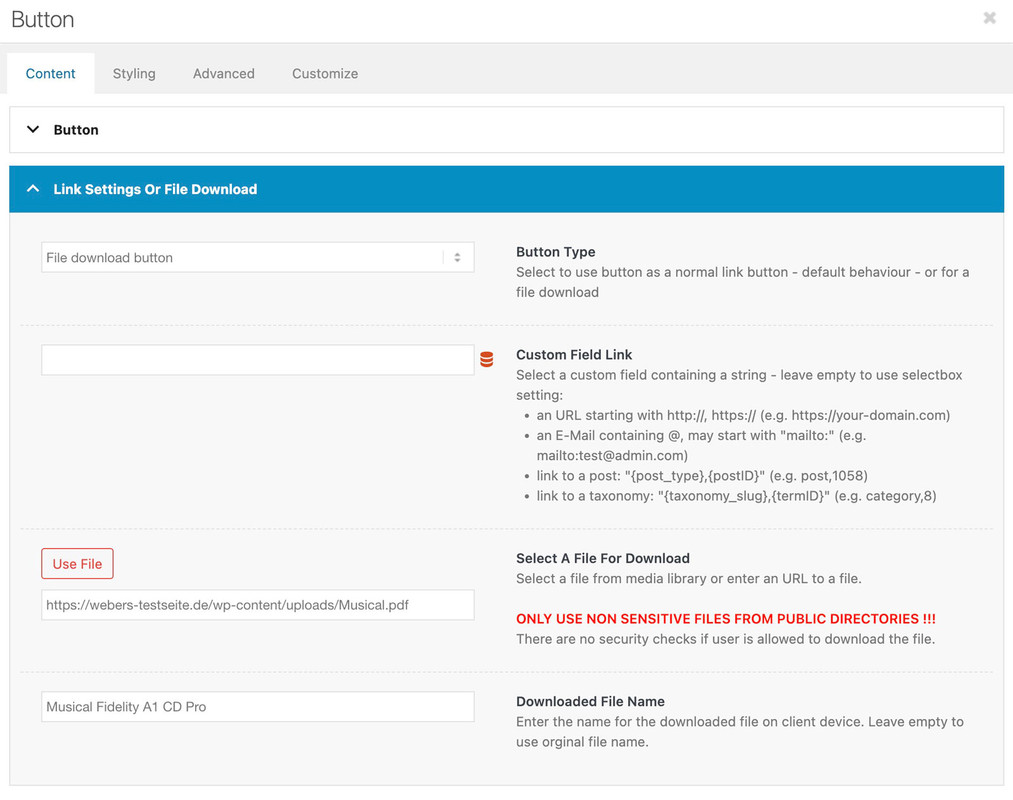
application/octet-streamby the way for Enfold Download Button – fill out only the Use File Input field
can you try in child-theme functions.php:
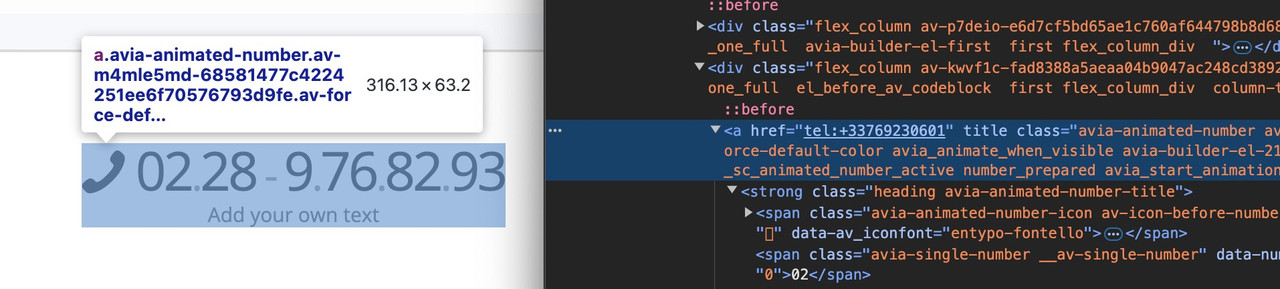
add_filter( 'avf_post_ingnore_featured_image_link', '__return_true' );December 13, 2024 at 11:48 am in reply to: How to set a phone number link into an animated number #1473564well there is on element itself on adanced tab – link setting – choose manual:
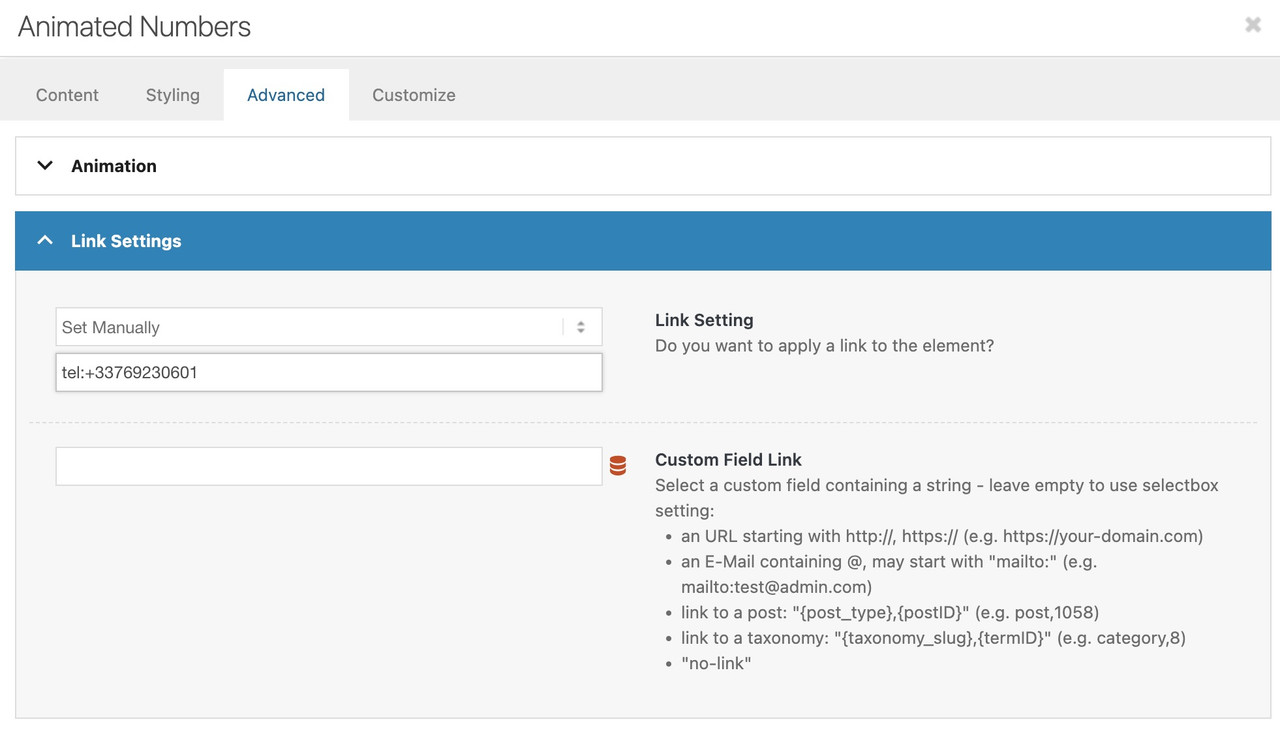
Doing this – will end on a wrap all inside that element with an anchor tag.
This anchor tag is displayed as block – so the whole width of the element ( if it is inside a 1/1 column it will have active click for the whole width.if you only like to have the active click area on that element:
put this to quick css:
.avia-animated-number {
    display: inline-block;
    left: 50%;
    transform: translateX(-50%);
}
December 13, 2024 at 10:57 am in reply to: Images uploaded to media libray are corrupted with yellow tint #1473560can you link to one image example ?
and by the way 9400×400 – really? can you link to one of those big images.
WP has for media library a dimension threshold at 2560px – so if bigger dimensions are uploaded a new source will be generated with : filename_scaled.What color profile did you choose on photoshop export: – did you check to have rgb export?
 December 13, 2024 at 10:16 am in reply to: SVG Logo: incorrect path color fill in (non-) scrolled header #1473556
your welcome – but if you like send me the link anyway.
December 13, 2024 at 9:32 am in reply to: SVG Logo: incorrect path color fill in (non-) scrolled header #1473547if you use both options this should work. But if only fill color is different then it might not be necessary to use them both – as you can see on my example page.
If you use both: look with a good text editor (for windows : notepad++ or for mac : sublimetext ) inside both svg files – there are the same classes used – as usually by illustrator – these are the st0, st1 etc.Now the transparency logo comes later in the DOM – so this fill rules inside the transparency logo rules the css for st0.
Or aslong your external css does not differ between both logo files – these rules are woring on both files.
The one for non transparency case is ( .avia-svg-logo > a > svg ) – and the one for transparency is at ( .avia-svg-logo-sub > svg )Yes – send me the link to your page via e-mail. Everything is under my nick.
December 12, 2024 at 7:53 pm in reply to: SVG Logo: incorrect path color fill in (non-) scrolled header #1473518have a look inside your svg code – i guess both will have the same st classes ( these are former illustrator standard classes) in the mean-time it is cls. But different name same shit.
if you inspect my test page: https://webers-testseite.de/
i only use my colored svg logo – have unique classes set and the transparency logo isn’t a different one but just different fill:.html_header_transparency #header:not(.header-scrolled) .buchstabe { fill: #FFF; }may i see your page it concerns?
i didn’t implement the script. Thats why i wrote: “Edit: you had to adopt now the scrubbing script to its selectors.”
Your question only referred to customization without additional wrappers. A little work should still be left for you.Edit: now i have implemented that script – but you see – bigger video files do not work – and even the current mp4 with 10sec and less resolution do not work nice ( as the demo too ). So believe me Apple realizes this effect in a different way.
well – put your code block just inside a color-section – that color section set custom class to: special-vids
inside you got your html structure like:<section id="scrubs" class="vid"> <div class="holder"> <video src="/wp-content/uploads/Time-Lapse.mp4" autoplay muted loop playsinline></video> </div> <div class="story"> <div> <h3>In the heart of Wildrise…</h3> </div> <div> <h3>…where the breezes play.</h3> </div> <div> <h3>We embrace the call of the wild each day.</h3> </div> <div> <h3>Untamed places stretch,</h3> </div> <div> <h3>vast and wide.</h3> </div> <div> <h3>Whispering secrets of a world outside.</h3> </div> </div> </section>put this to your child-theme functions.php:
function scrub_preparation_of_color_section() {
?>
<script>
window.addEventListener("DOMContentLoaded", function () {
	(function($){
		$('.avia-section.special-vids ').each(function() {
			var vids = $(this).find('.vid').detach().html();
			$(vids).prependTo($(this));
			$(this).addClass('vid').find('.container').remove();
		});
	})(jQuery);
});
</script>
<?php
}
add_action('wp_footer', 'scrub_preparation_of_color_section');
see: https://webers-testseite.de/scrubbing-videos/
my css on that page is:
.responsive body#top {
    overflow-x: visible;
}

#wrap_all {
    overflow: visible;
}

.avia-section.vid {
  height: 600vh;
  position: relative;
}

.avia-section.vid div.holder {
  position: sticky;
  top: var(--enfold-header-height);
}

.avia-section.vid video {
  width: 100%;
  height: 100vh;
  object-fit: cover !important;
}

.avia-section.vid div.story {
  position: absolute;
  top: 0;
  left: 0;
  width: 100%;
}

.avia-section.vid div.story div {
  height: 100vh;
  display: flex;
  align-items: center;
  justify-content: center;
  text-align: center;
}
but i do not want to style it till the end. have a look how that is made in that video. – and how to handle the other .avia-section
Edit: you had to adopt now the scrubbing script to its selectors. And perhaps a debounce and resize will be needed.you can use the embedded debounce function of enfold:
function ava_add_custom_script(){ ?> <script> (function($){ function b() { // here comes the script … } $(window).on('debouncedresize', function() { b(); }); })(jQuery); </script> <?php } add_action('wp_footer', 'ava_add_custom_script');Can you please post the code you like to insert? Where did you see that effect you like to reproduce?
And where do you like to insert it – as first child in #main or between other alb elements?why do i ask this: if it is first child inside #main you can use that filter: ava_after_main_title
f.e.:
add_action('ava_after_main_title', function() { if ( is_page(49162)){ echo '<section class="vid">'; echo '<div class="holder">'; echo '<video class=" " preload="metadata" autoplay=" " muted=" " playsinline=" " loop=" " controls=" " id="player_27_1266727400_788445252_html5" src="/wp-content/uploads/Time-Lapse.mp4"></video>'; echo '</div>'; echo '</section>'; } });i do not see any white gap on the bottom – neither on dev tools nor on my iPhone.
-
AuthorPosts