-
AuthorSearch Results
-
June 2, 2025 at 12:35 pm #1484974
In reply to: mobile shrinking header
i did it this way with the edited child-theme files
(just erased the && ! isMobile ):function wp_change_sticky_header_script() { wp_deregister_script( 'avia-sticky-header' ); $vn = avia_get_theme_version(); $options = avia_get_option(); $child_theme_url = get_stylesheet_directory_uri(); $min_js = avia_minify_extension( 'js' ); // $min_css = avia_minify_extension( 'css' ); for that js - file not needed to mention here $condition = ( isset( $options['header_position'] ) && $options['header_position'] == 'header_top' ); $condition2 = ( isset( $options['header_sticky'] ) && $options['header_sticky'] == 'header_sticky' ) && $condition; avia_enqueue_script_conditionally( $condition2 , 'avia-sticky-header-child', "{$child_theme_url}/js/avia-snippet-sticky-header{$min_js}.js", array('avia-default'), $vn, true); } add_action( 'wp_enqueue_scripts', 'wp_change_sticky_header_script', 100 );but allways to do this on all pages where i like to have a shrinking header on mobile devices too – and to generate allways the minified file from the actual avia-snippet-sticky-header.js file – is a lot of work.
A filter set by you would be a great time saver here
using something like this :
add_filter('avf_shrinking_header_on_mobile', '__return_true');
😉 I am of course aware that a filter has no place in a script file. But maybe there is a trick that could regulate it differently.June 2, 2025 at 8:24 am #1484966In reply to: Logo overlay top bar menu
Hi,
You have to remove the width property from this css code to keep the logo from being distorted:
.logo, .logo a {
    overflow: visible;
    height: 100px;
    background-color: #075195;
    border-bottom-right-radius: .3125rem;
    border-bottom-left-radius: .3125rem;
    width: 12.5rem;
}
And to replace the dashes with bullets, add this css code:
.html_av-overlay-side-classic #top .av-burger-overlay li li .avia-bullet {
    height: 3px;
    opacity: 1;
    border: none!important;
    width: 3px;
    border-radius: 100%;
}
Best regards,
IsmaelJune 2, 2025 at 5:41 am #1484957In reply to: Advanced Post Types Order conflict?
Hi,
If you’re using the Posts Slider element or the Blog Posts element in Grid Layout, you can use the avia_post_grid_query filter to modify the query or adjust the item sorting.
Example:
— https://kriesi.at/support/topic/remove-current-portfolio-post-from-related-portfolio-grid/#post-836906
— https://kriesi.at/support/topic/sort-blog-posts-element-ascending/#post-1001791
— https://kriesi.at/support/topic/add-a-order-by-attribute-on-portfolio-grid/#post-1015617
— https://kriesi.at/support/topic/add-event-date-to-portfolio/#post-1479828Best regards,
IsmaelJune 2, 2025 at 5:20 am #1484955Topic: Logo overlay top bar menu
in forum Enfoldminhndq
Participant👉 I would like to adjust the position of the logo as in website’s logo below
https://globalhealth.duke.edu/👉 Replace the “-” in the mobile submenu with a “.”
June 2, 2025 at 12:53 am #1484949In reply to: Background image issues.
Hey Mike,
We have some good progress. I changed the text padding-left from pixel to percentage. Now no matter how I change the shape of the page the text keeps the creative indentation I want. Thank you for showing me that. I also added some line breaks to the end of my text to allow the background image more room to show.
Still struggling with the background image. Your test page looked like this..
/Users/j-birdteching/Desktop/Contact-test-desktop.jpgThis is what I am hoping to achieve.
/Users/j-birdteching/Desktop/Jkos-contact.jpg
I know some people like a more vertical window and some like a more horizontal window so, fit, distort, stretch, fill, whatever you call it, I would like to always see the entire background image. The image is abstract enough to be able to handle considerable distortion.
/Users/j-birdteching/Desktop/contact-vert.jpg/Users/j-birdteching/Desktop/contact-horizontal.jpg
The next challenge is getting this page to look good on a phone. Is having a separate contact page just for phones something we should be considering?
Doing the left margin by percentage did work for the phone but, I think having 50-60% margin padding on a phone is unrealistic.
The font would have to be a micro font. lol
/Users/j-birdteching/Desktop/contact-phone-2.jpgThe test page you made looks like this on my phone. I could live without the text having the creative indentation and just being uniformly left, right or center justified but, the page didn’t scroll down to see the rest of the text.
/Users/j-birdteching/Desktop/test-contact-phone.jpgWe’ll see what the background image looks like on the phone after we make adjustments to the desktop.
Thank you,
JasonJune 1, 2025 at 7:33 pm #1484943In reply to: Timeline mobile
Hey rixi,
I notice that on mobile not all of the dates show, only every other one, so to correct try adding this code to the end of your child theme functions.php file in Appearance ▸ Editor, if you are not using a child theme you could use the WP Code plugin then add a new snippet, in the top right corner use the PHP snippet as the code type:

and ensure that it is activated, then add the bellow code and save.function custom_timeline_script_for_mobile() { ?> <script> document.addEventListener('DOMContentLoaded', () => { // Check if there are any .av-milestone-even elements const milestones = document.querySelectorAll('.av-milestone-even'); if (milestones.length === 0) return; // Exit if no milestones found // Define the media query for screens smaller than 989px const mediaQuery = window.matchMedia('(max-width: 989px)'); // Function to reorder elements const reorderMilestones = () => { if (mediaQuery.matches) { milestones.forEach(milestone => { const date = milestone.querySelector('.av-milestone-date'); const icon = milestone.querySelector('.av-milestone-icon-wrap'); const content = milestone.querySelector('.av-milestone-content-wrap'); // Ensure all elements exist before reordering if (date && icon && content) { milestone.innerHTML = ''; milestone.appendChild(date); milestone.appendChild(icon); milestone.appendChild(content); } }); } }; reorderMilestones(); mediaQuery.addEventListener('change', reorderMilestones); }); </script> <?php } add_action( 'wp_footer', 'custom_timeline_script_for_mobile', 99 );Then I notice that one of your content boxes has too much padding for the list:

Try this CSS in your Enfold Theme Options ▸ General Styling ▸ Quick CSS field:@media only screen and (max-width: 989px) { .av-no-preview ul.avia-timeline-vertical .av-milestone-content li { padding: 0; } }
Changing the content padding and font size of the title and content may also help:@media only screen and (max-width: 989px) { .avia-timeline-boxshadow .av-milestone-contentbox { padding: 1em; } #top #wrap_all .all_colors h4.av-milestone-title { font-size: 20px; } .av-milestone-content p, .av-milestone-content li { font-size: 12px; line-height: 18px; } }
Try this and adjust to suit.Best regards,
MikeJune 1, 2025 at 6:58 pm #1484940In reply to: Background image issues.
Hey jkos,
When you set the background image to Scale to fit it scales image, so the whole image is always visible, this includes the height. Which is why the image does not reach the sides.
At Stretch to fit it stretches the image width to cover the page, less the 50px padding that the page has by default.
The height of your column is not set so the content is determining the height, but you have little content so the whole background image is not shown. If you set the column height to 150% then it will show.
But I recommend trying the color section instead because the background image will then be full width. I created a test page linked below to demonstrate.
Since the color section wants to vertically center the content, I added this css to the bottom of the page so your content will be higher:.responsive #top #wrap_all .avia-section.av-minimum-height-99vw .container { display: flex; justify-content: center; margin-top: 15%; max-width: fit-content; }The reason your text is off the screen for mobile is because your text has 800px padding, which is larger than a mobile screen:

to correct this you could change it to a percentage, or for this I created a css grid for two columns to achieve the layout without padding, and on mobile the grid is stacked. See the test page below.
For others, this is the HTML for the two columns:<div class="parent"> <div class="div1"> first column text </div> <div class="div2"> second column text </div> </div>and this is the css:
@media screen and (max-width: 789px) {
  .parent{
      grid-template-columns: 1fr;
      grid-template-rows: 1fr;
   }
}
@media screen and (min-width: 790px) {
.parent {
display: grid;
grid-template-columns: repeat(2, 1fr);
grid-template-rows: 1fr;
grid-column-gap: 0px;
grid-row-gap: 0px;
}

.div1 { grid-area: 1 / 1 / 2 / 2; }
.div2 { grid-area: 1 / 2 / 2 / 3; }
}
Best regards,
MikeMay 31, 2025 at 4:00 pm #1484899In reply to: Column Accordion/Slider-like ability?
Hey syberknight-tb,
Unfortunately, we don’t have an element that will achieve this for you in the theme, while there are many plugins that may work for you, when I check some of them they don’t quite match, but if you spend more time testing each one you may find one.
I was able to create something that may work for you using javascript and HTML in a shortcode, on mobile it shows 1 1/2 team member cards with prev & next arrows and loop when you click to the end:

on tablet it shows 2 1/2 cards:

and on desktop it shows 3 1/2 cards:

As is it holds 8 cards, you can add more or have less, you will need to edit the HTML to add your images and text, hopefully you will be able to do this:

Try adding this code to the end of your child theme functions.php file in Appearance ▸ Editor, If you are not using a child theme you could use the WP Code plugin then add a new snippet, in the top right corner use the PHP snippet as the code type:
and ensure that it is activated, then add the code below and save.function team_carousel_shortcode() { ob_start(); ?> <div class="carousel-container"> <button id="prevBtn">←</button> <div class="carousel"> <div class="carousel-track"> <!-- START: Team Members --> <div class="card"> <img src="/people-2-2-300x300.jpg" alt="Member 1"><p>Member 1<br>A short bio for the team member</p></div> <div class="card"> <img src="/people-2-2-300x300.jpg" alt="Member 2"><p>Member 2<br>A short bio for the team member</p></div> <div class="card"> <img src="/people-2-2-300x300.jpg" alt="Member 3"><p>Member 3<br>A short bio for the team member</p></div> <div class="card"> <img src="/people-2-2-300x300.jpg" alt="Member 4"><p>Member 4<br>A short bio for the team member</p></div> <div class="card"> <img src="/people-2-2-300x300.jpg" alt="Member 5"><p>Member 5<br>A short bio for the team member</p></div> <div class="card"> <img src="/people-2-2-300x300.jpg" alt="Member 6"><p>Member 6<br>A short bio for the team member</p></div> <div class="card"> <img src="/people-2-2-300x300.jpg" alt="Member 7"><p>Member 7<br>A short bio for the team member</p></div> <div class="card"> <img src="/people-2-2-300x300.jpg" alt="Member 8"><p>Member 8<br>A short bio for the team member</p></div> <!-- END: Team Members --> </div> </div> <button id="nextBtn">→</button> </div> <style> .carousel-container { position: relative; width: 80%; overflow: visible; margin: auto; } .carousel { overflow: hidden; width: 100%; } .carousel-track { display: flex; transition: transform 0.5s ease-in-out; } .card { box-sizing: border-box; padding: 10px; background: #e8e8e8; margin: 5px; border-radius: 8px; text-align: center; box-shadow: 0 4px 10px rgba(0,0,0,0.1); } @media only screen and (max-width: 767px) { .card { flex: 0 0 62%; } } @media only screen and (min-width: 768px) and (max-width: 1800px) { .card { flex: 0 0 38%; } } @media only screen and (min-width: 1801px) { .card { flex: 0 0 28%; } } .card p { color: #000; } .card img { width: 100%; height: auto; object-fit: cover; border-radius: 100%; } #nextBtn, #prevBtn { position: absolute; top: 50%; transform: translateY(-50%); color: #000; border: 2px solid #000; padding: 10px; cursor: pointer; z-index: 10; } #prevBtn { left: -50px; } #nextBtn { right: -50px; } </style> <script> document.addEventListener('DOMContentLoaded', function () { const track = document.querySelector('.carousel-track'); const cards = document.querySelectorAll('.card'); const prevBtn = document.getElementById('prevBtn'); const nextBtn = document.getElementById('nextBtn'); let currentIndex = 0; let cardWidth = cards[0].offsetWidth + 20; function updateCarousel() { const shift = currentIndex * cardWidth; track.style.transform =translateX(-${shift}px); } function moveToNext() { currentIndex++; if (currentIndex >= cards.length) { currentIndex = 0; } updateCarousel(); } function moveToPrev() { currentIndex--; if (currentIndex < 0) { currentIndex = cards.length - 1; } updateCarousel(); } nextBtn.addEventListener('click', moveToNext); prevBtn.addEventListener('click', moveToPrev); window.addEventListener('resize', () => { cardWidth = cards[0].offsetWidth + 20; updateCarousel(); }); }); </script> <?php return do_shortcode(ob_get_clean()); } add_shortcode('team_carousel', 'team_carousel_shortcode');Then add this shortcode in a code block element on your page:
[team_carousel]
Feel free to adjust the colors in the css in the code.Best regards,
MikeMay 30, 2025 at 10:57 pm #1484892In reply to: Advanced Post Types Order conflict?
This reply has been marked as private.May 30, 2025 at 8:59 pm #1484885Topic: Background image issues.
in forum Enfoldjkos
ParticipantBear with me, I am new to using background images. Having several issues.
I am using a background image in the 1/1 element on my Contact page. The image matches the horizontal px of my site. I would love for the background image to go all the way to the edge of the page on theft and right – to stretch horizontally as needed to match page.
The left & right padding for desktop is set to 0px.
The background image is set: Stretch to fit.
When I expand my page to the right the background image does not ‘stretch’ to fit, it zooms in to fit. Resulting in the top and bottom of the image to be cut off. I would rather the image distort horizontally to fit.In addition, the text box on this page seems to be in a fixed position. I would love for it to stay proportional to the background image, if possible.
Lastly, this page on my phone is not even close. lol
Help, please! :)
May 30, 2025 at 8:57 pm #1484884In reply to: Uploaded childs theme – problemS
Hi,
Go to each setting then enable it and choose “select page” so none will be selected. See this post.Best regards,
MikeMay 30, 2025 at 4:38 pm #1484876Topic: please look at this:
in forum Pre Sale QuestionsVentsislav Krastev
GuestHi,
to my #post-1484859 , please look at this:
BR
VentyMay 30, 2025 at 10:16 am #1484858Hi,
Thanks for the update. I’ve imported the top level pages for you, please let us know if you should need anything else. Note that images are not included, but I’m guessing that you will replace them with your own anyway? If not, then you can download them from the demo pages by right clicking on the image and select to save them on your local machine.
Best regards,
RikardMay 30, 2025 at 7:21 am #1484853Hello Ismael
Thank you for the help. It is working but i wonder how i can also disable the top row of icons which seems to be duplicate of icons which are already there.
Its called:
Iconfont: Entypo Fontello Enfold (Default)
and contains like 12-15 iconsMay 29, 2025 at 11:45 pm #1484839In reply to: Missing arrows in carousel
Ok, what did I do wrong? :) I couldn’t find the code that you suggested to remove and added the one that you suggested to add and nothing changed.
This is the current CSS code that I have for the the sliders:
#top .avia-slideshow-arrows.avia-slideshow-controls a {
border-radius: 25px;
font-weight: bold;
font-size: 18px;
background:#transparent;
width: 45px;
height: 30px;
}I also tried to change background from #transparent to #a6a6a6 !important but still nothing.
Thanks again!
May 29, 2025 at 8:34 pm #1484832In reply to: Uploaded childs theme – problemS
Hey extraeyes,
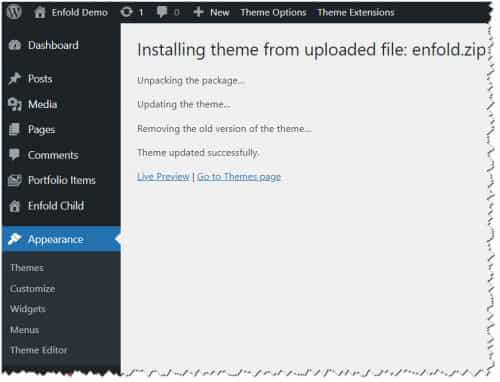
The old version 5.6.6 will not automatically update, to update your version of Enfold you will need to download the latest installable WP version from your Theme Forest account and upload it to your WordPress ▸ Appearance ▸ Themes ▸ Add Themes ▸ Add New

after you choose the zip file and click install, you will see a This theme is already installed message because you are updating, you can continue

then you will see the Theme updated successfully message.
For your other issue see this post.Best regards,
MikeMay 29, 2025 at 1:21 pm #1484823In reply to: Editor field does not exist
Hi Ismael,
thank you for your help! :) I suspected it had something to do with Ninja after reading this threat: https://kriesi.at/support/topic/theme-editor-option-under-appearance-has-disappeared-in-enfold-4-8-2/. But perhaps there is a completely different reason for this. I provide login data and a screenshot in the private field.
Kind regards,
ebenandersMay 29, 2025 at 3:28 am #1484819Topic: Colour Section doesnt go to the top of the page
in forum FAQ & Video TutorialsExperienceDNA2019
ParticipantHello, I have a transparent header, with a colour section on my page with a fulll size image set to align with the top.
The image however only goes partially behind the header, there is a black area at the top of the header.When i scroll the page you can see the image moves up.
How can i make the Colur Section start at the top of the page inline with the top of the header
May 29, 2025 at 3:24 am #1484816In reply to: Missing arrows in carousel
Hey Shari,
Thank you for the inquiry.
The arrows are there but they are barely visible because the background is transparent due to this css code.
#top .avia-slideshow-arrows.avia-slideshow-controls a {
    background: #fff0 !important;
}
You can either remove the modification or add this code in the Enfold > General Styling > Quick CSS field.
#top .avia-slideshow-arrows.avia-slideshow-controls a {
    background: #a6a6a6 !important;
}
Best regards,
IsmaelMay 28, 2025 at 10:09 am #1484767In reply to: having trouble with google maps api key
Hi,
Great, I’m glad that you found a solution. Please let us know if you should need any further help on the topic, or if we can close it.
Best regards,
RikardMay 27, 2025 at 7:28 pm #1484745In reply to: Google Tag Manager installieren
Hi,
If you have questions outside the current topic, then please open a new thread.
Best regards,
RikardMay 27, 2025 at 10:40 am #1484724Topic: Burger/Mobile menu in Widget or Footer
in forum Enfoldslikslok
ParticipantHi,
how can I use the Burger-Menu in a widget or in the footer or anywhere on the site? Is there a shortcode to implement it?
“Different menu for different pages” isn’t helpful because its site-specific.
I need a solution to show the Burger-Menu (and/or the Desktop-Menu!) within the footer and/(!)/or sidebars ((optional within a accordeon). Therefore I need a general solution I can use flexible…
Thanks
May 27, 2025 at 10:09 am #1484716Hey Elisa,
I don’t think that updating gradually would make any difference to be honest, I would suggest that you update to the latest version directly. The update to 7.1 has to be done manually from the version you are running, please refer to my replies in this thread: https://kriesi.at/support/topic/enfold-4-5-theme-update-update-failed-download-failed-a-valid-url-was-not-pro/#post-1021541
You can either update manually via FTP: https://kriesi.at/documentation/enfold/how-to-install-enfold-theme/#theme-update, or upload the theme as if it was new under Appearance->Themes->Add New Theme.
If that doesn’t work then please try to delete the whole theme folder, then replace it with the new version. Make sure that you have backups of the site before starting updating.
Also please read this after you have updated: https://kriesi.at/documentation/enfold/theme-registration/Best regards,
RikardMay 26, 2025 at 7:56 pm #1484708In reply to: Just one color on blog post on mobile
Hi,
Try this instead:@media only screen and (max-width: 767px) { .responsive #top.page-id-254 #wrap_all .slide-entry { width: 100%; margin-left: 0%; padding-bottom: 20px; } }Best regards,
MikeMay 26, 2025 at 6:47 pm #1484702In reply to: CHANGE WOO COMMERCE TYPE SIZE
Hi,
If you are not using a child theme you could use the WP Code plugin then add a new snippet, in the top right corner use the PHP snippet as the code type:
and ensure that it is activated, then add the above code and save.Best regards,
MikeMay 26, 2025 at 4:02 pm #1484695In reply to: Just one color on blog post on mobile
Hey limedrop,
Try this CSS in your Enfold Theme Options ▸ General Styling ▸ Quick CSS field:@media only screen and (max-width: 767px) { .responsive #top.page-id-254 #wrap_all .slide-entry { width: 100%; margin-left: 0%; } }Please ensure to copy the code from the forum and not an email notification so the symbols are not converted.
After applying the css, please clear your browser cache and check.Best regards,
MikeMay 26, 2025 at 3:54 pm #1484693In reply to: CHANGE WOO COMMERCE TYPE SIZE
Hey extraeyes,
To make this font-size 20px

this css works:#top #wrap_all .all_colors h2.woocommerce-loop-product__title { font-size: 20px; }but it will not remove the H2, which it sounds like this is what you want to do.
If you want this H2 to be a “p” instead, try adding this code to the end of your child theme functions.php file in Appearance ▸ Editor:function change_woocommerce_product_title_tag_in_product_slider() { ?> <script> (function($) { $(function() { function replaceElementTag(targetSelector, newTagString) { $(targetSelector).each(function(){ var newElem = $(newTagString, {html: $(this).html()}); $.each(this.attributes, function() { newElem.attr(this.name, this.value); }); $(this).replaceWith(newElem); }); } replaceElementTag('h2.woocommerce-loop-product__title', '<p></p>'); }); }(jQuery)); </script> <?php } add_action( 'wp_footer','change_woocommerce_product_title_tag_in_product_slider', 99 );Best regards,
MikeMay 26, 2025 at 2:47 pm #1484684In reply to: Show caption in iframe lightbox
Hi Ismael,
thanks for your link. This works: https://codepen.io/dimsemenov/pen/kXGxJv
But: The arrows ar missing again. We are one big step further and have JPG and MP4 with captions and opening in lightboxes. How can I have them grouped with arrows to go from one to the next?
  <div class="isotope">
    <a class="test" title="Test title1" href="xxx.mp4?iframe=true">Vid1</a>
    <a class="test" title="Test title2" href="xxx.mp4?iframe=true">Vid2</a>
    <a class="test" title="Test title3" href="xxx.jpg?iframe=true">Img1</a>
  </div>
Script:
(function($){
$(document).ready(function() {
$('.test').magnificPopup({
  type: 'iframe',

  iframe: {
     markup: '<div class="mfp-iframe-scaler">'+
                '<div class="mfp-close"></div>'+
                '<iframe class="mfp-iframe" frameborder="0" allowfullscreen></iframe>'+
                '<div class="mfp-title">Some caption</div>'+
              '</div>'
  },
  callbacks: {
    markupParse: function(template, values, item) {
     values.title = item.el.attr('title');
    }
  }

});
});
})(jQuery);
Do you have an idea how to merge the lightboxes as you have done with your script before?
Kind regards,
DanielMay 26, 2025 at 11:58 am #1484675In reply to: Fold/Unfold doesn’t work in child theme
Hi ENFOLD Support-Team,
it took some time to get a Testserver but now it’s done and I would ask you again to check our website and tell me, where we made a mistake. I’ll repeat again the Problem:
The fold/unfold function does not work in our Enfold-template. It is displayed as a preview during creation, but not on the page. No initial text is shown and clicking “Weiterlesen” does not open the text but jumps to the top of the page.
You can see this on the Frontpage of our DIZI-Intranet in the middle of the page. There are 3 columns with an image and the Link “Weiterlesen”. Instead of just the Link there should be some Text. You can see this in the backend.I also have one or two more questions which I will post each in its own thread.
Thanks in advance and greetings from Hannover, Germany
Ruth
May 25, 2025 at 10:03 pm #1484661In reply to: Fixed Header /// mobile
Hey Sven,
The fixed header on mobile devices has never been an option because the Dev Team has always felt that it takes too much space on mobile devices, over the years the only option was to add some custom css to achieve this.
To have a fixed header on your site and have a small header so it doesn’t take up as much space you can try this css, I specifically created it for your site and it works in my tests.@media only screen and (max-width: 989px) { .responsive #top #wrap_all #header_main .container.av-logo-container { height: 40px !important; line-height: 40px; } #header_meta .container { min-height: 12px; } #header_meta .phone-info { line-height: 12px; padding: 0; } #header_meta { min-height: 12px; } #header_main { height: 40px; line-height: 40px; } .responsive #top #header_main>.container .main_menu .av-main-nav>li>a, .responsive #top #wrap_all .main_menu { height: 40px; line-height: 40px; } .responsive .logo img, .responsive .logo svg { max-height: 40px; padding: 0; } .responsive #top .logo, .responsive #top .logo a { height: 40px !important; } .avia-section-huge .content, .avia-section-huge .sidebar { padding-top: 50px; padding-bottom: 50px; } .responsive.html_mobile_menu_tablet #top #header_main>.container .main_menu .av-main-nav>li>a, .responsive.html_mobile_menu_tablet #top #wrap_all .av-logo-container { height: 40px; line-height: 40px; } .responsive #top #wrap_all #header { position: fixed !important; } .responsive.html_mobile_menu_tablet.html_header_top #top #main { padding-top: 60px !important; } }Please ensure to copy the code from the forum and not an email notification so the symbols are not converted.
After applying the css, please clear your browser cache and check.
If you have any trouble disable your WP Rocket plugin and the Enfold Theme Options ▸ Performance ▸ JS & CSS file merging and compression and enable Enfold Theme Options ▸ Performance ▸ Delete old CSS and JS files. then check again.
Feel free to adjust to suit.
I also notice that your revolution slider doesn’t show on page load, only after the page is scrolled or clicked, this is due to your WP Rocket plugin lazy load, you should add an exclusion for the slider or disable the WP Rocket lazy load option.Best regards,
Mike -
AuthorSearch Results
-
Search Results
-
Topic: Logo overlay top bar menu
👉 I would like to adjust the position of the logo as in website’s logo below
https://globalhealth.duke.edu/👉 Replace the “-” in the mobile submenu with a “.”
Topic: Background image issues.
Bear with me, I am new to using background images. Having several issues.
I am using a background image in the 1/1 element on my Contact page. The image matches the horizontal px of my site. I would love for the background image to go all the way to the edge of the page on theft and right – to stretch horizontally as needed to match page.
The left & right padding for desktop is set to 0px.
The background image is set: Stretch to fit.
When I expand my page to the right the background image does not ‘stretch’ to fit, it zooms in to fit. Resulting in the top and bottom of the image to be cut off. I would rather the image distort horizontally to fit.In addition, the text box on this page seems to be in a fixed position. I would love for it to stay proportional to the background image, if possible.
Lastly, this page on my phone is not even close. lol
Help, please! :)
Topic: please look at this:
Hi,
to my #post-1484859 , please look at this:
BR
VentyHello, I have a transparent header, with a colour section on my page with a fulll size image set to align with the top.
The image however only goes partially behind the header, there is a black area at the top of the header.When i scroll the page you can see the image moves up.
How can i make the Colur Section start at the top of the page inline with the top of the header
Hi,
how can I use the Burger-Menu in a widget or in the footer or anywhere on the site? Is there a shortcode to implement it?
“Different menu for different pages” isn’t helpful because its site-specific.
I need a solution to show the Burger-Menu (and/or the Desktop-Menu!) within the footer and/(!)/or sidebars ((optional within a accordeon). Therefore I need a general solution I can use flexible…
Thanks