Viewing 30 results - 241 through 270 (of 16,888 total)
  • Author
    Search Results
  • #1486504

    In reply to: Favicon Not Appearing

    if you follow that little link on enfold options:
    (these two cards icon)

    you will see on that wiki page a good overview; and in detail a browser support. Best Format seems to be png.
    a svg has a bad support.

    you can manually add them if you put this to your child-theme functions.php:

    function add_icons_to_head(){
    ?>
      <link rel="icon" type="image/png" href="/wp-content/uploads/icons/your-favicon-image.png">
      <link rel="apple-touch-icon" type="image/png" href="/wp-content/uploads/icons/your-apple-touch-icon.png">
    <?php
    }
    add_action('wp_head', 'add_icons_to_head');

    You are free to select the names and paths of your PNGs.

    Hey ThiloKiefer,

    Thank you for the inquiry.

    The very first Color Section on the page should use a <main> element by default. You can change the tag of the #main <div> element to <main>, but this could potentially conflict with the container used by the first Color Section. If you would like to proceed, you can edit the enfold/header.php file, around line 279.

    
    <div id='main' class='all_colors' data-scroll-offset='<?php echo avia_header_setting( 'header_scroll_offset' ); ?>'>
    

    Best regards,
    Ismael

    #1486421

    In reply to: Update from 2.4.1

    Hey jmbernstein,
    Assuming that there are no customizations in the functions.php of the parent theme and you are not using a Child Theme, but your WordPress is up to date you can follow these steps:
    To update your version of Enfold you will need to download the latest installable WP version from your Theme Forest account and upload it to your WordPress ▸ Appearance ▸ Themes ▸ Add Themes ▸ Add New
    WordPress_Appearance_Themes_Add-Themes_Add-New.jpg
    after you choose the zip file and click install, you will see a This theme is already installed message because you are updating, you can continue.
    Installing_theme_from_uploaded_file_This_theme_is_already_installed.jpg
    then you will see the Theme updated successfully message.
    Theme_updated_successfully.jpg
    While I don’t expect any issues with updating the theme, I recommend testing on a staging site first to ensure that it works well.

    Best regards,
    Mike

    #1486411
    zimbo
    Participant

    I use the WP SMTP Mail plugin.

    Enfold is generating regular errors from the plugin. Here’s the error report:
    Debug Event Details
    Type
    Error
    Date
    July 7, 2025 at 2:06 pm
    Content
    Mailer: Other SMTP
    SMTP Error: data not accepted.SMTP server error: DATA END command failed Detail: Spam message rejected
    SMTP code: 554 Additional SMTP info: 5.7.1
    Source
    Enfold
    /home/storage/322/4077322/user/htdocs/wp-content/themes/enfold/framework/php/class-form-generator.php (line: 1485)

    I just found out the errors actually started in April 2024 but as I use the free version of the plugin I don’t get notified via email when an error occurs so I’d only notice it if I logged in to the WP admin panel and there had been a recent error (as I did today). Unfortunately when there is a successful send of an email the plugin clears the error flag from the admin bar which is why I only discovered this today.

    The errors are generated at random intervals. There have been one a day for the past 3 days, prior to that it was June 30, two on June 28, two on June 26, June 25, June 24, June 22, June 3, May 31 etc.

    Any ideas?

    WordPress 6.8.1, Enfold 7.1.1

    #1486384

    Hey idemadv,

    Thank you for the inquiry.

    This can be adjusted, but you’ll need to modify the file at themes/enfold/config-templatebuilder/avia-shortcodes/section/section.php. Look for the code around line 1883 and replace main with div or section.

    if( ! empty( $main_container ) )
    				{
    					$markup = 'main ' . avia_markup_helper( array( 'context' => 'content', 'echo' => false, 'custom_markup' => $custom_markup ) );
    					$avia_section_markup = 'main';
    				}
    

    Another option is to create a custom script that dynamically switches the main wrapper to another element or tag.

    https://stackoverflow.com/questions/918792/use-jquery-to-change-an-html-tag/20469901#20469901

    Best regards,
    Ismael

    Hi,
    Try adding this code to the end of your child theme functions.php file instead in Appearance ▸ Editor:

    function my_datepicker_limits() {
        ?>
        <script type="text/javascript">
        jQuery(document).ready(function($){
    
            setTimeout(function() {
                var $dateField = $('.avia_datepicker');
    
                if ($dateField.length && $dateField.data('datepicker')) {
                    var today = new Date();
                    var startDate = new Date(2025, 7, 8);  // August 8, 2025
                    var endDate   = new Date(2025, 7, 18); // August 18, 2025
    
                    // Use the later of today or startDate
                    var effectiveMinDate = today > startDate ? today : startDate;
    
                    $dateField.datepicker('option', {
                        minDate: effectiveMinDate,
                        maxDate: endDate
                    });
                } else {
                    console.warn("Datepicker not initialized or selector not found.");
                }
            }, 500);
    
        });
        </script>
        <?php
    }
    add_action('wp_footer', 'my_datepicker_limits', 30);
    

    Not both at the same time.
    Please ensure to copy the code from the forum and not an email notification so the symbols are not converted.

    Best regards,
    Mike

    mdx11
    Participant

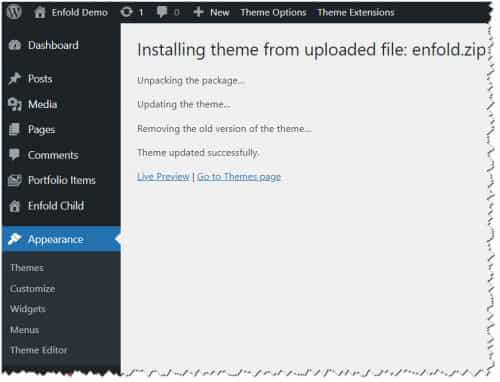
    Nach dem Update von Enfold erscheint folgender PHP-Fehler im Frontend und/oder Backend und nach Aktivierung von WP Rocket kam es zu einem Error 500.
    Nach einer Analyse mit Hilfe v. ChatGPT (sorry, hab nur eingeschränkte php-Kenntnisse) kam die KI zu diesem Schluss:

    Warning: Trying to access array offset on value of type null in /wp-content/themes/enfold/config-templatebuilder/avia-shortcodes/helper-templates/function-set-avia-frontend.php on line [XY]

    Ursache:
    In der Funktion avia_get_option() wird folgender Code ausgeführt:

    $pages[] = 'avia';
    $pages = array_unique( array_merge( $pages, array_keys( $avia->options ) ) );

    Wenn $avia->options nicht gesetzt oder null ist, erzeugt array_keys( $avia->options ) eine PHP-Warning.

    Lösungsvorschlag:
    Absicherung der Zeile, z.B. so:

    $pages[] = 'avia';
    if ( isset( $avia->options ) && is_array( $avia->options ) ) {
        $pages = array_unique( array_merge( $pages, array_keys( $avia->options ) ) );
    }

    So wird der Fehler zuverlässig vermieden, auch wenn $avia->options noch nicht initialisiert wurde.

    System:
    Enfold Version: 7.1.1
    WP Rocket:
    PHP Version: 8.2.28
    Hosting: Hetzner

    Um den Error 500 und die auftretenden PHP-Warnungen in Verbindung mit Enfold zu identifizieren, haben wir folgende Schritte unternommen:
    1. WP_DEBUG aktiviert: Fehlerausgabe und Logging wurden aktiviert, um detaillierte Fehlermeldungen zu erhalten.
    2. PHP-Log geprüft: Im Error-Log wurde die Warnung „Trying to access array offset on value of type null“ in der Datei function-set-avia-frontend.php gefunden.
    3. Object Cache geprüft: Im Hetzner-Webhosting wurde überprüft, ob Redis oder Memcached aktiv sind. Redis war aktiviert, wurde aber testweise deaktiviert. Das Problem bestand weiterhin.
    4. Theme-Tests: Das Enfold-Theme und das Enfold-Child-Theme wurden einzeln getestet. Der Error 500 blieb bestehen, unabhängig vom Theme.
    5. Kritische Theme-Datei überprüft: Die Datei function-set-avia-frontend.php wurde gezielt untersucht und der problematische Quellcode identifiziert.
    6. Optionen im Backend geprüft: Es wurde geprüft, ob veraltete oder ungültige Optionen (z. B. durch Caching) eine Rolle spielen könnten.

    Diese gezielten Analysen führten letztlich zur Identifikation des fehlerhaften Codes in der Theme-Funktion.

    By the way, if you have two date pickers, one for the start date and one for the end date, you can restrict the second date picker so that it only allows dates that are later. For example, we can also remove weekends from the selection.

    here in my example the minDate/maxDate are relative Values by +7 Days and +12 Month:

    
    function my_datepicker_limits() {
    ?>
    <script type="text/javascript">
    window.addEventListener("DOMContentLoaded", function () { 
    (function($) { 
        setTimeout(function() {
            var $allDatepickers = $('.avia_datepicker');
    
            // Let's assume that the first avia_datepicker found is the start date
            var $startDateField = $allDatepickers.eq(0);
            // and the second avia_datepicker found the end date
            var $endDateField = $allDatepickers.eq(1);
    
            // Check whether we have found at least two datepicker fields
            if ($startDateField.length === 0 || $endDateField.length === 0) {
                console.warn('Could not find both Start and End datepicker fields. Ensure they are the first two .avia_datepicker elements.');
                return; // Exit script if not enough fields are found
            }
    
            // Find the container of the end date field (the <p> element in your structure)
            // This is the parent tag of the input field that also contains the label.
            var $endDateFieldContainer = $endDateField.parent('p.form_element');
    
            // Fallback if the container is not the <p> tag or is not found
            if (!$endDateFieldContainer.length) {
                $endDateFieldContainer = $endDateField; // Then we only hide the input field itself
            }
    
            function updateEndDatepickerState() {
                var selectedStartDate = $startDateField.datepicker('getDate');
                
    
                if (selectedStartDate) {
                    // Optional: Add one day to ensure that the end date is at least one day after the start date.
                    // then remove the backslashes of the next line
                    // selectedStartDate.setDate(selectedStartDate.getDate() + 1);
                  
                    // If a start date is selected, display the end date field
                    $endDateFieldContainer.css('display', 'block'); // Verwendet 'block', da <p> ein Block-Element ist
    
                    $endDateField.datepicker('option', 'minDate', selectedStartDate);
    
                    // Optional: Make sure that the end date is not before the start date.
                    var currentEndDate = $endDateField.datepicker('getDate');
                    if (currentEndDate && currentEndDate < selectedStartDate) {
                        $endDateField.datepicker('setDate', selectedStartDate);
                    }
    
                } else {
                    // If no start date is selected, hide the end date field
                    $endDateFieldContainer.css('display', 'none');
    
                    // Reset minDate of the end date date picker (e.g. to “today”)
                    $endDateField.datepicker('option', 'minDate', 0);
                }
            }
    
            if ($startDateField.data('datepicker')) {
                $startDateField.datepicker('option', {
                    beforeShowDay: $.datepicker.noWeekends,
                    minDate: "+7d", 
                    maxDate: "+12m",
                    onSelect: function(dateText, inst) {
                        // Update the state when a date is selected
                        updateEndDatepickerState();
                    },
                    onClose: function(dateText, inst) {
                        // Update the state even when closing the data picker (for robustness)
                        updateEndDatepickerState();
                    }
                });
            }
    
            if ($endDateField.data('datepicker')) {
                $endDateField.datepicker('option', {
                    // beforeShowDay: $.datepicker.noWeekends,
                    minDate: 0,
                    maxDate: "+12m"
                });
            }
    
            // Execute the function once when loading the page to set the initial state
            updateEndDatepickerState();
    
        }, 500);
    }(jQuery));
    });
    </script>
    <?php
    }
    add_action('wp_footer', 'my_datepicker_limits', 20);
    

    see: https://webers-testseite.de/datepicker/

    Edit here – because topic is closed:

    This was also only intended as additional information. It is in case someone lands here via the search. They may have exactly this request.

    Hey shop802,
    Try adding this code instead to the end of your child theme functions.php file in Appearance ▸ Editor:

    function my_datepicker_limits() {
        ?>
        <script type="text/javascript">
        jQuery(document).ready(function($){
    
            // Use a short delay to wait for Enfold to initialize the datepicker
            setTimeout(function() {
                var $dateField = $('.avia_datepicker'); // Adjust this if needed
    
                if ($dateField.length && $dateField.data('datepicker')) {
                    $dateField.datepicker('option', {
                        minDate: new Date(2025, 7, 8),  // August 8, 2025
                        maxDate: new Date(2025, 7, 18)  // August 18, 2025
                    });
                } else {
                    console.warn("Datepicker not initialized or selector not found.");
                }
            }, 500); // delay to allow Enfold scripts to finish
    
        });
        </script>
        <?php
    }
    add_action('wp_footer', 'my_datepicker_limits', 30);
    

    Screen Shot 2025 07 04 at 5.35.07 PM

    Best regards,
    Mike

    ORC
    Participant

    Hallo folgendes Problem.
    Ich will auf meiner Reservierungsseite einfach das Datum einschränken in der Form tt.mm.jjjj
    Z.B. nur von 08.08.2025 – 18.05.2025

    Was hab ich alles getan.
    1. Supportseiten durchforstet
    2. Child Theme angelegt
    3. In functions.php folgendes eingetragen:

    /* Datum Platzhalter auf tt.mm.jjjj Format gesetzt */
    add_filter(‘avf_datepicker_date_placeholder’, ‘new_date_placeholder’);
    function new_date_placeholder() {
    $placeholder = “TT.MM.JJJJ”;
    return $placeholder;
    }

    /* Datum Platzhalter auf tt.mm.jjjj Format gesetzt */
    add_filter(‘avf_datepicker_dateformat’, ‘avf_change_datepicker_format’);
    function avf_change_datepicker_format($date_format) {
    $date_format = ‘dd.mm.yy’;
    return $date_format;
    }

    => Format auf tt.mm.jjjj gesetzt, sowohl Platzhalter als auch bei der Übernahme.

    4. Verschiedene Versuche das Datum via jQuery.datepicker zu ändern.
    (DANK an Guenni007)
    z.B. durch

    function my_datepicker_defaults() {
    ?>
    <script type=”text/javascript”>
    jQuery(document).ready(function(){
    jQuery.datepicker.setDefaults({
    minDate: 0,
    maxDate: ‘1m’ )
    });
    });
    </script>
    <?php
    }
    add_action(‘wp_footer’, ‘my_datepicker_defaults’, 20);

    Hier sollte von heute auf 1 Monat eingeschränkt werden.
    Leider keine Reaktion. Nicht durch private Mode, anderen Browser und Browserdaten löschen.

    Liebe Leute, alle Versuche via den Supportseiten eine funktionierende Lösung zu finden sind gescheitert.

    Jetzt bitte erneut:

    Wie schränke ich im Reservierungsformular am Datumsfeld den auszuwählenden Zeitraum ein?
    Also nur Bereich zwischen 08.08.2025 – 18.08.20205 wählbar.

    Vielen Dank.

    #1486318

    Hi,
    I don’t think that the theme option in our documentation is what you want. The theme option displays the author image (with a link to the author page) beside the feature image of the post.
    Screen Shot 2025 07 04 at 7.16.35 AM
    But only if you choose Enfold > Blog Layout > Single post Option > Single post style > Multi Author Blog.
    If you read the documentation carefully it says to add a author box you need to add PHP & CSS:
    Screen Shot 2025 07 04 at 7.29.43 AM
    In my test this works:
    Screen Shot 2025 07 04 at 7.32.00 AM
    But you need to add the link manually in the profile:
    Screen Shot 2025 07 04 at 7.33.46 AM
    I thought the thread that I posted to above covered this with a different PHP solution, you would not want to use both at the same time.

    Best regards,
    Mike

    #1486305

    In reply to: Logo as SVG

    Hi! In my testing I deactivated the code and as I already mentioned the path versions are loaded correctly if the code is inactive. White an all screen sizes.

    With the active code in functions.php there is only the white one on large screens (the one defined for transpareny mode) and the blue one (normal logo) on screen sizes below 990px. Activated the code and you can see the behaviour online.

    Maybe you can check CSS because what’s interesting: I don’t have the lines mentioned from Guenni007 in my layout.css. See our posts above.

    Thanks in advance!

    Kind regards,
    Daniel

    #1486189

    Hi Mike,
    i was hoping there is an easy way just to make the columns inside the section move down instead go moving up during the parallax move.

    Did I overlook a simple way to do it?
    Your discussion with another member is for me too much tech talk :-)


    @guenni007
    : thx for your efforts , but -30% does not change the direction at my end, just the speed (as the enfold hints tell). And advanced coding via functions.php is not my business …
    .

    WPDESIGNER
    Participant

    Hello Enfold Support Team,

    I am trying to change the default cropped size of my featured images on single blog posts to a proper 16:9 aspect ratio, so that my 1280x720px images are displayed in full without any cropping.

    I have tried two different PHP-based methods based on my research, but neither has worked on my local server environment (so caching should not be the issue).

    Method 1: Modifying Existing Sizes

    First, I tried to modify the existing theme sizes using the avf_modify_thumb_size filter. This was the code I used in my child theme’s functions.php (respectively in a Code Snippet Plugin):

    function enfold_definitive_image_ratio_fix( $size_array ) {
        $size_array['entry_without_sidebar'] = array('width' => 1210, 'height' => 681);
        $size_array['entry_with_sidebar'] = array('width' => 845, 'height' => 475);
        return $size_array;
    }
    add_filter( 'avf_modify_thumb_size', 'enfold_definitive_image_ratio_fix', 10, 1 );

    When this code is active, the “Regenerate Thumbnails” page still shows the old default dimensions (e.g., 1210×423), so the filter does not seem to be applying correctly.

    Method 2: Registering a New Size and Forcing its Use

    As an alternative, I also tried registering a brand new 16:9 image size (custom-16-9-hero) and then used the avf_post_featured_image_size filter to force the theme to use it. Here is the code for that attempt:

    function enfold_add_custom_image_sizes() {
        add_image_size( 'custom-16-9-hero', 1280, 720, true );
    }
    add_action( 'after_setup_theme', 'enfold_add_custom_image_sizes' );
    
    function enfold_use_custom_featured_image_size( $size ) {
        if ( is_singular('post') ) {
            return 'custom-16-9-hero';
        }
        return $size;
    }
    add_filter( 'avf_post_featured_image_size', 'enfold_use_custom_featured_image_size', 10, 1 );

    With this method, the “Regenerate Thumbnails” plugin does show my new custom-16-9-hero – 1280 x 720 size and creates the files correctly after regenerating. However, the theme’s single post template still ignores the filter and continues to display the old default cropped image.

    My question is:

    In the latest version of Enfold, what is the definitive and correct method to ensure the featured image on a single post page is displayed at a custom 16:9 ratio?

    Thank you very much for your help.

    Kind regards,
    David

    #1486105

    Hi,
    Thanks for your help Guenni007, but in my test it seems that only targeting the ID “#av_section_1” didn’t help, I tried adjusting to const container = document.querySelector('#av_section_1 .av-parallax-object'); to target the text in the parallax but as you pointed out it was jerky for the speed needed.
    With trial and error and AI I found that this javascript & css works well for desktop & mobile and smooths out most all the jerk from the text and background image.
    Try adding this code to the end of your child theme functions.php file in Appearance ▸ Editor:

    function move_text_in_parallax_down_on_scroll() { ?>
      <script>
      document.addEventListener("DOMContentLoaded", function () {
      const el = document.querySelector("#av_section_1 .av-parallax-object");
      const bg = document.querySelector("#av_section_1 .av-parallax");
    
      if (!el || !bg) return;
    
      const isMobile = window.innerWidth < 768;
    
      const textSpeed = isMobile ? 0.9 : 0.7;
      const bgSpeed = isMobile ? 0.3 : 0.2;
    
      let currentYText = 0;
      let currentYBg = 0;
    
      const updateParallax = () => {
        const scrollY = window.scrollY || window.pageYOffset;
    
        // Text transform
        const targetYText = scrollY * textSpeed;
        currentYText += (targetYText - currentYText) * 0.05;
        el.style.transform = translateY(${currentYText}px);
    
        // Background transform
        const targetYBg = scrollY * bgSpeed;
        currentYBg += (targetYBg - currentYBg) * 0.05;
        bg.style.transform = translateY(${currentYBg}px); // GPU accelerated
    
        requestAnimationFrame(updateParallax);
      };
    
      requestAnimationFrame(updateParallax);
    });
      </script>
      <style>
      #av_section_1 .av-parallax-object {
      position: relative;
      top: 0;
      left: 0;
      will-change: transform;
      backface-visibility: hidden;
      transform: translateZ(0);
    }
    #av_section_1 {
      position: relative;
      overflow: hidden;
    }
    #av_section_1 .av-parallax {
      background-attachment: scroll !important; /* disables fixed scroll handling */
      background-position: center center !important;
      transform: none !important;
      will-change: auto !important;
    }  
      </style>
      <?php
    }
    add_action( 'wp_footer', 'move_text_in_parallax_down_on_scroll', 99 );

    If you are not using a child theme you could use the WP Code plugin then add a new snippet, in the top right corner use the PHP snippet as the code type:
    use wpcode php snippet and activate
    and ensure that it is activated, then add the above code and save.

    Best regards,
    Mike

    #1486042

    In reply to: lightbox issues

    the code snippet will work on your page for all images. Even on that graphics page.
    But if you create these images in a different way – and i see some Enfold Lightbox on paintings page we had to find then a different solution.
    But if you use the same way like on mixed media and graphics page – the code will work there too.

    But as mentioned – it would be nice to have a fallback for the bottom-bar title on lightbox. my advise – and not only for seo purpose – give an alt tag to your images via media library.

    and use that snippet with fallback alt -tag as title inside bottom-bar:

    Edit
    this checks if original image is present and if widget-text or alt is present :

    function mixed_media_lightbox() {
    ?>
    <script type="text/javascript">
    window.addEventListener("DOMContentLoaded", function () { 
    (function($){
        $('.widget_media_image').magnificPopup({
          delegate: 'img',
          type: 'image',
          removalDelay: 500,  // to allow animated closing in ms
          mainClass: 'avia-popup mfp-zoom-in mfp-image-loaded mixed-media',  
          midClick: true,
          gallery: { 
            enabled:true,
            preload: [1, 1] ,
          },
          image: {
            titleSrc: false,
            markup: '<div class="mfp-figure">'+
                      '<div class="mfp-close"></div>'+
                      '<div class="mfp-img"></div>'+
                        '<div class="mfp-bottom-bar">'+
                          '<div class="mfp-title"></div>'+
                      //  '<div class="mfp-counter"></div>'+
                        '</div>'+
                    '</div>',
            },  
            callbacks: {
              elementParse: function(item) {
                var originalSrc = item.el.attr('src');
                var fullSizeSrc = originalSrc.replace(/-\d+x\d+\./, '.');
    
                // Create a temporary image object to check whether the full resolution exists
                var img = new Image();
                img.onload = function() {
                  item.src = fullSizeSrc;
                };
                img.onerror = function() {
                  item.src = originalSrc;
                };
                img.src = fullSizeSrc;
                item.src = originalSrc;
              },
    
              markupParse: function (template, values, item) {
                var title = ''; // Initialize title as an empty string. This is our default fallback.
    
                // 1. Highest Priority: Check for content from a nearby .widget_text element
                var textWidget = item.el.closest('.panel-grid-cell').find('.widget_text');
                if (textWidget.length && textWidget.html().trim() !== '') {
                  title = textWidget.html();
                } else {
                  // 2. Second Priority: If no text widget, check the image's alt attribute
                  var altAttribute = item.el.attr('alt');
                  if (altAttribute && altAttribute.trim() !== '') { // Checks if exists AND has non-empty content
                    title = altAttribute;
                  } else {
                    // 3. Third Priority: If no alt, check the image's title attribute
                    var titleAttribute = item.el.attr('title');
                    if (titleAttribute && titleAttribute.trim() !== '') { // Checks if exists AND has non-empty content
                      title = titleAttribute;
                    }
                  }
                }
    
                // Finally, assign the title to values.title, wrapping it in <h3> ONLY if there's content
                if (title) {
                  values.title = '<h3 class="heading">' + title + '</h3>';
                } else {
                  values.title = ''; // If no title was found at all, ensure nothing is displayed
                }
              },
            },
        });
    })(jQuery);
    });
    </script>
    <?php
    }
    add_action('wp_footer', 'mixed_media_lightbox', 9999);

    And

    #top .mixed-media .mfp-image-holder .mfp-content {
      max-width: 1200px; 
      box-sizing: border-box; 
      padding-bottom: 90px; 
      vertical-align: middle; 
    }
    
    #top .mixed-media .mfp-bottom-bar {
      margin-top: -36px;
      position: absolute;
      top: 100%;
      left: 0;
      width: 100%;
      cursor: auto;
      background-color: rgba(0,0,0,0.3);
      backdrop-filter: blur(4px);
      padding: 5px 10px;
    }
    
    #top .mixed-media .mfp-bottom-bar .mfp-counter {
      right: 5px
    }
    
    #top .mixed-media .mfp-content img.mfp-img {
      width: auto;
      max-width: 100%;
      max-height: 90vh !important;
      height: auto;
      display: block;
      line-height: 0;
      box-sizing: border-box;
      padding: 40px 0 40px;
      margin: 0 auto;
    }
    
    #top .mixed-media .mfp-content .mfp-title .heading * {
      font-weight: 400 !important;
    }
    
    #top .mixed-media .mfp-content .mfp-title .heading p {
      margin: 0.3em 0;
    }
    
    #top .widget_media_image img {
      cursor: pointer;
    }
    #1485960

    Thank you@Guenni007! That is great information. Yesterday was the first time I had seen the site, as I am just helping one of my good friends who sent me an SOS message his site was broken. I have never used the Enfold theme before, but great advice to upgrade it, as it is on the latest version of PHP. Again, much thanks for your help!

    Hi Rikard,

    like I said in my initial post:
    – the problem is with BOTH 7.1.1 and 6.x
    – we use the included LS version ( bundled LS version numbers were mentioned in the post, ( Enfold 6.x / LS 7.12.4 , and Enfold 7.1.1 / LS 7.14.4 )

    Also, on both sites we are on the latest php 7.4 version, matching the requirements of WP, enfold and LS.
    Regards Ulrich

    #1485929

    Hey keep12,

    Thank you for the inquiry.

    Yes, you can override the includes > loop-index.php file in the child theme folder. Create a folder named includes, then place the loop-index.php file inside it. You can then add the author markup within the file.

    This thread should help with the author markup: https://stackoverflow.com/questions/20467008/how-to-add-author-image-and-description-wordpress

    Best regards,
    Ismael

    Hi,

    Thank you for the update.

    The post_type attribute can be adjusted using the Select Post Type option, but when we re-enabled it using the add_avia_builder_post_type_option in the functions.php file, the post type “hotels-resorts” was not found. This could be due to a missing parameter when the “hotels-resorts” post type was registered or created.

    add_theme_support('add_avia_builder_post_type_option');
    

    You may need to set this attribute manually by editing the element shortcodes directly in the debug mode field. Please check the link below:

    https://kriesi.at/documentation/enfold/intro-to-layout-builder/#debug-mode

    Once debug mode is enabled, a shortcode field will appear below the Advanced Layout Builder where you can manually set the post_type attribute in av_blog shortcodes.

    This is the Select Post Type option:

    View post on imgur.com

    Another thing that you could try is to select all post types or items in the Select Post Type list.

    Best regards,
    Ismael

    #1485899
    Katie Pritchard
    Guest

    Hi there,

    I’m in the process of taking over a customer’s website that was previously managed by another provider. The site is using the Enfold theme, currently running on PHP 7.3. I’m having trouble backing up and restoring it on my server, which is running a newer PHP version.

    I also downloaded the theme files from the existing site, but they’re not working correctly on my setup—likely due to outdated compatibility.

    Would it be possible to purchase the latest version of the Enfold theme directly from you? If so, would the child theme from the original site still work once installed with the updated parent theme on my server?

    Many thanks in advance for your help!

    #1485898
    ArjanDenHaag
    Participant

    Hello,
    I have created a webshop in Enfold and it’s online for some weeks now. Suddenly, when I now want to change a page, the Enfold builder keeps loading and loading. I do have an error:
    [Wed Jun 25 17:15:24.316261 2025] [error] [pid 2241641] mod_proxy_fcgi.c(911): [client 80.69.66.83:0] AH01071: Got error ‘PHP message: PHP Warning: session_start(): open(/data/sites/web/plantenbloemenshopnl/tmp/sess_19d3d7d790334ec4a47fef4459fab6f9, O_RDWR) failed: File too large (27) in /data/sites/web/plantenbloemenshopnl/www/wp-content/themes/enfold/config-templatebuilder/avia-shortcodes/masonry_entries/masonry_entries.php on line 112; PHP message: PHP Warning: session_start(): Failed to read session data: files (path: /data/sites/web/plantenbloemenshopnl/tmp) in /data/sites/web/plantenbloemenshopnl/www/wp-content/themes/enfold/config-templatebuilder/avia-shortcodes/masonry_entries/masonry_entries.php on line 112’

    What could be wrong and what is the solution? Kindly need your support. I did have contact with the web hosting and I cannot change settings like WP_Memory_Limit.

    Looking forward for your reply,
    With kind regards,
    Arjan

    onlineprodcontent
    Participant

    So I have Enfold 6.x / LS 7.12.4 on our live site, and Enfold 7.1.1 / LS 7.14.4 on a staging clone.

    On both sites, I can open the wp-admin/admin.php?page=layerslider main admin page. But I can not edit a single LayerSlider slide any more. We rarely do this, so I don’t know when it stopped working.

    When loading a slider for editing, the blue loading layer of LayerSlider just stays on top forever. No JS Console messages, and even with WP DEBUG enabled, no serverside errors or messages.
    On the LayerSlider Admin page, an update of LS is announced, this is of course not yet included in Enfold. Would that solve the problem? What else could resolve this problem?
    Regards
    Ulrich

    #1485870

    Hey Darren Dittrich,

    Thank you for the inquiry.

    And one more: is this v4.0 Enfold compatible with the latest WP 6.8.1 and PHP7.4?

    The latest version of the theme is 7.1.1, so the version currently installed is a bit outdated. You may need to download the latest version from your ThemeForest account and update the theme manually via FTP.

    https://kriesi.at/documentation/enfold/theme-update/#update-via-ftp

    It would also be good if we could register a support account, and possibly have this purchase tranferred to (Email address hidden if logged out) since the person who bought this plugin is no longer associated with this site.

    Unfortunately, we don’t handle any sales-related inquiries in the forum. You will need to forward this issue to the ThemeForest team.

    Let us know if you need more info.

    Best regards,
    Ismael

    #1485860
    Darren Dittrich
    Guest

    Hi, thanks for your help many years ago (see my email support from (Email address hidden if logged out) )!
    We’ve updated this old client to v4.0 of Enfold, which has helped with PHP errors. But we’re still getting this error on every Save or Save Settings button:

    [Back Popup] : Saving didnt work!
    Please reload the page and try again

    It would also be good if we could register a support account, and possibly have this purchase tranferred to (Email address hidden if logged out) since the person who bought this plugin is no longer associated with this site.

    And one more: is this v4.0 Enfold compatible with the latest WP 6.8.1 and PHP7.4? We’d like to move this to a more modern hosting platform. Thanks!

    #1485810

    In reply to: MySql version

    I am doing some tests in clean versions of wordpress,last version.
    On this server, in the main root, it is installed regularly:
    Architettura del server Linux 3.10.0-1160.119.1.el7.x86_64 x86_64
    Server web Apache
    Versione di PHP 8.2.24 (supporta valori a 64bit)
    PHP SAPI fpm-fcgi
    Variabile PHP max input 10000
    Limite di tempo PHP 300
    Limite di memoria PHP 256M
    Max input time 240
    Dimensione massima di upload dei file 256M
    Dimensione massima del post PHP 256M
    Estensione del database mysqli
    Versione del server 10.6.19-MariaDB-log
    Versione del client mysqlnd 8.2.24
    ////////////
    On this server where I need the installation, in a subfolder of the root, it doesn’t give me any error message, it stays loading but doesn’t install:
    Architettura del server Linux 5.15.0-124-generic x86_64
    Server web Apache
    Versione di PHP 8.2.28 (supporta valori a 64bit)
    PHP SAPI fpm-fcgi
    Variabile PHP max input 10000
    Limite di tempo PHP 900
    Limite di memoria PHP 1024M
    Max input time 300
    Dimensione massima di upload dei file 1024M
    Dimensione massima del post PHP 512M
    Estensione del database mysqli
    Versione del server 8.0.41-32
    Versione del client mysqlnd 8.2.28

    #1485751

    Hey Ernst Grubbauer,
    Thank you for the login, please note that your version 4.1.2 is not compatible with PHP 8+, and it can not be updated in the theme, due to how Envato (Theme Forest) changed from a API key to a Token. Unfortunately this occurs when a old “developer” buys the theme in their Envato account and doesn’t create an account for the customer. Envato will not transfer the license nor issue a new license.
    Due to our exclusive contract with Envato we can not issue licenses.
    Your customer should create an account with Envato and purchase a new license The upside to this is that by purchasing a new license you will also get 6 months of support on our forum to help with any issues. I recommend upgrading to a full year of support for just a little more, as the cost of the theme and a full year of support costs the same as a single hour of support from many developers. 2022-12-04_001.jpeg.
    To update your version of Enfold you will need to download the latest installable WP version from your Theme Forest account and upload it to your WordPress ▸ Appearance ▸ Themes ▸ Add Themes ▸ Add New
    WordPress_Appearance_Themes_Add-Themes_Add-New.jpg
    after you choose the zip file and click install, you will see a This theme is already installed message because you are updating, you can continue
    Installing_theme_from_uploaded_file_This_theme_is_already_installed.jpg
    then you will see the Theme updated successfully message.
    Theme_updated_successfully.jpg
    Please note that using the contact form is not appropriate for support questions, please log in to the support forum and open a new thread if you need further assistance.
    After you purchase a new license you can register for the support forum and post your questions.

    Best regards,
    Mike

    This reply has been marked as private.
    #1485659

    Hi,

    Thank you for the screenshots.

    How did you set the font? It’s only loading on the homepage, probably because you have selected the fonts in the layer slider settings and it only loads on pages where the slider is present. You will need to manually load the fonts on other pages as well.

     	<link href="https://fonts.googleapis.com/css?family=Jost:100,100i,200,200i,300,300i,400,400i,500,500i,600,600i,700,700i,800,800i,900,900i%7CFraunces:100,100i,200,200i,300,300i,400,400i,500,500i,600,600i,700,700i,800,800i,900,900i" rel="stylesheet">
    

    Please try this code in the functions.php file:

    function ava_load_custom_fonts() {
        wp_enqueue_style(
            'ava-custom-google-fonts',
            'https://fonts.googleapis.com/css?family=Jost:100,100i,200,200i,300,300i,400,400i,500,500i,600,600i,700,700i,800,800i,900,900i|Fraunces:100,100i,200,200i,300,300i,400,400i,500,500i,600,600i,700,700i,800,800i,900,900i',
            false
        );
    }
    add_action('wp_enqueue_scripts', 'ava_load_custom_fonts');
    

    Best regards,
    Ismael

    #1485615

    Hi,

    However, I believe there may have been a misunderstanding regarding the issue. The problem is not with the icon itself or its aria-hidden attribute, but with the structure and function of the link that wraps the icon.

    If we’re not mistaken, the issue occurs because the SVG icon includes the aria-hidden attribute, which makes it unreadable to accessibility tools. As a result, the parent link is marked as “suspicious” since the icon is hidden and the link lacks any accessible text or description. The span avia_hidden_link_text, which contains the word “Search” also has its display property set to none, making it inaccessible to screen readers as well.

    Removing the aria-hidden attribute from the SVG icon or adjusting the visibility of the avia_hidden_link_text should help.

    #top .avia_hidden_link_text {
        position: absolute;
        width: 1px;
        height: 1px;
        padding: 0;
        margin: -1px;
        overflow: hidden;
        clip: rect(0 0 0 0);
        white-space: nowrap;
        border: 0;
    }

    You can also try editing the enfold/includes/config-enfold/functions-enfold.php, around line 125, change the text “Search” to “Click here to search”.

    $items .=			'<span class="avia_hidden_link_text">' . __( 'Click Here to Search', 'avia_framework' ) . '</span>';
    

    According to https://wave.webaim.org/, screen readers tend to better interpret buttons or links when it contains more descriptive text.

    View post on imgur.com

    If this doesn’t help, you can always try the suggestions above.

    Let us know the result.

    Best regards,
    Ismael

Viewing 30 results - 241 through 270 (of 16,888 total)