Forum Replies Created
-
AuthorPosts
-
Hi,
Normally in PHP you would add the closing to the file
?>but in this case you don’t because this is a special file and other PHP files are loaded after it, I removed the closing for you.
I’m glad we could help, unless there is anything else we can help with on this issue, shall we close this then?
Best regards,
MikeHi,
There are a few different filters that you can apply to your images, here are some examples they can all be applied with the “:hover” rule.
So for your stretched image with the coffee cup try this css:.flex_cell.avia-builder-el-6:hover { -webkit-filter: brightness(.5); filter: brightness(.5); }Best regards,
MikeHi,
Glad we could help, unless there is anything else we can help with on this issue, shall we close this then?Best regards,
MikeOctober 25, 2018 at 2:00 pm in reply to: White screen of death after host updates php version to 7.2 #1026352Hi,
That’s great news! Thank you for sharing your solution, we will close this now. Thank you for using Enfold.For your information, you can take a look at Enfold documentation here
For any other questions or issues, feel free to start new threads under Enfold sub forum and we will gladly try to help you :)Best regards,
MikeHi,
Thanks for sharing, we will leave this open for now, please let us know when all of your updates are done, and we’ll close this then.Best regards,
MikeHi,
I took a look and disabled the “Social Warfare” plugin which removed many of the errors, but when editing the page you still get this error:wp-admin/admin-ajax.php:1 Failed to load resource: the server responded with a status of 404 (Not Found)Please ask your host if the ModSecurity module is enabled, and try disabling it, I also see you are using PHP v7.2, try downgrading to PHP v7
I checked your homepage with the debugger and found no issues, I also tested your homepage on my localhost with no issues. I also tried disabling your plugins, and that didn’t solve, as you said.Best regards,
MikeHi,
I took a look at your pages and found none of the worked, and you had these jQuery errors
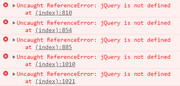
I assume “Autoptimize” is enabled?I may have found a new solution, Please try this code in the General Styling > Quick CSS field or WordPress > Customize > Additional CSS and clear your browser cache. I tested this on four of your pages and for mobile width it reversed the columns so the images were on top:
@media only screen and (max-width: 767px) {
  .entry-content-wrapper {
  display: flex !important;
  flex-wrap: wrap !important;
  }
  .flex_column.first {
      order: 2 !important;
  }
  .el_after_av_one_half {
      order: 1 !important;
  }
  }
Best regards,
MikeHi,
You could use the “pointer-events: none” css, for example, try this css on your site and try to hover the two coffee cups with the dark overlay on your site:.post-entry-431 { pointer-events: none !important; }Best regards,
MikeHi,
Well done, your images look good, here is a solution that might help:
Better Image Preloading with CSS3
in the article they talk about it being better than CSS Sprites, but you could try both.Best regards,
MikeHi,
Glad to hear that it helped,
I have noticed that the PHP max upload for some servers are less than the 16.7mb that the enfold.zip is, such as 16mb.
Please note that if you update via FTP, you will need to remove the old theme folder “enfold” first then upload the new “enfold” folder at /wp-content/themes/enfold/
Please don’t try to overwrite the theme folder, as this will leave old files behind and cause errors.Best regards,
MikeHi,
Please open or extract the file “themeforest-4519990-enfold-responsive-multipurpose-theme-wordpress-theme.zip” inside of it is another zip called “enfold.zip” that is the correct one to upload.Best regards,
MikeHi,
Please try this code in the General Styling > Quick CSS field or in your WordPress > Customize > Additional CSS#top #wrap_all .av-social-link-slack:hover a { color: #fff !important; background-color: red !important; }If this doesn’t help, please include a admin login in the private content area so we can take a closer look.
Best regards,
MikeOctober 25, 2018 at 3:37 am in reply to: White screen of death after host updates php version to 7.2 #1026181Hey ArneDaMan,
I took a look at your ftp account and it looks like you have many sites hosted there, but the one I looked at “consulting” looks like it is already using Enfold v4.5, which should work with PHP v7.2, but I couldn’t verify your version of WordPress, do you know what version it is?
Perhaps even though your host changed your PHP to v7.2, your KIS > PHP Version was not set.
Please see this documentation for your webhostBest regards,
MikeHi,
I see that you asked the question if the update to v4.5 can be done manually, by renaming the enfold folder to “enfold-old” and then upload the new enfold folder via ftp.
The answer is yes, you can update the theme via ftp, just as long as you create a new folder and don’t try to overwrite the theme.
Then going forward, you should be able to update the theme as normal.Best regards,
MikeHey Martin Fernandez,
Thank you for contacting us, but unfortunately the advanced layout builder is not available outside of WordPress.Best regards,
MikeHi,
Typically in your child theme, the files that should be included are:
style.css
functions.php
screenshot.png
The style.css is for your custom css & functions.php is for you custom functions.
You can add other files if you are going to customize them, such as your header.php & footer.php
but once in a while the theme changes these core file so much that continue to use the old files causes issues, such as in your case, you were using files from v3.8.4 and we need to remove the header.php in your child theme.So I found your customization in your old header.php and rewrote it to work as a function, but I noticed that your child theme didn’t have a functions.php to put the code it, so I created you a new one and linked to it in the Private Content area. You will see that I linked to it again for you. :)

Please add this file to your child theme folder.
To be sure that I didn’t miss anything, I asked that you rename your header.php to headerold.php, if you have no issues in the future you can delete the headerold.php, maybe next week.So in the future, when you update the Enfold theme your customization will always be safety stored in your new functions.php in your child theme, and the next time we write some code for you, we will ask you to add it to your functions.php in your child theme. :)
I hope that I have explained this well, and please feel free to always ask any questions you would like. :)
Best regards,
MikeHi,
Glad to hear, unless there is anything else we can help with on this issue, shall we close this then?Best regards,
MikeHi,
Sorry, I’m not sure I understand your question. The full post will be displayed when using the default editor but not for the advanced layout editor. Instead you will need to create a custom excerpt when editing your post. If you do not see the excerpt field then click on “Screen Options” in the top right hand corner of your screen and check it to display.
The content of the blog posts are handled differently wherever you are using the default editor or the ALB (advanced layout builder) for posts. The ALB is designed to give you more design and layout options than the default editor.Best regards,
MikeHi,
Please open new threads for these questions, they are off topic for this thread, if you will recall it’s about not being able to import the demo, which I would say has been resolved now, would you agree?
Thank you for understanding, we try to work though the queue fairly for all customers.Best regards,
MikeOctober 24, 2018 at 11:30 pm in reply to: update 4.5 destroys access from mobile access and google crawlers #1026153Hi,
@migduvednok
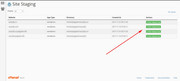
The easiest way to set up a staging site is to check your webhost to see if you have the one click staging site option, this is a option in most cPanels to create a staging clone of your site so we can test on it and you site will stay up and running. You can always ask your webhost to help you with setting this up if you want.Here are some screenshots of what it would look like:

Best regards,
MikeHi,
Glad to hear that this is sorted out now. I’m curious how you had been ftp’ing the files to your server that was causing the files to be corrupt?Best regards,
MikeHi,
Please try opening a incognito browser tab and entering the token then.
Another possibly is that there are some permissions that is needed, but not selected when creating the token, please read this.Best regards,
MikeHey mynoxin,
Theme Forest has changed their API for Token keys, v4.5 fixes this, it is recommend to update manually.
You can read more about it here.
This free plugin will allow you to manually update via the WordPress Theme panel by uploading the enfold.zip file, otherwise you can update via FTP, please remember to delete the current enfold folder and then upload the new one. Please don’t try to overwrite the theme folder, as this will leave old files behind and cause errors.
My recommendation is to go to your Theme Forest account and download the updated Enfold v4.5 and manually update it, then going forward it will use the new Token keys. All users will need to generate a new token for updates.Here are the steps to update with the plugin
1: please install the plugin: Update Theme and Plugins from Zip File

2: then go to WordPress > Themes > Add New > Upload
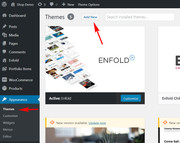
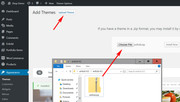
3: after the install, click “Return to Themes page” (NOT Activate)

4: success:

Best regards,
MikeHey doboon,
Theme Forest has changed their API for Token keys, v4.5 fixes this, it is recommend to update manually.
You can read more about it here.
This free plugin will allow you to manually update via the WordPress Theme panel by uploading the enfold.zip file, otherwise you can update via FTP, please remember to delete the current enfold folder and then upload the new one. Please don’t try to overwrite the theme folder, as this will leave old files behind and cause errors.
My recommendation is to go to your Theme Forest account and download the updated Enfold v4.5 and manually update it, then going forward it will use the new Token keys. All users will need to generate a new token for updates.Here are the steps to update with the plugin
1: please install the plugin: Update Theme and Plugins from Zip File
2: then go to WordPress > Themes > Add New > Upload
3: after the install, click “Return to Themes page” (NOT Activate)
4: success:
Best regards,
MikeHey asapevictions,
Theme Forest has changed their API for Token keys, v4.5 fixes this, it is recommend to update manually.
You can read more about it here.
This free plugin will allow you to manually update via the WordPress Theme panel by uploading the enfold.zip file, otherwise you can update via FTP, please remember to delete the current enfold folder and then upload the new one. Please don’t try to overwrite the theme folder, as this will leave old files behind and cause errors.
My recommendation is to go to your Theme Forest account and download the updated Enfold v4.5 and manually update it, then going forward it will use the new Token keys. All users will need to generate a new token for updates.Here are the steps to update with the plugin
1: please install the plugin: Update Theme and Plugins from Zip File
2: then go to WordPress > Themes > Add New > Upload
3: after the install, click “Return to Themes page” (NOT Activate)
4: success:
Best regards,
MikeHey Beth,
Please try this code in the General Styling > Quick CSS field:#menu-item-1967 .avia-menu-text { background-color: #fff !important; color: #8a1b1d !important; }Best regards,
MikeOctober 24, 2018 at 6:52 am in reply to: Generate a new valid API token at Envato for updating Enfold in Theme Update #1025805Hi,
@ricedean I believe your update on this post is that you found the step-by-step solution.
but here is some more info just in caseBest regards,
Mike -
AuthorPosts