Forum Replies Created
-
AuthorPosts
-
November 26, 2020 at 5:19 pm in reply to: Enfold Latest-News Sidebar Widget: reduce Excerpt Length and insert "read more" #1263299
well there is a more complex way of having a substituted edited : class-framework-widgets.php
on that it will be possible to have the Read more insert translatable with avia_framework.but a fast way is to put this in child-theme functions.php:
on my opinion it will be better to shorten the amount of words in that excerpt than to have letter shortening.function custom_news_excerpt(){ ?> <script> (function($){ function trimByWord(sentence,wordcount = 5) { var result = sentence; var resultArray = result.split(" "); if(resultArray.length > wordcount){ resultArray = resultArray.slice(0, wordcount); result = resultArray.join(" "); } return result; } $(document).ready(function(){ $('.news-content').each(function() { var newsLink = $(this).find('.news-link').attr('href'); $(this).find('.news-excerpt').text(function(index, currentText) { return trimByWord(currentText); }); $(this).find('.news-excerpt').append('<div class="read-more-link"><a class="more-link" href="'+newsLink+'">Read more<span class="more-link-arrow"></span></a></div>'); }); }); })(jQuery); </script> <?php } add_action('wp_footer', 'custom_news_excerpt');f.e. for your quick css:
.avia-slideshow-inner li::before { background-image: url(https://webers-testseite.de/wp-content/uploads/Logo-animiert-2.svg); background-size: 50vw; z-index: 5; position: absolute; top: 0; left: 0; content: ""; background-repeat: no-repeat; width: 100%; height: 100%; background-position: center; }you can have a before pseudo container on every selector you like. The before content is set to empty:
content: ""
and then a background-image your svg etc. pp. if you need detailed advice – it will be better to have a concrete link to your page.Trial and Error is the best way – just create your own test-page and have a look how it works.
Grid row is a mighty element – you can “nest” columns because you can have columns in it. etc.
with a little snippet you can avoid the full-width of that element too. So it is a kind of color-section with the possiblity to have independent parts to put in other elements to.use the grid-row element for that.
you can change the sizes on right bottom Corner of that element to 3/5 2/5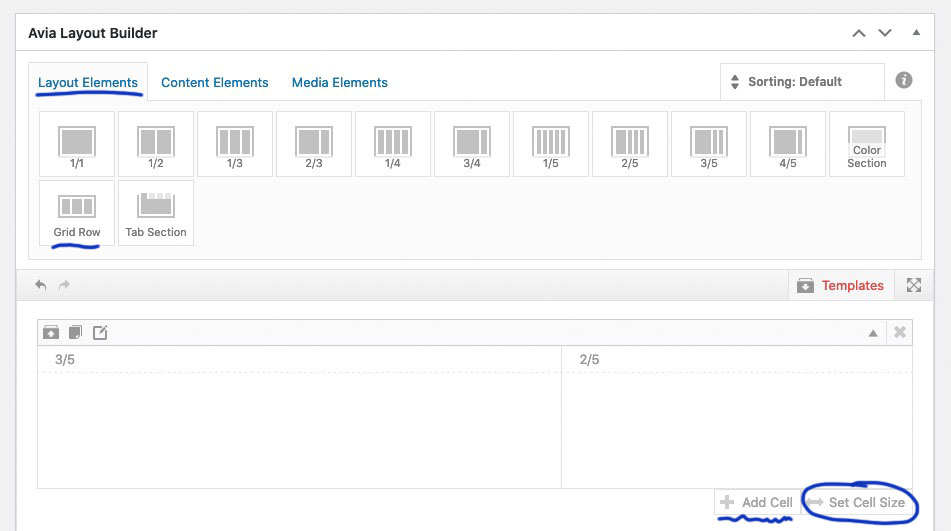
for your image uset the grid-cell background option .
you can see here on the demo the 1/2 1/2 case: https://kriesi.at/themes/enfold-freelancer/November 23, 2020 at 9:17 am in reply to: Colour section background image mobile responsive issue #1262283an additional setting is needed for safari browsers – that the text in content stayes selectable and clicks are all valid: pointer-events on the before container had to be set to none:
.bg-fixed {
  -webkit-clip-path: inset(0 0 0 0);
  clip-path: inset(0 0 0 0);
  background-size: 0 !important;
  overflow: hidden;
  position: relative;
  top: 0;
}

.bg-fixed:after {
  content: "";
  position: fixed;
  width: 100%;
  height: 100%;
  top: 0;
  left: 0;
  background-image: inherit !important;
  background-repeat: no-repeat !important;
  background-size: cover;
  background-position: inherit;
  pointer-events: none;
  z-index: -1;
  visibility: visible !important;
  /** will-change: transform;    - only if you have less then 3 images like that    ***/
}
PS: sometimes it is good to preserve an existing :before container – then you can use the after pseudo-container.
I do not know what is going on with me lately. I’ve been overlooking things that are obvious. The popup for the media file used has even better a title input field – which can be set independently from the one in the media library. This is even better suited for this purpose.
But you always have to set it in the advanced options of the image – the title attribute from the media library does indeed not appear on the image in the frontend.and please report that off topic info too.
It would be nice – because we can use the title for lightbox Info.if you do not want to influence all fullwidth buttons on all pages – you should give to those fullwidth-buttons a custom-class.
in my case i use for that : fullwidth-specialbuttonbecause of the inline setting of most of those values we had to use !important on most of the rules
#top .fullwidth-specialbutton .avia-button.avia-button-fullwidth { padding: 40px !important; margin: 40px 30px !important; width: calc(100% - 60px) !important; /*** this has to correspond to your margin (left/right) settings ***/ background-color: yellow; color: #333 !important; border-radius: 20px !important; border: 2px solid #333 !important; box-shadow: 2px 2px 15px #333; -webkit-transition: all 0.5s ease; transition: all 0.5s ease } #top .fullwidth-specialbutton .avia-button.avia-button-fullwidth:hover { background-color: darkblue; color: #FFF !important; -webkit-transition: all 0.5s ease; transition: all 0.5s ease } /*** this background is on enfold for highlite status - we do that with hover-style ***/ #top .fullwidth-specialbutton .avia-button.avia-button-fullwidth .avia_button_background { display: none } #top .fullwidth-specialbutton .avia-button.avia-button-fullwidth .avia_iconbox_title, #top .fullwidth-specialbutton .avia-button.avia-button-fullwidth .avia_button_icon { font-size: 50px !important; }on most css rules concerning to an orientation the rules goes from top, right , bottom, left ( clockwise)
so you can have f.e:.avia-button { border: solid #FFF !important; border-width: 0 10px 0 5px !important }if you have top/bottom and right/left the same value you can shorten it to:
.avia-button {
  border:  solid #FFF !important;
  border-width: 0 10px  !important
}
on border-radius it is again clockwise but you start at upper-left corner
f.e.:.avia-button { border-radius: 5px 10px 20px 30px !important }To give better advice, it would be good to see the corresponding page. Maybe a custom class for these buttons is then the best solution.
or try this in your quick css:
/****** sticky header with transparent bg at beginning *************/
/****** adjust the 989px to when responsive case burger is visible ***** my setting is 990px ********/
@media only screen and (max-width: 989px) {
  .responsive #top #wrap_all #header .container {
    width: 90%;
    max-width: 90%;
  }

  #header {
    position: fixed !important;
    height: 115px !important;   /*** 80px if you got no top header ****/
    max-height: 115px !important;   /*** 80px if you got no top header ****/
  }

  .responsive #top #wrap_all .av_header_transparency {
    background-color: transparent;
  }

/****** if you like to have on mobile white bg first then this and remove transparency option
  .responsive #top .header_bg {
    opacity: 1;
    filter: alpha(opacity=100);
    background-color: #fff !important;
  }
*************/

  .responsive #top .av-logo-container ,
  .responsive #top .logo a,
  .responsive #top .logo img {
    height: 80px !important;
    max-height: 80px !important;
  }

  .responsive #top .av-main-nav .menu-item-avia-special a {
    height: 80px !important;
    line-height: 80px !important;
  }
}
/****** End *************/
you can see it here in action: https://webers-testseite.de/pureinstall/
sorry that the topic is closed too soon. https://kriesi.at/support/topic/how-to-remove-h3-in-slider-accordeon/#post-1260055
You do not have to mark that field but to unmark it.
Hide means – to not show these fieldsbut please try the second solution. It seems the better one for responsive case:
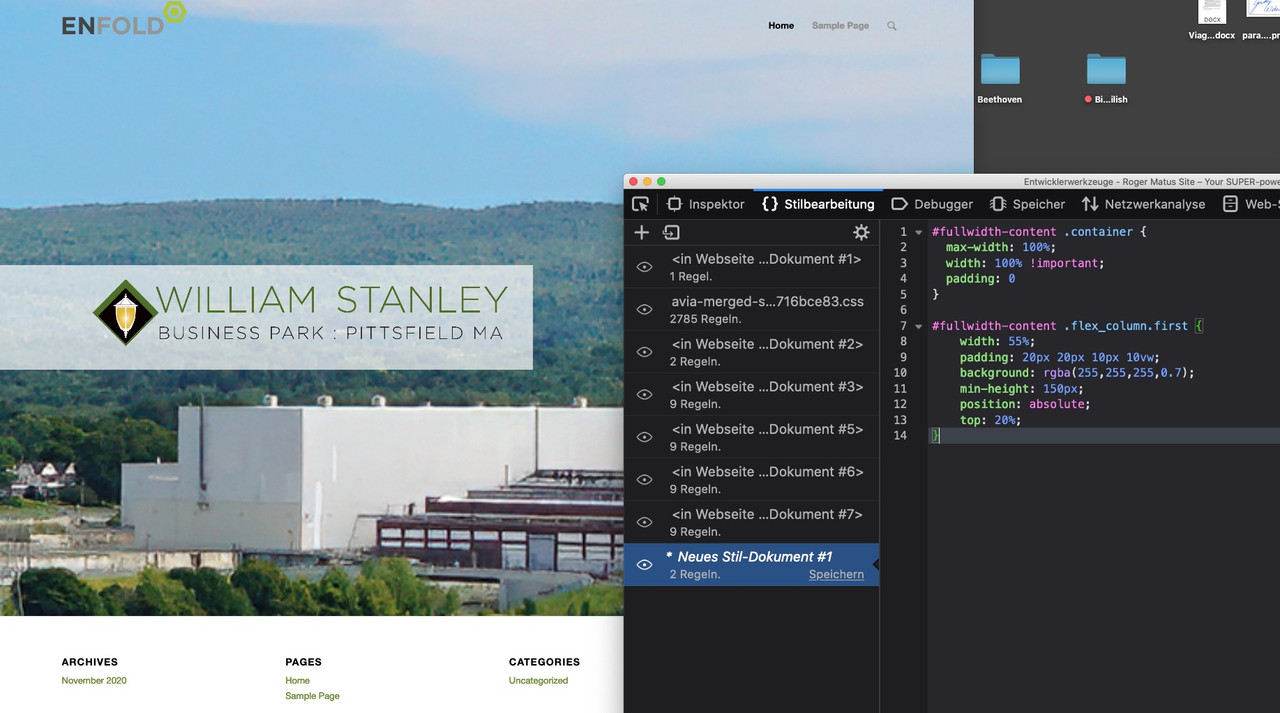
#fullwidth-content .container .content { vertical-align: top !important; } #fullwidth-content .post-entry { position: relative; top: 5%; } #fullwidth-content .container { max-width: 100%; width: 100% !important; padding: 0 !important; margin: 0 !important; } #fullwidth-content .flex_column.first { width: 55%; padding: 20px 20px 10px 10vw; background: rgba(255,255,255,0.7); position: relative; float: left; } #fullwidth-content .flex_column.avia-builder-el-last { position: relative; float: left; width: 30%; } @media only screen and (max-width: 767px) { #fullwidth-content .flex_column.avia-builder-el-last { float: none; width: calc(100% - 100px) !important; margin: 0 50px !important; } #fullwidth-content .flex_column.first { float: none; width: calc(100% - 50px) !important; margin-right: 50px } }hm ?
or do you mean this “sticky” behavior: https://webers-testseite.de/sticky-elements/
you can see that example on nearly most of enfold pages that have longer content: the scroll-top link is a button that is in fixed positon.
Fixed positioning needs position values ( top, bottom, left or right)so first give a custom-class or unique ID to that button element: in my case it is ID: fixed-button
f.e. to quick css:#fixed-button.avia-button-wrap { position: fixed; left: 50px; bottom: 50px; z-index: 1050; }but my advice would be to place a button via button shortcode outside wrap_all container by child-theme functions.php.
There is a hook : ava_after_body_opening_tag that can be used for it.
( this is site-specific only for my testpage – adjust page-id to your needs):add_action('ava_after_body_opening_tag', function() { if(is_page(457)){ echo do_shortcode("[av_button label='fixed-button' icon_select='yes' icon='ue800' font='entypo-fontello' link='manually,http://' link_target='' size='large' position='center' label_display='' title_attr='' color_options='color_options_advanced' color='theme-color' custom_bg='#444444' custom_font='#ffffff' btn_color_bg='aqua' btn_custom_bg='#444444' btn_color_bg_hover='blue' btn_custom_bg_hover='#444444' btn_color_font='custom' btn_custom_font='#ffffff' id='fixed-button' custom_class='' av_uid='av-khd9fkov' admin_preview_bg='']"); } });see here f.e.: https://webers-testseite.de/impressum/ left bottom corner
this is css for the possibility to have a neightbour container to that “flag” on the left
second color-section got a unique ID : fullwidth-content2
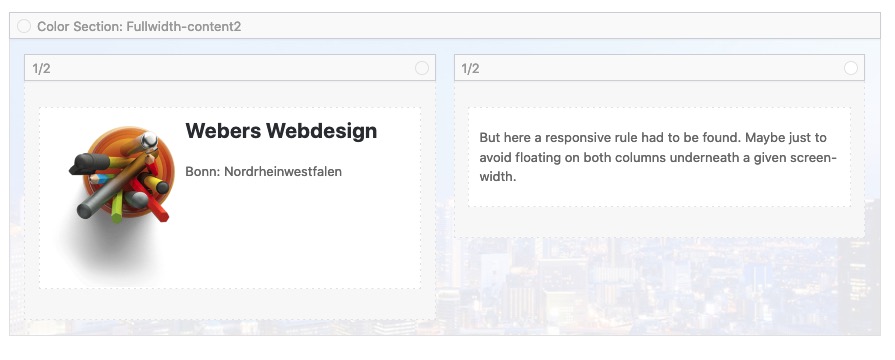
#fullwidth-content2 .container .content { vertical-align: top !important; } #fullwidth-content2 .post-entry { position: relative; top: 20%; } #fullwidth-content2 .container { max-width: 100%; width: 100% !important; padding: 0 } #fullwidth-content2 .flex_column.first { width: 55%; padding: 20px 20px 10px 10vw; background: rgba(255,255,255,0.7); min-height: 150px; position: relative; float: left; } #fullwidth-content2 .flex_column.avia-builder-el-last { position: relative; float: left; width: 30%; } @media only screen and (max-width: 767px) { #fullwidth-content2 .flex_column.avia-builder-el-last { float: none; width: calc(100% - 100px) !important; margin: 0 50px !important; } #fullwidth-content2 .flex_column.first { float: none; width: calc(100% - 50px) !important; margin-right: 50px } }Layout – or similar :
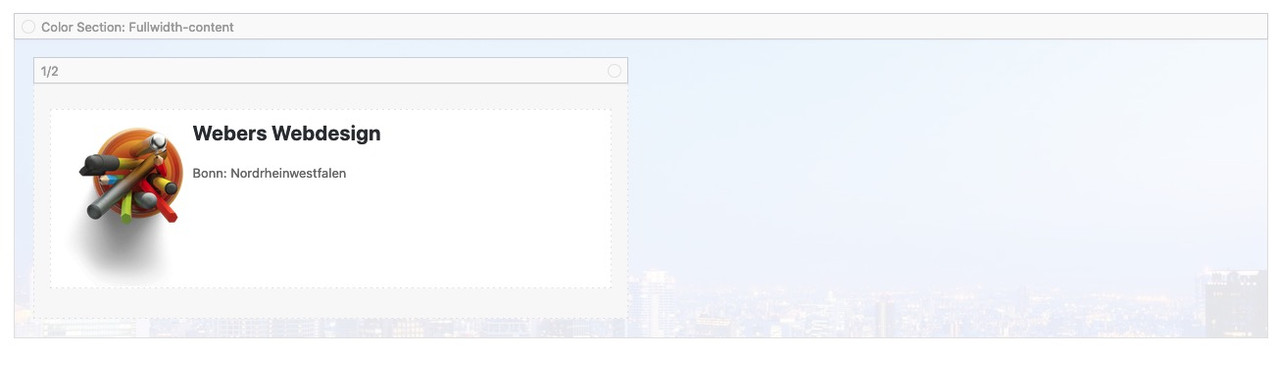
give a custom class or in my case a unique ID to the color-section: fullwidth-content
then to quick css:#fullwidth-content .container { max-width: 100%; width: 100% !important; padding: 0 } #fullwidth-content .flex_column.first { width: 55%; padding: 20px 20px 10px 10vw; background: rgba(255,255,255,0.7); min-height: 150px; position: absolute; top: 20%; }see example page: https://webers-testseite.de/rmatus/
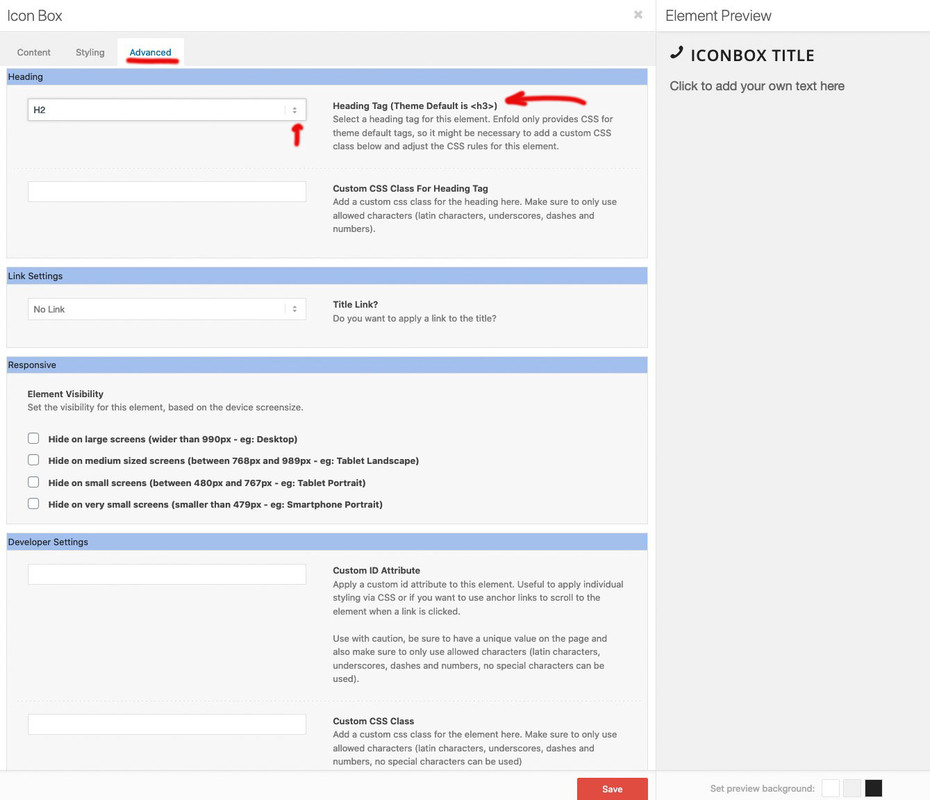
if you open the icon-box Element you do not have 3 General Tabs on top ( see screenshot above )
Content, Styling and Advanced !on default the option is not activated ( “Hide template builder developer options” ) – see dashboard – Enfold – Layout Builder:
https://kriesi.at/documentation/enfold/intro-to-layout-builder/#developer-optionsyes that is the normal way.
but if you had to change it on many pages / post all headings at once this will be the best and fastest way to do it.
Just for info: some ALB Elements got extra-args for that filter – so you can influence f.e. on timeline.php the date and the title headings
Date is on default : h2 – and the title is h4
if you want to influence those ALB Elements with extra args you had to do following:function my_avf_customize_heading_settings( array $args, $context, array $extra_args = array() ){ //so here comes the extra_arg date with that filter if( $context == 'avia_sc_timeline' && is_array( $extra_args ) && in_array( 'date', $extra_args ) ) { $args['heading'] = 'h3'; $args['extra_class'] = 'my-timeline-date-class'; } //so here comes the extra_arg title with that filter if( $context == 'avia_sc_timeline' && is_array( $extra_args ) && in_array( 'title', $extra_args ) ) { $args['heading'] = 'h1'; $args['extra_class'] = 'my-timeline-title-class'; } return $args; } add_filter( 'avf_customize_heading_settings', 'my_avf_customize_heading_settings', 10, 3 );@Nikko
https://kriesi.at/support/topic/how-to-remove-h3-in-slider-accordeon/#post-1202501this was new to my – and a look to source code is right – the filter ( avf_customize_heading_settings ) is indeed part of this on line 875:
if ( ! class_exists( 'aviaccordion' ) )if i use the filter i always took as victoria intends to do the context from the beginning:
if ( ! class_exists( 'avia_sc_slider_accordion' ) )it seems to be a specific thing for accordion slider !
@mtrebbi the iconbox has on top of the alb source code:if ( ! class_exists( 'avia_sc_icon_box' ) )so context of the filter is : avia_sc_icon_box
only the title is set with conjuction to that filter – so this will be enough:function my_heading_settings_for_iconbox( array $args, $context, array $extra_args = array() ) { if( $context == 'avia_sc_icon_box') { $args['heading'] = 'h1'; $args['extra_class'] = 'my-iconbox'; } return $args; } add_filter( 'avf_customize_heading_settings', 'my_heading_settings_for_iconbox', 10, 3 );the extra_class you can set by yourself – it is only for additonal Styling Options.
November 8, 2020 at 10:46 pm in reply to: ?iframe=true custom dimensions (width and height) #1259137the max-width is set on :
.mfp-iframe-holder .mfp-content {
    line-height: 0;
    width: 100%;
    max-width: 900px;
}
so set on quick css f.e.
.mfp-iframe-holder .mfp-content { max-width: 80vw; }-
This reply was modified 5 years, 4 months ago by
Guenni007.
sollte – wenn du auch die deutsche WordPress Version installiert hattest eigentlich automatisch so sein.
Sonst geh bitte und schau unter Dashboard – Settings – General nach ob du dort umstellen kannst. : “Site Language”
Wenn du dort nicht auf Deutsch ( Sie oder Du) umstellen kannst, musst du für WordPress die Sprachfiles nachinstallieren.November 5, 2020 at 4:31 pm in reply to: Element color stretch to left or right side of viewport #1258652and for the breakpoint for responsive case ( in my case it is 990px ):
@media only screen and (max-width: 989px) {
  .gridcontent-special .flex_cell {
    padding-left: 50px !important;
  }

  .gridcontent-special .flex_cell {
    padding-right: 50px !important;
  }
}
November 5, 2020 at 4:27 pm in reply to: Element color stretch to left or right side of viewport #1258650with custom-class on grid-row element : gridcontent-special
@media only screen and (min-width: 1510px) {
  .gridcontent-special .flex_cell.avia-builder-el-first {
    padding-left: calc((100vw - 1510px)/2 + 50px) !important;
  }

  .gridcontent-special .flex_cell.avia-builder-el-first {
    padding-left: calc((100vw - 1510px)/2 + 50px) !important;
  }

  .gridcontent-special .flex_cell.avia-builder-el-last {
    padding-right: calc((100vw - 1510px)/2 + 50px) !important;
  }

  .gridcontent-special .flex_cell.avia-builder-el-last {
    padding-right: calc((100vw - 1510px)/2 + 50px) !important;
  }
}

@media only screen and (max-width: 1509px) {
  .gridcontent-special .flex_cell.avia-builder-el-first {
    padding-left: 50px !important;
  }

  .gridcontent-special .flex_cell.avia-builder-el-first {
    padding-left: 50px !important;
  }

  .gridcontent-special .flex_cell.avia-builder-el-last {
    padding-right: 50px !important;
  }

  .gridcontent-special .flex_cell.avia-builder-el-last {
    padding-right: 50px !important;
  }
}
November 5, 2020 at 4:23 pm in reply to: Element color stretch to left or right side of viewport #1258648see now with new css above:
https://webers-testseite.de/grid-again/November 5, 2020 at 4:05 pm in reply to: Element color stretch to left or right side of viewport #1258637for my setting 1510px and 50px setting on Grid-Cell padding overall:
( Sorry this for my page id specific – remove it or replace it to your IDs – or even better give to the grid-row a custom-class )@media only screen and (min-width: 1510px) { .flex_cell.avia-builder-el-first { padding-left: calc((100vw - 1510px)/2 + 50px) !important; } .flex_cell.avia-builder-el-first { padding-left: calc((100vw - 1510px)/2 + 50px) !important; } .flex_cell.avia-builder-el-last { padding-right: calc((100vw - 1510px)/2 + 50px) !important; } .flex_cell.avia-builder-el-last { padding-right: calc((100vw - 1510px)/2 + 50px) !important; } } @media only screen and (max-width: 1509px) { .flex_cell.avia-builder-el-first { padding-left: 50px !important; } .flex_cell.avia-builder-el-first { padding-left: 50px !important; } .flex_cell.avia-builder-el-last { padding-right: 50px !important; } .flex_cell.avia-builder-el-last { padding-right: 50px !important; } }see: https://webers-testseite.de/grid-row-layout/
the 1/1 Container shows you the standard of 1510px width on my setting.
-
This reply was modified 5 years, 4 months ago by
November 5, 2020 at 1:29 pm in reply to: Element color stretch to left or right side of viewport #1258600Take the grid-row element and set your 2/3 – 1/3 grid cell settings – one of those paddings had to be in relation to screen width
you had to set a calculated relative padding left or right ( depends if your 2/3 grid cell is on the left or right ) – and only set the rules for screen-width less than 1400px ( your 1340px + 2x30px (if this is the alb padding setting ) case if you like to preserve a left / right padding of your alb setting ( in my case 30px )
on responsive case Enfold has its own rules for padding.@media only screen and (min-width: 1400px) { /*** it depends on your setting on the alb - i got 30px on all sides : 1340px + 60px ***/ .flex_cell.avia-builder-el-first { padding-left: calc((100vw - 1340px)/2) !important; } .flex_cell.avia-builder-el-first { padding-left: calc((100vw - 1340px)/2) !important; } .flex_cell.avia-builder-el-last { padding-right: calc((100vw - 1340px)/2) !important; } .flex_cell.avia-builder-el-last { padding-right: calc((100vw - 1340px)/2) !important; } }these rules can be used for all grid-cell sizes because only the first and last are selected!
See example page with 1/2 grid-cell size – but it is the same rules as above ( i have 1510px standard setting for content)
https://webers-testseite.de/grid-row-layout/Kann sein, dass du
a) das Merging der css und js files: Unter Enfold / Leistung: “Alte CSS- und JS-Dateien löschen?” erneuern musst
b) den Browsercache refreshen musst #
und c) natürlich darfst du nicht erwarten, das alt angelegte Layouts sich dadurch verbessern.
– es werden nur neu erstellte Texte beeinflusst.welche p tags stören dich? manchmal werden nämlich auch lästige leere p-tags erstellt.
da gäbe es eine Lösung für. -
This reply was modified 5 years, 4 months ago by
-
AuthorPosts