Forum Replies Created
-
AuthorPosts
-
in the Enfold demo – they work – the link is just identical to the home url:
https://kriesi.at/themes/enfold-health-coach/.
So if you have a page where we can see the problem, it is better to advise you.June 10, 2022 at 8:45 am in reply to: Portfolio grid does not display category content correctly. #1354759Now my login datas are good – i think it was the WPML Update that solves the problem.
Yes:
You may need to hire a freelance developer to create a script or function that automatically installs a specific demo …
;)
– but to be honest: it is strictly speaking, it’s a one-time manual install, which is then carried out completely automatically.
you can add this to your child-theme functions.php:
function kriesi_logo_addition($sub){
  $sub .= "<span class='logo-title logo-subtitle'>";
  $sub .= get_bloginfo( 'description', 'display' );
  $sub .= "</span>";
  return $sub;
}
add_filter('avf_logo_subtext', 'kriesi_logo_addition');
now the rest will be quick css work. Depends on your header setting and dimensions.
If you do not see it directly – it is placed below the header – you had to shift it then to the position you like
big advantage of that insertion – the subtext will follow a shrinking header behavior – because this is part of logoJune 9, 2022 at 7:41 pm in reply to: Open up random ajax portfolio item when the page is loaded #1354718well one of your other mistake is the fact that the old function :
$(window).load(function() {is deprecated – you had to use now:
$(window).on('load', function(){Honestly, you have to say – no.
Yes, you can make it more difficult for inexperienced visitors to your site by, for example, blocking the context menu option of the mouse etc. pp. – but if you know a little bit about the developer tools of a browser, you can get the info – where a picture is stored.https://www.wpbeginner.com/beginners-guide/4-ways-to-prevent-image-theft-in-wordpress/
Try viewing a portrait image on your home TV. If you want this image to be shown without black borders, you only have the option to either crop it – or to keep the image the same in height and stretch it in width. That means you leave the original aspect ratio.
The full-width slider, on the other hand, keeps the aspect ratio.well it depends on what the animation should look like.
Text and rotation etc. could be animated via svg usage, because you can address parts of the logo separatly.

_______
 June 9, 2022 at 4:31 pm in reply to: Portfolio grid does not display category content correctly. #1354685
My login data are unfortunately no longer valid – but what i see is that the sort filter which is noticed as a class on the grid-entry goes to one element only – and is not set on each entry it belongs to.
The count for that sort filter is f.e. 9 – then that class will be added 9-times to one entry – after click event.You mean by icon gallery – a normal gallery with icons inside. Do you have links on those images?
see: https://enfold.webers-webdesign.de/gallery/
Follow the link to see how it can be done.by the way – if you have a multi-language installation this will offer an option to show on all languages or only show on lang1 , lang2 etc. – nice to have
why don’t you do that yourself.
Install a fresh wordpress with enfold – and install your demo then.
Install duplicator – that nice free backup tool will generate two files – one installer file and one data file ( on default a zip file – on bigger installations it will be an own format (daf)).
Thats all – upload both files to your new server – start installer and only enter the new database values.
_____
I do have that too for my installations – but not with a demo – but with Enfold and Child-Theme and all necessary plugins and some standard settings and functions.php snippets.June 8, 2022 at 11:17 am in reply to: reducing the overlay opacity and adding hover text to the masonry gallery #1354505do you realy mean a masonry gallery? What should be learned from an opened image? Or do you have custom links on the images?
Anyway – it will work on masonry too:
i tried this:
( and because all classes on buttons do have avia-… i switched ismaels class to : avia-masonry-learn-more )
to have this in a translatable “Learn more” phrase i put in that tooadd_filter("avf_masonry_entry_content", function($content, $entry, $atts) { $content .= " <span class='avia-button avia-size-small avia-color-theme-color avia-masonry-learn-more'>". __( 'Learn more', 'avia_framework' ) . "</span>"; return $content; }, 10, 3);.avia-masonry-learn-more { opacity: 0; transition: all 0.8s; } .av-masonry-entry:hover .avia-masonry-learn-more { opacity: 1; }i don’t know why the wp_trim_words( ) does not work
June 8, 2022 at 10:09 am in reply to: Bug: New Typography tools clash with settings on the page #1354499The whole thing wouldn’t be so bad if the first value in the ALB element didn’t override the default values of the Enfold options under Advanced Options: Customize Typography Settings.
So if values are changed in the ALB, only the values for the corresponding screen width should be changed – and no new default value should be set.June 8, 2022 at 8:47 am in reply to: Bug: New Typography tools clash with settings on the page #1354485if this is important for me to have a more responsive design on font-sizes – i use often the clamp method
see the heading on page: https://webers-testseite.de/heading-with-fluid-font-size/one big disadvantage on that – you had to think of column-width – because the middle font-size definition is related to screen-width.
but a 1/2 column only got 50vw of total place … and after colaps it has that 100vw again.So a perfect simple solution is not in sight. Customized solutions are then sought after. For headings that are positioned within a full-width container, one can take the min – max solution.
You can see here a nice font-size calculator to get this css definition:
https://websemantics.uk/tools/responsive-font-calculator/June 8, 2022 at 8:29 am in reply to: Bug: New Typography tools clash with settings on the page #1354482Yes – i can confirm this for headings
on that test page i choose under styling tab : 48px and for the next ( 768-989) 40px and let the rest to default.So – I can confirm that. Strangely enough, it is also there as it is.
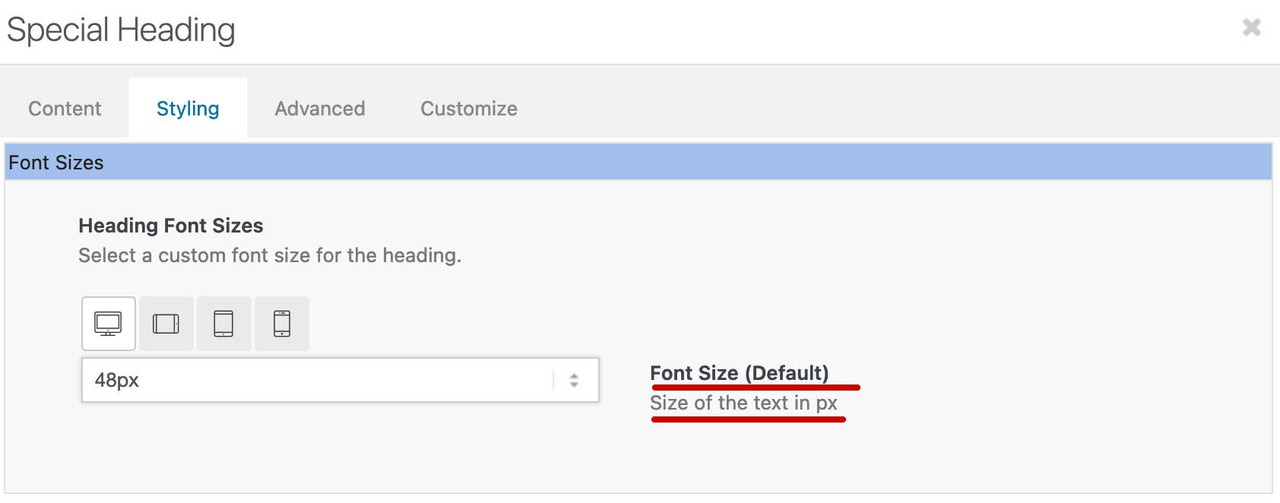
The first setting defines the “Default Size”. I think this is not how it should be interpreted. The format should be set there for large screens.
Or one takes it in fact here around the default to specify, it can be overwritten then in the following with another setting and if one leaves it on “default” with the smaller screen widths it is defined there relative (thus 480px to 767px) on 50% then the smaller screens accordingly smaller.first – please try my approach from above. When inserting the image, choose the right source right away, namely the Full Image.

________________
Now to your legitimate question (even if you always come out with the details only part by part).
On my test page, the full image is still displayed with your setting – even when i insert the smaller source image. But there I’m already testing a newer beta version of Enfold. I will now run the same test on a current Enfold version to see if it is the same there.
Edit same here with Enfold 4.9.2.3 the image isn’t cropped when choosing on styling tab : No scaling (…)
So there must be something with your installation – on both testing pages the non-cropped image is shown in backend.
allthough i’m seeing this in backend preview:

But please try the other method first if that helps to have the non-cropped version
PS: you link to the page was forced redirected – i could not see that page.
i do not see any tab-section on that page – the ID has changed too. So can you correct the link to that element it is concerning too – or make a screenshow what you like to change.
there is that one snippet for child-theme functions.php :
( it turns from inline css to internal css )function custom_avf_post_css_create_file( $create ){ return false; } add_filter( 'avf_post_css_create_file', 'custom_avf_post_css_create_file', 10, 1 );After that the inline css will be not there ( it changes to Internal CSS ) – and the styles are placed before the container as
<style …>…</style>which is then included to merged styles.how do you place the text to your layout. Are you working with the advanced layout builder of enfold ?
in this case you open f.e. the column in which your text element is placed – and open the tab on top: Advanced – on that tab you have those input fields in the developer section for IDs or custom-classes – insert alluppercase to that custom-class field ( without dot )
Or directly to the text-block alb element itself.
If you want to change all texts in a color-section – go to that advance tab to insert the class.

If you completely want to change the whole Text in your installation then use it without that class:.responsive #top #wrap_all { text-transform: uppercase !important }because of the two ID’s within this rule and the Important setting, it will mostly prevail against existing css rules that state differently.
You can of course edit all loop files that are affected and upload them as child-theme files.
Unfortunately, this is quite a lot of places to change, due to the fact that we have different cases here.
(Business-, Elegant-, Business-modern Blog) and that in loop-index.php, loop-portfolio-single.php etc.but you can try this substitution via gettext:
function my_text_strings( $translated_text, $text, $domain ){ switch ( $translated_text ){ case 'Read more' : $translated_text = __( 'Read more of it', $domain ); break; // in case you got different languages on your page and want to change them too: case 'Weiterlesen' : $translated_text = __( 'Mehr über das Thema …', $domain ); break; } return $translated_text; } add_filter('gettext', 'my_text_strings', 20, 3);maybe this could help you:
https://kriesi.at/support/topic/how-to-add-associated-tags-to-each-blog-post-using-the-blog-post-widget/#post-1353460the code provided is only – if you choose on that options page to show tags. If you like to have it anyway change the if clause
// from: if('blog-meta-tag' == avia_get_option('blog-meta-tag') && $tags ){ // to: if($tags ){in loop-index.php you have that filter : avf_show_author_meta search for it – one of the next lines is:
$meta_author = '<span class="blog-author minor-meta">' . __( 'by', 'avia_framework' ) . ' ';there is the linking word : by
so my advice is to have a child-theme loop-index.php
edit that line to :$meta_author = '<span class="blog-author minor-meta">';and create a child-theme subfolder called : includes and put a version of that edited loop-index.php inside it.
PS: if you like to have the same on author loop – look at loop-author.php
search there also for the same filter name and change this line in a similar way – proceed with the changed copy in the same way.@HulaSlim : If something is fixed in height but needs to respond to decreasing widths, then there are only two options. Either the image is distorted or cropped, regardless of the original aspect ratio. That’s exactly what the full-width slider is for – to adjust the height according to the screen width. This is what the word responsive means.
What kind of slider you are using?
But you thought of setting the custom-class as well? how it is named is up to you.
Otherwise i would need to see the page – if you could send me the link, I will look for a solution. Just keep in mind that I can not see the private content fields.look here on a test page the “entry without sidebar” will show your exact Image section
https://webers-web.info/mediation/my question was if you have inserted that full size image to the image alb element.
That you have uploaded the non cropped image is clear to me.
I also sometimes select the image on the left, but do not pay attention to what was preselected in the selection on the right. Then one of the possibly recalculated other images is used as source.
That shown screenshot seems to be the 748×423 image:

now i know what is your request. ( it would be better to have an english screenshot on that ) hard to read for a german user your image
the list of those colors to choose is in class-popup-templates.phpat lines 1473ff there is an array: colored:
$colored = array(
	__( 'Theme Color', 'avia_framework' )			=> $theme_col_key,
	__( 'Theme Color Highlight', 'avia_framework' )	=> 'theme-color-highlight',
	__( 'Theme Color Subtle', 'avia_framework' )	=> 'theme-color-subtle',
	__( 'White', 'avia_framework' )		=> 'white',
	__( 'Blue', 'avia_framework' )		=> 'blue',
	__( 'Red',  'avia_framework' )		=> 'red',
	__( 'Green', 'avia_framework' )		=> 'green',
	__( 'Orange', 'avia_framework' )	=> 'orange',
	__( 'Aqua', 'avia_framework' )		=> 'aqua',
	__( 'Teal', 'avia_framework' )		=> 'teal',
	__( 'Purple', 'avia_framework' )	=> 'purple',
	__( 'Pink', 'avia_framework' )		=> 'pink',
	__( 'Silver', 'avia_framework' )	=> 'silver',
	__( 'Grey', 'avia_framework' )		=> 'grey',
	__( 'Black', 'avia_framework' )		=> 'black',
);
but these are only for named colors
but i do not know if there is a child-theme method to add to that dropdown-list some custom colors.
maybe the filter : avf_alb_popup_templates_named_colors could be used for thati do not see your table but if there are headings on it – do not forget to style them too:
.custom-class table tbody tr td:nth-of-type(1),
.custom-class table thead tr th:nth-of-type(1) {
    width: 22% !important;
}
.custom-class table tbody tr td:nth-of-type(2),
.custom-class table thead tr th:nth-of-type(2) {
    width: 58% !important;
}
.custom-class table tbody tr td:nth-of-type(3),
.custom-class table thead tr th:nth-of-type(3) {
    width: 20% !important;
}
PS : there are no other elements in between – so nth-child( ) will do the job too !
And: on enfold demo page i see that the headings are sometimes in tbody ( not thead ) too – then it will be:
.custom-class table tbody tr th:nth-of-type(x)June 4, 2022 at 5:33 am in reply to: How to overwrite the new class-avia-masonry.php using the child theme? #1354108the code from the first lines shows you that there has been a newer file now – and this is only for older masonry
next – yes thats what i try to describe.
If you do have ftp access, what’s the harm in putting a modified file there and seeing if my claim works. This is not Star Trek and the self-destruction mechanism is triggered. If it doesn’t work then you take the whole thing out of the folder. (If it doesn’t work, it is rather because of the made change within the file – because I always test my assertions before).
That was a substitution of a parent file inside the shortcodes – so it is not necessary to build the same folder structure.
If you substitute a file inside e.g. includes folder – there it might be better to build the same subfolders to your child-theme directory. -
AuthorPosts