Forum Replies Created
-
AuthorPosts
-
Hey collinssafety,
Thank you for your new thread, it seems that you have found the big blue button at the top of the forum with the text:
“Can’t find a solution to your problem? Open a new thread”
But I can see that if you are reading a thread this button is not visible, in this case please look at the breadcrumbs and click the “Enfold” to be taken back to the main forum.I didn’t find the css to create a accordion style menu, so I worked this out for you by installing the demo on my localhost and adding a couple of menu items under one, Please try this code in the General Styling > Quick CSS field:
.av-main-nav li:hover > ul {
    top: 100% !important;
    left: 0% !important;
    position: relative !important;
    width: 100% !important;
}
.header_color ul.sub-menu li {
    border-width: 0px !important;
}
.av-main-nav > li > ul.sub-menu {
    border-top-width: 0px !important;
    border-top-style: none !important;
}
.av-main-nav ul.sub-menu li a {
    border-right-style: none;
    border-right-width: 0px;
    border-left-style: none;
    border-left-width: 0px;
}
.av-main-nav ul.sub-menu li:last-child > a {
    border-bottom-style: none;
    border-bottom-width: 0px;
}

.html_header_sidebar #header .av-main-nav ul.sub-menu > li > a {
    border-bottom-style: solid;
    border-bottom-width: 1px;
}
If this fails, please try this code in the WordPress > Customize > Additional CSS field.
If this still fails, then include your url so we can take a closer look.Best regards,
MikeNovember 19, 2018 at 12:07 am in reply to: Change size of text at footer ( sub menu ), but not in rest of website #1034934Hey Edsbjerg,
Please try this code in the General Styling > Quick CSS field:#footer ul#menu-main-menu.menu a,#footer .menu-submenu-container a { font-size:18px !important; font-weight: 400 !important; }Please clear your browser cache and check.
If this fails please try the same code in the WordPress > Customize > Additional CSS fieldBest regards,
MikeNovember 18, 2018 at 11:49 pm in reply to: Responsive Portfolio Grid: How to control column count on mobile layouts? #1034930Hi,
Glad we were able to help, we will close this now. Thank you for using Enfold.For your information, you can take a look at Enfold documentation here
For any other questions or issues, feel free to start new threads under Enfold sub forum and we will gladly try to help you :)Best regards,
MikeNovember 18, 2018 at 11:38 pm in reply to: No access to Website and WP-Admin page after theme update to 4.5!! #1034927Hi,
Please try increasing your PHP memory: Fix: WordPress Memory Exhausted Error – Increase PHP MemoryThis is done at your webhost, but to gain WP access, and If you have a default theme in the theme folder, try renaming “enfold” via ftp to something else, WP will switch to the default theme automatically. Then you can login.
Best regards,
MikeHi,
Do you mean that you want to have someone look at the Safari issue above before adjusting the menu for 768px though 1160px ?Best regards,
MikeHi,
Glad we were able to help, we will close this now. Thank you for using Enfold.For your information, you can take a look at Enfold documentation here
For any other questions or issues, feel free to start new threads under Enfold sub forum and we will gladly try to help you :)Best regards,
MikeHi,
Thanks, I have taken a look at this and some of the forms are a little different, but I tried to recreate this for all of the forms, but please remove all of the css for the forms and use this instead:@media only screen and (min-width: 641px) { .gform_wrapper .gform_body { width: 100% !important; max-width: 500px !important; margin-left: 0px !important; margin-bottom: 3% !important; } #top .gform_wrapper .gform_body li>.gfield_label { margin-left: 0px !important; width: 45% !important; max-width: 150px !important; } } #top .gform_wrapper .gform_body li>.ginput_container { width: 50% !important; max-width: 300px !important; float: left !important; margin-left: 0px !important; } #top .gform_wrapper .gform_body li>.ginput_container { margin-bottom: 3% !important; } }They should all be very close now, but if there are still any issues, please include a admin login in the private content area so we can take a closer look.
Best regards,
MikeHey gabs01,
Sorry for the late reply, if I understand your question correctly, you would like to have your homepage images in a circle like the ones you linked to in the Private Content area.
But I don’t see the link to your site, please include.Best regards,
MikeNovember 18, 2018 at 9:43 pm in reply to: No access to Website and WP-Admin page after theme update to 4.5!! #1034905Hey ksei81,
I see that all of your errors are for the plugin “revslider” please disable by renaming the plugin folder via FTP to something like “revslider-2”
Is your WordPress also up-to-date?
Please explain how you updated, via FTP?
If you update via FTP you must remove the old copy of Enfold competently before uploading the new version with FTP – otherwise the old elements will remain in /shortcode folder and be duplicate, which breaks the theme.
Please try, via ftp, delete the “enfold” theme directory and then upload the new “enfold”Another possible issue: please ensure your PHP is at least v5.6, if you are unsure please ask your webhost to check that this is done correctly, often this is not done correctly.
Best regards,
MikeNovember 18, 2018 at 9:31 pm in reply to: Problem with 2 column code using avia layout builder versus default editor #1034900Hi,
Glad we were able to help, we will close this now. Thank you for using Enfold.For your information, you can take a look at Enfold documentation here
For any other questions or issues, feel free to start new threads under Enfold sub forum and we will gladly try to help you :)Best regards,
MikeHi,
That’s good to hear, please include the ftp access for the next two sites.Best regards,
MikeHi,
Is your Safari showing this between 1160px & 1282px and is it a iPad? I didn’t add “pixel-ratio” into the media query which the Safari takes into account.
I don’t have a IOS so I can’t effectively adjust this, but we can have a team member look at this for you.Shall we make the adjustments for 768px though 1160px, so when it’s looked at later with Safari they can check all of the sizes?
Best regards,
MikeHi,
Thank you for the feedback, the dev team are making many changes which we hope to remove your struggles.
Are you satisfied with the solution, or would you like me to login to your site and investigate further?Best regards,
MikeNovember 18, 2018 at 8:23 pm in reply to: Blog Post Content Element used on Page: Possible to randomize posts that appear? #1034890Hi,
I have tried a few solutions on my localhost & found this a little trickier than expected, but I found this one to show the post randomly:add_filter('avia_post_slide_query','avia_order_by_random', 10, 2); function avia_order_by_random($query, $params) { $query['orderby'] = 'title'; $query['orderby'] = 'rand'; return $query; }and this one to show the blog posts randomly within a category.
add_filter('avia_post_slide_query','avia_order_by_random', 10, 2);
function avia_order_by_random($query, $params)
{
$query['orderby'] = 'title';
$query['order'] = 'rand';

$terms = explode(',', $params['categories']);
if (!empty($terms) && in_array(1, $terms))
{
    $query['orderby'] = 'date';
}
return $query;
}
the “1” is the category, please adjust to suit.
Best regards,
MikeHi,
Are you using header transparency on that page?
Another option is this jQuery, Try adding this code to the end of your functions.php file in Appearance > Editor:function custom_blog_title_script(){ ?> <script> jQuery(window).load(function(){ jQuery( '<h1 class="main-title entry-title"><a title="Blog" itemprop="headline">Blog</a></h1>' ).insertBefore( '#top.blog article.post-entry:first-child' ); }); </script> <?php } add_action('wp_footer', 'custom_blog_title_script');Best regards,
MikeHi,
Thank you, the smallest width your menu can be without resizing the menu items is 1160px, and your mobile menu ends at 768px, so between those two you should decide if you want to continue the mobile menu more or have the menu items smaller or a mixture of both.
Some choose to have the mobile menu go to 1024px, but I’ve seen mobile menus go to 1200px, let us know how you want to proceed.So for mobile menus I moved the image over the burger and inline with the logo with this css. For now the media query ends at 767px, but this can be changed:
@media only screen and (max-width: 767px) {
#custom_html-2 {
    width: 60px;
    float: right;
    top: -95px;
}
}
For 1160px and up I put the image inline with the menu and float it to the end, and adjusted once at 1295px:@media only screen and (min-width: 1160px) and (max-width: 1295px) { nav.main_menu { width: 85% !important; } #custom_html-2 { width: 60px; float: right; top: -5px; } } @media only screen and (min-width: 1296px) { nav.main_menu { width: 75% !important; } #custom_html-2 { width: 60px; float: right; top: -5px; } }
Best regards,
MikeHi,
Oh I see, you had the content outside of the tags on purpose.
I corrected your content & tags, and I linked to a comparison via dropbox in the Private Content area.
Please clear your browser cache and check your layerslider.Best regards,
MikeHi,
Thanks for the screenshot, I wonder why your blue overlay is so off in your screenshot? Here is the screenshot of the one I worked on:

and this is the same one with your css:

this is not as off as your screenshot, but the blue overlay doesn’t stay in the box it goes down to the next element.
Also is your element inside of another column? That might be limiting it’s size, mine is not and it’s quiet large.Best regards,
MikeHi,
Happy Sunday! :)
Unless there is anything else we can assist with on this issue, shall we close this then?Best regards,
MikeHi,
Thank you for the FTP access, for both sites I renamed your current theme to “enfold-old” then I uploaded the new “enfold” and checked that your site is working correctly. Please also check for yourself.
Once you are happy you, (or I) can delete the “enfold-old” via ftp, (not the WP theme page)
Should for some reason you wish to roll-back to the old version, it’s easy to do, simply rename the new “enfold” to “enfold-new” via ftp and then rename “enfold-old” to “enfold” then refresh your page.So please check the sites and let us know if there is anything else we can assist with.
Best regards,
MikeHi,
Sorry, I got mixed up, so for your test site
I used this css to override your image and background-color:.header_color .header_bg { background: transparent url(//demo.kmu-betreuung.ch/wp-content/uploads/2018/11/test-curved-header.png) center center no-repeat !important; background-size: cover !important; top: 112px !important; } #header.header_color { background-color: red !important; }to make the curve hang down over the pink content, and have the header a solid red. Notice that the image has to hang down 112px because the dips in the curve are a lot and we are trying to hide the straight line of the header.

Best regards,
MikeHey losting,
Please try enabling the title bar for your blog page, by going to the layout option in the page editor, and choosing “display only title”
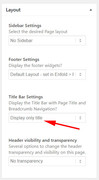
Please let us know if this is what you had in mind.Best regards,
MikeNovember 18, 2018 at 6:52 am in reply to: Problem with 2 column code using avia layout builder versus default editor #1034827Hey webworm72,
I have taken a look at your pages and for the second column that is down some, there is a line brake in the source code.<br>I tested this on my localhost and found that if a new line is created in the text block element then the BR tag is created.
To solve this issue, simply ensure no line brake is added to the element.
This is an example with the line break:[av_one_half first]<ul> <li>Meal planning</li> <li>Calorie and macronutrient recommendations</li> <li>Recipe selection and review</li> <li>Nutrition therapy (for diabetes, high cholesterol, etc.)</li> </ul>[/av_one_half] [av_one_half]<ul> <li>Restaurant and dining tips</li> <li>Kitchen clean-out and grocery shopping advice</li> <li>Information about diet myths, trends, and facts</li> <li>Accountability and encouragement</li> </ul>[/av_one_half]and this is without the line brake:
[av_one_half first]<ul>
<li>Meal planning</li>
<li>Calorie and macronutrient recommendations</li>
<li>Recipe selection and review</li>
<li>Nutrition therapy (for diabetes, high cholesterol, etc.)</li>
</ul>[/av_one_half][av_one_half]<ul>
<li>Restaurant and dining tips</li>
<li>Kitchen clean-out and grocery shopping advice</li>
<li>Information about diet myths, trends, and facts</li>
<li>Accountability and encouragement</li>
</ul>[/av_one_half]
Best regards,
MikeHey koraytastan,
I recommend using the first method, of creating a widget area in the header and adding your text or image as a widget. What you are experiencing is the lack of room in your header for the widget.
Please link to your page with the widget area, so we can help adjust the elements.Best regards,
MikeNovember 18, 2018 at 6:02 am in reply to: Responsive Portfolio Grid: How to control column count on mobile layouts? #1034823Hey Gary,
Please try this code in the General Styling > Quick CSS field:@media only screen and (max-width: 767px) and (min-width: 300px) { .responsive #top #wrap_all .grid-sort-container .grid-entry { width: 50% !important; } }Best regards,
MikeHey cl-hurt,
I took a look at your layerslider, and for some reason your text is outside the paragraph tags.
Your font and color is correct, right? The only error is that there are no paragraph brakes, right?
Have you tried disabling your plugins? Can you please include a admin login in the private content area so we can take a closer look.Best regards,
MikeHi,
The first video has a wave.png in the area under the video, it is a example. I took your image and used the tool at Online Background Remover and made your image transparentBest regards,
MikeNovember 18, 2018 at 4:11 am in reply to: Blog Post Content Element used on Page: Possible to randomize posts that appear? #1034817 -
AuthorPosts