Forum Replies Created
-
AuthorPosts
-
Hi,
I was able to test your site, please check your horizontal gallery > advanced tab > link settings > Image Link > lightbox linking active
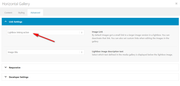
this is what adds the little icon to open the image in lightbox. I see your “Marie-Pierre” doesn’t have this but “Coeur de Pixel” does.
If this doesn’t help please include an admin login in the Private Content area so we can be of more assistance.Best regards,
MikeFebruary 9, 2020 at 8:32 pm in reply to: Masonry Gallery hide title and excerpt for mobil (tablet and smartphone) #1182844Hi,
Sorry for the late reply, please try this css while “pointing” or “touching” an image with a finger.
Please try this code in the General Styling > Quick CSS field or in the WordPress > Customize > Additional CSS field:#wrap_all #main #portfolio .av-caption-on-hover .av-masonry-item-with-image.av-masonry-entry .av-inner-masonry-content { opacity: 0; } #wrap_all #main #portfolio .av-caption-on-hover .av-masonry-item-with-image.av-masonry-entry:hover .av-inner-masonry-content { opacity: 1; }Best regards,
MikeHi,
Sorry for the late reply, your videos look as though your content was gone, but as I check your site it seems as though everything is working ok, were you able to have it restored from a backup?Best regards,
MikeHi,
Sorry your page also crashed for me, I didn’t get any error messages. Perhaps your webhost has some error messages, or you could try enabling WP Debug to capture an error message.Best regards,
MikeHi,
Please try using the Classic Editor in a new blank post and choosing the shortcode wand to create your element, it looks like 1/3 columns with icon boxes, then paste the shortcode inside of a HTML widget in your new header widget.
Or you could copy the current shortcode for these elements from your page by Enabling the Avia Layout Builder Debugger and get the shortcode from the debugger field under the editor
Best regards,
MikeHi,
Thanks for the login, I found that you had the jQuery loading in the footer, I disabled this to solve this issue.
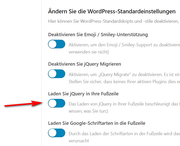
Please clear your browser cache and check.Best regards,
MikeFebruary 9, 2020 at 6:45 pm in reply to: Hamburger Menu (screen reader) how to add or "aria-label" #1182804Hey corefocusgroup,
To add the aria-label to the burger menu please try adding this code to the end of your functions.php file in Appearance > Editor:function custom_aria_label(){ ?> <script> (function($){ $(document).ready(function(){ $('.av-burger-menu-main a').attr("aria-label","Menu"); }); })(jQuery); </script> <?php } add_action('wp_footer', 'custom_aria_label');
Best regards,
MikeHi,
Thank you for the screenshot and link. So as I look at your toggle content it looks like you have added in-line span colors for different strong tags, some green and others blue. So I believe the best course to take is to set the color to “inherit” so your in-line styles will take effect.
Please try this code in the General Styling > Quick CSS field or in the WordPress > Customize > Additional CSS field:#top #main .main_color .toggle_content p > span > strong { color: inherit !important; }
After applying the css, Please clear your browser cache and check.Best regards,
MikeHi,
Do you mean the white header bar across the top after you scroll? Please see the screenshot in Private Content area.
This would be the view after scroll because right now the header is transparent before scroll.
Have you thought about using a logo that has a transparent background, or do you like that the logo is in a white box?Best regards,
MikeHi,
Sorry for the late reply but thanks for the WebPageTest, I notice that you have quite a few images but have not enabled gzip Compress Images, which is the only “F” on your test and it says that doing this should cut your load in half. Typically you only need to add this to your .htaccess file:<IfModule mod_deflate.c> # Compress HTML, CSS, JavaScript, Text, XML and fonts AddOutputFilterByType DEFLATE application/javascript AddOutputFilterByType DEFLATE application/rss+xml AddOutputFilterByType DEFLATE application/vnd.ms-fontobject AddOutputFilterByType DEFLATE application/x-font AddOutputFilterByType DEFLATE application/x-font-opentype AddOutputFilterByType DEFLATE application/x-font-otf AddOutputFilterByType DEFLATE application/x-font-truetype AddOutputFilterByType DEFLATE application/x-font-ttf AddOutputFilterByType DEFLATE application/x-javascript AddOutputFilterByType DEFLATE application/xhtml+xml AddOutputFilterByType DEFLATE application/xml AddOutputFilterByType DEFLATE font/opentype AddOutputFilterByType DEFLATE font/otf AddOutputFilterByType DEFLATE font/ttf AddOutputFilterByType DEFLATE image/svg+xml AddOutputFilterByType DEFLATE image/x-icon AddOutputFilterByType DEFLATE text/css AddOutputFilterByType DEFLATE text/html AddOutputFilterByType DEFLATE text/javascript AddOutputFilterByType DEFLATE text/plain AddOutputFilterByType DEFLATE text/xml # Remove browser bugs (only needed for really old browsers) BrowserMatch ^Mozilla/4 gzip-only-text/html BrowserMatch ^Mozilla/4\.0[678] no-gzip BrowserMatch \bMSIE !no-gzip !gzip-only-text/html Header append Vary User-Agent </IfModule>You could also use progressive JPEG images which will also help you a lot on the 69 images on your homepage. TinyJPG has a WordPress plugin which you could try. Compress JPEG & PNG images
Best regards,
MikeHi,
Sorry for the late reply, I took a look at your headline rotator in your topbar, but it looks link it is working correctly to me, were you able to correct this already?Best regards,
MikeHi,
Sorry for the late reply, you said that the Toolset author said that the js files used by the plugin were being moved to the uploads directory, and that is causing the issue? When I look at your site I see them in a directory named “siteground-optimizer-assets”
but you said that you deleted the siteground cache plugin?
If Toolset needs the js files to be in a certain directory can you copy them there via FTP?Best regards,
MikeHi,
Glad we were able to help, we will close this now. Thank you for using Enfold.For your information, you can take a look at Enfold documentation here
For any other questions or issues, feel free to start new threads in the Enfold forum and we will gladly try to help you :)Best regards,
MikeFebruary 9, 2020 at 2:50 pm in reply to: Add icon list on all pages of my website, including product page? #1182746Hi,
Sorry for the late reply and thanks for the login, so I investigated the hooks for the woocommerce single product page to try to move your CTA (call to action) bar below the related products enough that they would be out of the container and not mess up the page, I found that adding a higher number to the end of the action seemed to help:
add_action( 'woocommerce_after_single_product_summary', 'enfold_customization_extra_product_content', 90 );
but there were no other hooks to use on the page. I then realized that the real issue is that your shortcode is using a color section which is breaking the layout, you would also notice this on any page that has a sidebar as the color section always forces the sidebar below it. This is expected and can not be corrected. So you would have to use a different layout for your shortcode.
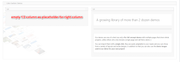
I put one together for you using flex css to align the icon lists into 1/3 containers and gave the section a full-width container to match your layout. It seems to work well, but feel free to adjust if you wish.
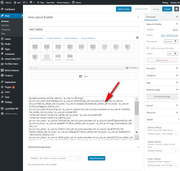
In the Private Content area are two text files, one is your original shortcode and the other is the new shortcode that is now in your functions.php
I added custom classes and IDs to the shortcode so I could use this css in your Quick CSS:/*make cta full-width*/ #cta { width: 30%; margin-left: 3%; display: inline-flex; justify-content: space-around; } #cta-first > .avia-icon-list,#cta > .avia-icon-list { width: 370px; } .container.bottom-cta-container { padding: 0 !important; margin: 0 !important; width: 100% !important; max-width: 1800px !important; } /*add padding to related items*/ #top.single-product .product_column.product_column_4 { padding: 0 50px 0 50px !important; }to add a class to the parent container on the cta bar to remove the padding and margin so it would be full width like a color section, I added this code to the end of your functions.php file in Appearance > Editor:
function bottom_cta_container(){
  ?>
  <script>
(function($){
$(document).ready(function(){
   $('#bottom-cta').closest('div.container').addClass('bottom-cta-container');
});
})(jQuery);
</script>
<?php
}
add_action('wp_footer', 'bottom_cta_container');
Best regards,
MikeHi,
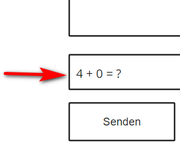
Please try this code in the General Styling > Quick CSS field or in the WordPress > Customize > Additional CSS field:#top.page-id-2479 #kontakt .value_verifier_label { font-size: 16px !important; }After applying the css, Please clear your browser cache and check.
Best regards,
MikeHi,
Please ask your administer to look again, I’m still seeing 99 errors from “http://sswim.ru” on your live site with a broken layerslider and homepage.
But on your test site I don’t see these errors and your test site layerslider is working correctly.Best regards,
MikeHi,
Please try clearing your cache, when I look at your site it looks like your mockup now, Please see the screenshot in Private Content area.Best regards,
MikeFebruary 9, 2020 at 11:17 am in reply to: Move Date below blog Title – using Blog Posts content element #1182704Hi,
Glad we were able to help, we will close this now. Thank you for using Enfold.For your information, you can take a look at Enfold documentation here
For any other questions or issues, feel free to start new threads in the Enfold forum and we will gladly try to help you :)Best regards,
MikeFebruary 9, 2020 at 11:13 am in reply to: URGENT: wp-admin / wp-login.php problems after update theme #1182702Hi,
Glad we were able to help, we will close this now. Thank you for using Enfold.For your information, you can take a look at Enfold documentation here
For any other questions or issues, feel free to start new threads in the Enfold forum and we will gladly try to help you :)Best regards,
MikeHi,
Please try this code in the General Styling > Quick CSS field or in the WordPress > Customize > Additional CSS field:@media only screen and (max-width: 767px) { #top.page-id-17 #av-layout-grid-1 > div > div > div,#top.page-id-17 #av-layout-grid-1 > div > div > div > .avia-iframe-wrap { margin-bottom: 0 !important; } #top.page-id-17 #av-layout-grid-1 > div { padding-bottom: 0 !important; } #top.page-id-17 #angebot > div > div { padding-top: 0 !important; padding-bottom: 0 !important; } }This is for both requests, after applying the css, Please clear your browser cache and check.
Best regards,
MikeFebruary 8, 2020 at 9:59 pm in reply to: Heading Font Sizes mobile – Special Heading / Spezielle Überschrift & HTML #1182658Hey Johannes,
Für das spezielle Überschriftenelement gehen Sie bitte auf die Registerkarte “Stying”> “Schriftgrößen” und klicken Sie dann auf das Symbol der Gerätegröße, die Sie einstellen möchten, und wählen Sie eine Größe aus der Dropdown-Liste aus
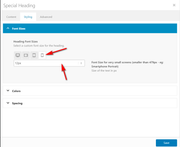
Leider haben Überschriftengrößen wie H1 keine globale Größenpräferenz für Mobilgeräte, aber als ich Ihre Website überprüft habe, waren alle Überschriften spezielle Überschriften. Wenn Sie diesen Schritt befolgen, wird Ihre mobile Schriftgröße für H1, H2 usw. festgelegt .
Wenn Sie eine globale Schriftgröße für Mobilgeräte wünschen, verwenden Sie in Ihrem Quick CSS bitte das folgende CSS:@media only screen and (max-width: 479px) { .responsive #top #wrap_all #main h1.av-special-heading-tag { font-size: 40px !important; } }Dies funktioniert nur für die H1-Sonderüberschrift, wenn der Bildschirm des Handys kleiner als 479 Pixel ist.
— Translated with Google —
For the special heading element please go to the stying tab > font sizes and then click the icon of the device size you wish to set and choose a size from the dropdown
Unfortunately, heading sizes such as H1 do not have a global size preference for mobile devices, but when I checked your site all of your heading were special headings so if you follow this step your mobile font size for H1, H2, etc will be set.
If you would like to have a global font size for mobile then please use css like this in your Quick CSS:@media only screen and (max-width: 479px) { .responsive #top #wrap_all #main h1.av-special-heading-tag { font-size: 40px !important; } }this will only work for H1 special heading when the mobile screen is smaller than 479px, please feel free to adjust.
Best regards,
MikeFebruary 8, 2020 at 9:24 pm in reply to: URGENT: wp-admin / wp-login.php problems after update theme #1182655Hi,
Sorry for the late reply, I was able to login to your site by renaming your Enfold theme to enfold1 and braking it and forcing WordPress to load the default theme, I then renamed Enfold back and had no issues.
I carefully reviewed your site and believe that the issue was either the WP-Optimize plugin or the iThemes Security Pro plugin, something was not setting the login cookie correctly. I note that the Enfold Theme Options > Performance > JS & CSS file merging and compression was disabled.
I disabled your plugins and tested logging in on a couple of different browsers without issue.
Please try clearing your browser cache a few times and then login, if you still have problems logging in then try going to your homepage first and accept your site cookie then try logging in again.Best regards,
MikeHi,
Thanks for the screenshot, you can accomplish this by using a color section in the middle of your page because it has 100% browser width while other columns have the page widths. For example I tested with a special heading then two 1/2 columns and then a color section in which I added the image as a background:
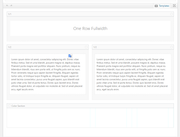
which gave me:
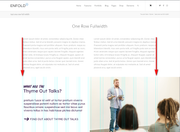
you could use an very wide image that is one half white and add your text section over that half, that is how this section on the Enfold Demo is created:

backend:
On my test page I forced the very wide color section background to browser full-width with this css:#av_section_1 { background-size: contain !important; }you would change the ID to a custom ID for the color section.
then since my page width was already set to stretch I used this css to make the text section above have a max-width of 1210px#main > .main_color > .container { max-width: 1210px !important; }Please give this a try.
Best regards,
MikeHi,
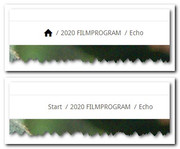
I didn’t see a breadcrumb on your homepage, but I did find one on another page, Please try this code in the General Styling > Quick CSS field or in the WordPress > Customize > Additional CSS field:.breadcrumb-trail a.trail-begin:after { content: "\e821"; font-family: entypo-fontello; font-size: 16px; color: #000; } .breadcrumb-trail a.trail-begin { color:#fff !important; }expected results:
Best regards,
MikeHey Syosse,
Thank you for the mockup and link.
Please try this code in the General Styling > Quick CSS field or in the WordPress > Customize > Additional CSS field:span.logo { width: 150px !important; } #header_main > .container.av-logo-container { max-width: 1010px !important; }feel free to adjust the numbers to suit.
Best regards,
MikeHey andyqueanda,
Thank you for the link, but I do not see any breadcrumbs, are they disabled right now, or do you mean a different page?
If it is this page then please enable the breadcrumbs so we can see them and include a screenshot mockup where you would like them to be.Best regards,
MikeHi,
Glad we were able to help, we will close this now. Thank you for using Enfold.For your information, you can take a look at Enfold documentation here
For any other questions or issues, feel free to start new threads in the Enfold forum and we will gladly try to help you :)Best regards,
MikeHey kmmackey,
Thank you for the link to your example, but unfortunately, we don’t have a way to change the animation from page-load to scroll into view.Best regards,
MikeHey Oversberg,
Sorry for the late reply, thanks for creating two test installs for us to investigate. On the site that the plugin works it creates a div for each Variation Swatch and an image with role=”presentation”
On the other site these div’s and images are not created. Please see the screenshot in Private Content area.
My guess is that these containers are created with javascript and the plugin can’t find the correct place to hook into.
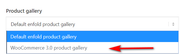
In your Enfold Theme Options > Shop Options > Product gallery try using the WooCommerce 3.0 product gallery option
Best regards,
MikeHi,
Typically we prefer if you would open a new thread for each issue, but in this case please include the logins here. I wonder why the sites are braking? Are you overwriting the theme folders or are you uploading a new theme folder for the new theme?
The steps I took were:
1: rename the new extracted theme folder on my desktop to “enfold-new” from “enfold”
2: upload “enfold-new” to /wp-content/themes/ via FTP
3: in FTP rename “enfold” to “enfold-old” in /wp-content/themes/
4: in FTP rename “enfold-new” to “enfold” in /wp-content/themes/
5: check the site.
note everything is done in FTP, afterwards you can login to the site to ensure everything is working correctly, I would only expect complications if your PHP version is 5.4 or under or if your WordPress is under version 5, or if you didn’t use a child theme and had custom scripts or theme modifications in the parent theme.
Should you need to switch back to the old version, simply reverse the rename order above so your “old” theme is “enfold”Best regards,
Mike -
AuthorPosts