Viewing 30 results - 1 through 30 (of 1,190 total)
  • Author
    Search Results
  • #1496141

    In reply to: Making the logo bigger

    can you please activate the shrink option – then we can see what declaration is needed to have the automatic shrink for the navigation logo too.
    Advantage you can have a much bigger header height – f.e. 200px – all your visitors can read the text of your logo – after scroll it goes to f.e. 100px height.

    #1496049

    Hey hegartpetersen,

    Thank you for the update.

    If you prefer wrapping the title container into multiple rows, please try to add this css code:

    
    #top .av-tabs-scrollable .av-tab-section-outer-container {
        overflow: visible;
    }
    
    #top .av-tabs-scrollable .av-tab-section-tab-title-container {
        display: flex !important;
        flex-wrap: wrap;
        justify-content: center;
        min-width: unset !important;
        left: 0 !important;
        white-space: normal;
    }
    
    #top .av-tabs-scrollable .av-section-tab-title {
        flex: 0 0 auto;
    }
    

    Note that this will hide the arrow indicator beneath the active tab since it depends on the container’s positioning logic. Please refer to the documentation on adding custom css classes to elements:

    https://kriesi.at/documentation/enfold/add-custom-css/

    Let us know the result.

    Best regards,
    Ismael

    #1495982

    Lass also nur noch als hack drin:

    .avia-safari.avia_mobile #wrap_all, 
    .avia-safari.avia_mobile html, 
    .avia-safari.avia_mobile body {
        height: auto !important;
        min-height: 0 !important;
    }
    
    .avia-safari.avia_mobile #main {
        padding-bottom: env(safe-area-inset-bottom) !important;
    }
    
    .avia-safari.avia_mobile html {
        background-color: #11abd6 !important; 
    }
    
    #socket {
        z-index:10005
    }
    

    die untere ist dafür, wenn man manchmal schnell wischt, und “überscrollt” zeigt sich hie und da der Hintergrund (meist weiß) um das zu verhindern auf deine Footer Farbe setzen.

    #1495978

    Bitte lies auch mal was ich so schreibe!

    Warum das CSS deine Seite zerstört:
    Der “Sticky-Footer”-Killer: html, body { height: -webkit-fill-available } zwingt das gesamte Dokument dazu, genau so hoch wie der Bildschirm zu sein. Das bricht oft das natürliche Scrollverhalten.

    Die “Tab-Bar-Überdeckung”: Dass der Footer unten überdeckt wird, liegt am Konflikt zwischen -webkit-fill-available und 100svh. Das iPhone rechnet bei fill-available oft die untere Leiste (die Browser-UI) nicht korrekt ab, wodurch der Content “hinter” die Safari-Buttons rutscht.

    Die Weißflächen: min-height: -webkit-fill-available !important in Kombination mit height: auto !important zwingt Sektionen, die eigentlich klein sein sollten, dazu, den gesamten Screen zu füllen – selbst wenn sie mitten im Content stehen.

    Daher: notiere dir die bestehenden CSS Rules – und lösche diese:

    html, body {
        height:-webkit-fill-available
    }
    
    #wrap_all {
        min-height:-webkit-fill-available
    }
    
    @supports (-webkit-touch-callout: none) {
        .av-minimum-height, .fullsize {
            min-height: -webkit-fill-available !important;
            height:auto !important
        }
    }
    
    @supports (-webkit-touch-callout: none) {
        .av-fullscreen, .av-minimum-height {
            min-height:100svh !important
        }
    }

    und versuche mal diese hier:

    /* 1. Globalen Zwang für html/body nur auf Mobilgeräten aufheben */
    /* Nur für Mobile + Safari (iPhone/iPad) */
    .avia-safari.avia_mobile #wrap_all, 
    .avia-safari.avia_mobile html, 
    .avia-safari.avia_mobile body {
        /* Wir heben den globalen Zwang auf, der das Scrollen und die Footer-Sichtbarkeit stört */
        height: auto !important;
        min-height: 0 !important;
    }
    
    /* 2. Gezielter Fix für die Weißflächen und Footer-Überdeckung auf iOS Safari */
    @supports (-webkit-touch-callout: none) {
        /* Nur wenn Enfold Safari und Mobile erkennt */
        .avia-safari.avia_mobile .av-minimum-height, 
        .avia-safari.avia_mobile .fullsize,
        .avia-safari.avia_mobile .av-fullscreen {
            /* Nutze dvh (Dynamic Viewport Height) für korrekte Footer-Berechnung */
            min-height: 100dvh !important;
            height: auto !important;
            /* Verhindert den Geister-Weißraum durch fill-available */
            -webkit-fill-available: stretch; 
        }
    }
    
    /* 3. Sicherstellen, dass der Footer nicht von der unteren Tab-Bar verdeckt wird */
    .avia-safari.avia_mobile #main {
        padding-bottom: env(safe-area-inset-bottom) !important;
    }
    @supports (-webkit-touch-callout: none) {
        .avia-safari.avia_mobile #wrap_all {
            /* Erzeugt einen Puffer unten, damit der Content nicht unter der Leiste klebt */
            padding-bottom: env(safe-area-inset-bottom) !important;
        }
    }
    

    Ob du den fixierten “Einwilligung verwalten” da lassen solltest – oder lieber hinter dem Footer verschwinden lässt ist dir überlassen.
    Setze mal :

    #socket{
        z-index: 10005;
    }
    #1495087

    but you have seen on top left – the project settings ?

    That page offers you the option for the advanced Layerslider Project.
    On layout there is the option to have a popup slider.

    You can choose the position and the dimension; you can have that popup open automatically – etc.
    or in your case : open by click
    enter a trigger ID or trigger class :

    Enter a CSS selector to trigger the Popup when clicking a target element. Use a dot for class (e.g., .popup-trigger) or a hashtag for ID (e.g., #popup-button). The Popup will toggle open/close with repeated clicks. Leave blank if no trigger is needed.

    next hint: if you like to have the chance to reopen the popup on another click to that button – scroll down again to Repeat Control:
    and uncheck “prevent from reopening”.

    Depending on your settings, the same Popup can be displayed in multiple times without reloading the page. Such example would be when you use a scroll trigger and the user scrolls to that location a number of times. Enabling this option will prevent opening this Popup consequently.

    PS: do not forget before you leave the layerslider dashboard – to save and publish with these popup settings.

    now link on your page a button to only # but give the custom-id (or custom class) to that button element: popup-button !!!

    Do not link to the trigger ID (or class) just fill in the trigger ID or class on advanced tab – developer settings.

    PPS: do not forget to place the layerslider to that page ;)

    see: https://webers-testseite.de/advanced-layerslider/

    • This reply was modified 1 month ago by Guenni007.

    test :

    /* 1. GLOBAL STICKY PERMISSION */
    html.html_stretched, 
    html.html_stretched body#top,
    #top #wrap_all, 
    #top #main {
        overflow: visible !important;
    }
    
    @media only screen and (min-width: 768px) {
    
        /* 2. MAIN CONTAINER 
           We use CSS Grid for the 65% / 1fr split */
        #top .avia-gallery.av-gallery-sticky-scroll {
            display: grid !important;
            grid-template-columns: 65% 1fr !important;
            gap: 30px !important;
            align-items: start !important; /* Crucial: prevents big-wrapper from stretching to full height */
            overflow: visible !important;
            position: relative !important;
            width: 100% !important;
        }
    
        /* 3. STICKY WRAPPER (Left Column) */
        #top .avia-gallery.av-gallery-sticky-scroll .avia-gallery-big-wrapper {
            grid-column: 1 !important;
            position: -webkit-sticky !important;
            position: sticky !important;
            top: 100px !important; /* Adjust based on your header height */
            z-index: 100 !important;
            height: auto !important;
            margin: 0 !important;
            background: #ffffff !important;
        }
    
        /* 4. IMAGE ELEMENT */
        #top .avia-gallery.av-gallery-sticky-scroll .avia-gallery-big {
            position: relative !important;
            display: block !important;
            height: auto !important;
        }
    
        #top .avia-gallery.av-gallery-sticky-scroll .avia-gallery-big img {
            display: block !important;
            width: 100% !important;
            height: auto !important;
            max-height: 80vh;
            object-fit: contain;
        }
    
        /* 5. THUMBNAILS (Right Column) */
        #top .avia-gallery.av-gallery-sticky-scroll .avia-gallery-thumb {
            position: relative !important;
            z-index: 10 !important;
            padding: 0 !important;
            width: 100% !important;
          min-height: 100vh;  /*** we need the gallery thumbs container bigger than the big image *** /
        }
    }

    the min-height option is necessary only because my thumbs container is less high than the big image – guess your

    And change the 65% to your needs in : grid-template-columns: 65% 1fr !important;

    goldengate415
    Participant

    Hi Enfold team,

    I’m using the Enfold Gallery element in WordPress (Avia Layout Builder). I’m trying to achieve a CSS-only UX like this:

    The large preview image stays at the top and is sticky while the user scrolls down through the thumbnails below it.

    Once the thumbnails end, the page continues scrolling normally to the next section.

    I’m not using any JS. I added a custom class to the Gallery element and tried multiple CSS approaches. I can sometimes get sticky to work, but then the layout breaks (preview shifts left / preview becomes tiny / thumbnails become huge or microscopic / only a few thumbs show per row). When I fix thumbnail sizing, the sticky behavior stops working.

    What I’m using

    Enfold theme (latest) + WordPress

    Gallery element style: big preview + thumbnails (the normal preview-on-top layout)

    I added a custom class on the Gallery element: av-gallery-sticky-scroll

    What I want (exact behavior)

    Keep Enfold’s default layout: big image on top, thumbnails below

    Make only the big preview sticky (position: sticky; top: …)

    Thumbnails should remain a normal-sized grid below

    No inner scrolling container — I want normal page scroll, with preview sticking until the thumbnail list ends

    CSS attempts (examples)

    I tried sticky on .avia-gallery-big and also .avia-gallery-big-inner (in case the inner wrapper is needed), plus forcing overflow: visible on likely parents. I also tried overriding thumbnail widths using flex/grid.

    Example of my latest attempt:

    @media (min-width: 990px){
    .av-gallery-sticky-scroll{
    –stickyTop: 120px;
    –thumbSize: 140px;
    }

    .av-gallery-sticky-scroll .avia-gallery-big,
    .av-gallery-sticky-scroll .avia-gallery-big .avia-gallery-big-inner{
    position: sticky;
    top: var(–stickyTop);
    z-index: 50;
    }

    .av-gallery-sticky-scroll,
    .av-gallery-sticky-scroll .avia-gallery,
    .av-gallery-sticky-scroll .avia-gallery-big{
    overflow: visible !important;
    }

    .av-gallery-sticky-scroll .avia-gallery-thumb{
    display: grid !important;
    grid-template-columns: repeat(auto-fill, var(–thumbSize));
    gap: 12px;
    margin-top: 14px;
    justify-content: start;
    }

    .av-gallery-sticky-scroll .avia-gallery-thumb li{
    float: none !important;
    width: auto !important;
    margin: 0 !important;
    padding: 0 !important;
    }

    .av-gallery-sticky-scroll .avia-gallery-thumb img{
    width: 100% !important;
    height: auto !important;
    display: block;
    }
    }

    Result: thumbnail sizing becomes unpredictable (either microscopic or huge), and sticky often stops working.

    My questions

    Is it possible CSS-only to make the Gallery element’s big preview sticky (preview on top, thumbs below) without breaking Enfold’s internal thumb sizing/layout rules?

    Is there a recommended selector/wrapper inside the Gallery element that is safe to apply position: sticky to?

    If sticky fails because of an Enfold container overflow rule, which wrapper should I override (and is there an Enfold setting that influences this)?

    If this isn’t feasible with the Gallery element, is there a recommended Enfold-native alternative (e.g., specific element/layout pattern) that support suggests?

    Thanks,
    Rob

    #1494610

    Hey Sebastian,

    Thank you for the inquiry.

    You can use the Column elements from the Advanced Layout Builder (ALB). Add a custom CSS class to the first (left) column (for example, av-column-with-scrollbar), then add custom css to limit its height and enable a scrollbar.

    .av-column-with-scrollbar {
      height: 100vh; 
      overflow-y: auto;
      overflow-x: hidden;
    }

    For the right column, add the class name “av-column-without-scrollbar”, then add this css code:

    .av-column-without-scrollbar {
      height: 100vh;
    }

    Let us know the result.

    Best regards,
    Ismael

    #1494037

    Hey SurigliaStudio,
    When I test your site the “Taglie” button doesn’t create a mobile style flyout menu, I assume that you now have the plugin disabled, but I think that I understand. I have created a custom function that will create a mobile style overlay menu from a sticky button on the right using a image that you can choose:
    fUawEAX.md.png
    fUaOLwF.md.png
    and on mobile the overlay is about 95% of the screen.
    The function uses the Named Menus from your WordPress menus to show:
    fUaQF6B.md.png
    In Configuration there is a line to choose your menu image/icon and the default menu to show on all pages:
    fUcd32j.md.png
    and below you can add as many additional menus with an array of pages that they will show on:
    fUcFI4e.md.png
    The code also has all of the css built-in for styling if you want to adjust.
    Add this code to your child theme functions.php file, if you are not using a child theme you could use the WP Code plugin then add a new snippet, in the top right corner use the PHP snippet as the code type:
    fUcTO4R.jpg
    then add the above code and save.

    /**
     * Add Sticky Button with Fly-out Menu
     * Add this to your Enfold child theme's functions.php
     */
    
    function custom_sticky_menu_button() {
        // Configuration - Change these values as needed
        $button_image = '/wp-content/uploads/2026/01/menu.png'; // Update path to your PNG
        $menu_slug = 'sticky menu'; // Default menu slug - change as needed
        
        // Optional: Set different menu based on page ID
        $current_page_id = get_the_ID();
        // Example: Use different menu for specific pages
         if (in_array($current_page_id, array(1028, 1080, 1031, 1034))) {
            $menu_slug = 'sticky menu two';
         }
    	if (in_array($current_page_id, array(1376, 1331, 1277, 1283))) {
            $menu_slug = 'sticky menu three';
         }
        
        // Get the menu
        $menu_items = wp_get_nav_menu_items($menu_slug);
        
        if (!$menu_items) {
            return; // Exit if menu doesn't exist
        }
        ?>
        
        <!-- Sticky Button -->
        <div id="sticky-menu-btn" class="sticky-menu-button">
            " alt="Menu">
        </div>
        
        <!-- Fly-out Menu Overlay -->
        <div id="flyout-menu-overlay" class="flyout-menu-overlay">
            <div class="flyout-menu-close">×</div>
            <nav class="flyout-menu-content">
                <?php
                wp_nav_menu(array(
                    'menu' => $menu_slug,
                    'container' => false,
                    'menu_class' => 'flyout-nav-menu',
                    'fallback_cb' => false
                ));
                ?>
            </nav>
        </div>
        
        <style>
            /* Sticky Button Styles */
            .sticky-menu-button {
                position: fixed;
                right: 20px;
                top: 50%;
                transform: translateY(-50%);
                width: 50px;
                height: 50px;
                border-radius: 50%;
                cursor: pointer;
                z-index: 9998;
                transition: opacity 0.3s ease;
                box-shadow: 0 2px 10px rgba(0,0,0,0.3);
                overflow: hidden;
            }
            
            .sticky-menu-button img {
                width: 100%;
                height: 100%;
                object-fit: cover;
            }
            
            .sticky-menu-button.hidden {
                opacity: 0;
                pointer-events: none;
            }
            
            /* Fly-out Menu Overlay */
            .flyout-menu-overlay {
                position: fixed;
                top: 0;
                right: -100%;
                width: 25%;
                height: 100vh;
                background: #fff;
                z-index: 9999;
                transition: right 0.4s ease;
                box-shadow: -2px 0 10px rgba(0,0,0,0.2);
                overflow-y: auto;
            }
            
            .flyout-menu-overlay.active {
                right: 0;
            }
            
            /* Close Button */
            .flyout-menu-close {
                position: absolute;
                top: 20px;
                right: 20px;
                font-size: 36px;
                cursor: pointer;
                color: #333;
                width: 40px;
                height: 40px;
                display: flex;
                align-items: center;
                justify-content: center;
                line-height: 1;
                transition: color 0.3s ease;
            }
            
            .flyout-menu-close:hover {
                color: #000;
            }
            
            /* Menu Content */
            .flyout-menu-content {
                padding: 80px 30px 30px;
            }
            
            .flyout-nav-menu {
                list-style: none;
                margin: 0;
                padding: 0;
            }
            
            .flyout-nav-menu li {
                margin: 0 0 15px 0;
            }
            
            .flyout-nav-menu a {
                display: block;
                padding: 12px 0;
                color: #333;
                text-decoration: none;
                font-size: 16px;
                transition: color 0.3s ease;
                border-bottom: 1px solid #eee;
            }
            
            .flyout-nav-menu a:hover {
                color: #000;
            }
            
            /* Sub-menu styles */
            .flyout-nav-menu .sub-menu {
                list-style: none;
                margin: 10px 0 0 20px;
                padding: 0;
            }
            
            .flyout-nav-menu .sub-menu a {
                font-size: 14px;
                padding: 8px 0;
            }
            
            /* Mobile Styles */
            @media (max-width: 768px) {
                .flyout-menu-overlay {
                    width: 95%;
                }
            }
        </style>
        
        <script>
            (function() {
                var btn = document.getElementById('sticky-menu-btn');
                var overlay = document.getElementById('flyout-menu-overlay');
                var closeBtn = document.querySelector('.flyout-menu-close');
                
                // Open menu
                btn.addEventListener('click', function() {
                    overlay.classList.add('active');
                    btn.classList.add('hidden');
                    document.body.style.overflow = 'hidden'; // Prevent body scroll
                });
                
                // Close menu
                closeBtn.addEventListener('click', function() {
                    overlay.classList.remove('active');
                    btn.classList.remove('hidden');
                    document.body.style.overflow = ''; // Restore body scroll
                });
                
                // Close on overlay click outside menu
                overlay.addEventListener('click', function(e) {
                    if (e.target === overlay) {
                        overlay.classList.remove('active');
                        btn.classList.remove('hidden');
                        document.body.style.overflow = '';
                    }
                });
            })();
        </script>
        
        <?php
    }
    add_action('wp_footer', 'custom_sticky_menu_button');
    

    Adjust the image, menus, and page IDs to suit.

    Best regards,
    Mike

    #1493779
    finchkelsey
    Participant

    HELP!
    I don’t want t0 rebuild what is missing..

    [av_section min_height='custom' min_height_pc='25' min_height_px='300px' padding='default' custom_margin='0px' custom_margin_sync='true' color='main_color' background='bg_color' custom_bg='#f2f2f2' src='https://cdnbeefperforms.ca/wp-content/uploads/2024/03/frying-pans-bg-scaled-1030x687.jpg' attachment='25287' attachment_size='large' attach='scroll' position='center right' repeat='stretch' overlay_enable='aviaTBoverlay_enable' overlay_opacity='0.5' overlay_color='#000000' shadow='no-border-styling' bottom_border='no-border-styling']
    [av_heading heading='Foodservice Resources' tag='h2' style='blockquote modern-quote' subheading_active='subheading_below' color='custom-color-heading' custom_font='#ffffff' padding='10' custom_class='white']
    New resources provided by Canada Beef and the Canadian Beef Centre of Excellence.
    [/av_heading]
    [/av_section]

    [av_section min_height_pc='25' min_height_px='500px' padding='default' custom_margin='0px' custom_margin_sync='true' color='main_color' background='bg_color' shadow='no-border-styling' bottom_border='no-border-styling']

    [av_one_fourth first min_height='av-equal-height-column' vertical_alignment='av-align-top' margin='40px' margin_sync='true' padding='40px' padding_sync='true' background='bg_color' background_color='#f2f2f2']
    [av_textblock]
    <h4 style=”text-align: center;”>Appetizers and Soups</h4>
    [/av_textblock]
    [av_image src='https://cdnbeefperforms.ca/wp-content/uploads/2024/05/CDNB_Culinary_Planner_Appetizers_and_Soups_Interactive_F-pdf-796x1030.jpg' attachment='25496' attachment_size='large' align='center' overlay_opacity='0.4' overlay_color='#000000' overlay_text_color='#ffffff' animation='fade-in']
    [/av_image]
    [av_button label='View Now' link='manually,https://cdnbeefperforms.ca/wp-content/uploads/2024/03/RS12961_Menu_Planner_Appetizers_and_Soups_Interactive_F_LowRes.pdf' link_target='_blank' size='large' position='center' color='black' custom_bg='#444444' custom_font='#ffffff']
    [av_textblock]
    Beef cuts, known for their rich and savory flavours, are the perfect addition to any soup or appetizer spread. From tenderloin to brisket, there are endless possibilities to create delicious bites that will leave your guests craving for more.
    [/av_textblock]
    [/av_one_fourth]

    [av_one_fourth min_height='av-equal-height-column' vertical_alignment='av-align-top' margin='40px' margin_sync='true' padding='40px' padding_sync='true' background='bg_color' background_color='#f2f2f2']
    [av_textblock]
    <h4 style=”text-align: center;”>Beef Bowls</h4>
    [/av_textblock]
    [av_image src='https://cdnbeefperforms.ca/wp-content/uploads/2024/05/CDNB_Culinary_Planner_Beef_Bowls_Interactive_F-pdf-796x1030.jpg' attachment='25498' attachment_size='large' align='center' overlay_opacity='0.4' overlay_color='#000000' overlay_text_color='#ffffff' animation='fade-in']
    [/av_image]
    [av_button label='View Now' link='manually,https://cdnbeefperforms.ca/wp-content/uploads/2024/05/10053_CB_Beef_Bowl_Menu_Planner_Ph5F_Digital.pdf' link_target='_blank' size='large' position='center' color='black' custom_bg='#444444' custom_font='#ffffff']
    [av_textblock]
    Beef bowl entrées are a popular choice among meat lovers and food enthusiasts. These hearty and satisfying dishes showcase the versatility and succulence of various beef cuts. Each cut adds its unique flavour and texture to the dish
    [/av_textblock]
    [/av_one_fourth]

    [av_one_fourth min_height='av-equal-height-column' vertical_alignment='av-align-top' margin='40px' margin_sync='true' padding='40px' padding_sync='true' background='bg_color' background_color='#f2f2f2']
    [av_textblock]
    <h4 style=”text-align: center;”>Burgers</h4>
    [/av_textblock]
    [av_image src='https://cdnbeefperforms.ca/wp-content/uploads/2024/05/CDNB_Culinary_Planner_Burgers_Interactive_F-pdf-796x1030.jpg' attachment='25500' attachment_size='large' align='center' overlay_opacity='0.4' overlay_color='#000000' overlay_text_color='#ffffff' animation='fade-in']
    [/av_image]
    [av_button label='View Now' link='manually,https://cdnbeefperforms.ca/wp-content/uploads/2024/05/RS12961_Menu_Planner_Burgers_Interactive_F_LowRes.pdf' link_target='_blank' size='large' position='center' color='black' custom_bg='#444444' custom_font='#ffffff']
    [av_textblock]
    Beef burgers are highly popular and versatile, ideal for quick service and diverse culinary styles. Easy to customize and profitable, they appeal to a broad customer base, fitting various dining settings from fast food to gourmet restaurants, ensuring consistent demand and customer satisfaction.
    [/av_textblock]
    [/av_one_fourth]

    [av_one_fourth min_height='av-equal-height-column' vertical_alignment='av-align-top' margin='40px' margin_sync='true' padding='40px' padding_sync='true' background='bg_color' background_color='#f2f2f2']
    [av_textblock]
    <h4 style=”text-align: center;”>Sandwiches, Flatbreads and Wraps</h4>
    [/av_textblock]
    [av_image src='https://cdnbeefperforms.ca/wp-content/uploads/2024/05/CDNB_Culinary_Planner_Sandwiches_Flatbreads_and_Wraps_Interactive_F-pdf-796x1030.jpg' attachment='25502' attachment_size='large' align='center' overlay_opacity='0.4' overlay_color='#000000' overlay_text_color='#ffffff' animation='fade-in']
    [/av_image]
    [av_button label='View Now' link='manually,https://cdnbeefperforms.ca/wp-content/uploads/2024/05/RS12961_Menu_Planner_Sandwiches_Flatbreads_and_Wraps_Interactive_F_LowRes.pdf' link_target='_blank' size='large' position='center' color='black' custom_bg='#444444' custom_font='#ffffff']
    [av_textblock]
    Sandwiches, flatbreads, and wraps are versatile dishes that can be made using various ingredients, and beef cuts are an excellent choice to add a hearty and satisfying flavour to these dishes.
    [/av_textblock]
    [/av_one_fourth]

    [av_one_fourth first min_height='av-equal-height-column' vertical_alignment='av-align-top' margin='40px' margin_sync='true' padding='40px' padding_sync='true' background='bg_color' background_color='#f2f2f2']
    [av_textblock]
    <h4 style=”text-align: center;”>Entrées Salads</h4>
    [/av_textblock]
    [av_image src='https://cdnbeefperforms.ca/wp-content/uploads/2024/05/CDNB_Culinary_Planner_Entree_Salads_Interactive_F-pdf-796x1030.jpg' attachment='25505' attachment_size='large' align='center' overlay_opacity='0.4' overlay_color='#000000' overlay_text_color='#ffffff' animation='fade-in']
    [/av_image]
    [av_button label='View Now' link='manually,https://cdnbeefperforms.ca/wp-content/uploads/2024/05/RS12961_Menu_Planner_Entree_Salads_Interactive_F_LowRes.pdf' link_target='_blank' size='large' position='center' color='black' custom_bg='#444444' custom_font='#ffffff']
    [av_textblock]
    Beef cuts in salads offer a hearty twist, bringing savoury slices of sirloin or flavourful strips of flank steak to vibrant greens and vegetables. Grilled to perfection, these cuts elevate salads, adding richness and a protein-packed punch to every bite.
    [/av_textblock]
    [/av_one_fourth]

    [av_one_fourth min_height='av-equal-height-column' vertical_alignment='av-align-top' margin='40px' margin_sync='true' padding='40px' padding_sync='true' background='bg_color' background_color='#f2f2f2']
    [av_textblock]
    <h4 style=”text-align: center;”>Kids Menu</h4>
    [/av_textblock]
    [av_image src='https://cdnbeefperforms.ca/wp-content/uploads/2024/05/CDNB_Culinary_Planner_Kids_Menu_Interactive_F-pdf-796x1030.jpg' attachment='25507' attachment_size='large' align='center' overlay_opacity='0.4' overlay_color='#000000' overlay_text_color='#ffffff' animation='fade-in']
    [/av_image]
    [av_button label='View Now' link='manually,https://cdnbeefperforms.ca/wp-content/uploads/2024/05/RS12961_Menu_Planner_Kids_Menu_Interactive_F_LowRes.pdf' link_target='_blank' size='large' position='center' color='black' custom_bg='#444444' custom_font='#ffffff']
    [av_textblock]
    A kids menu featuring beef cuts offers tasty and nutritious options that cater to young tastes. These meals aim to please young palates while delivering essential protein and nutrients for their growth.
    [/av_textblock]
    [/av_one_fourth]

    [av_one_fourth min_height='av-equal-height-column' vertical_alignment='av-align-top' margin='40px' margin_sync='true' padding='40px' padding_sync='true' background='bg_color' background_color='#f2f2f2']
    [av_textblock]
    <h4 style=”text-align: center;”>Entrées</h4>
    [/av_textblock]
    [av_image src='https://cdnbeefperforms.ca/wp-content/uploads/2024/05/CDNB_Culinary_Planner_Entree_Classics_Interactive_F-pdf-796x1030.jpg' attachment='25509' attachment_size='large' align='center' overlay_opacity='0.4' overlay_color='#000000' overlay_text_color='#ffffff' animation='fade-in']
    [/av_image]
    [av_button label='View Now' link='manually,https://cdnbeefperforms.ca/wp-content/uploads/2024/05/RS12961_Menu_Planner_Entree_Classics_Interactive_F_LowRes.pdf' link_target='_blank' size='large' position='center' color='black' custom_bg='#444444' custom_font='#ffffff']
    [av_textblock]
    Beef cuts can be utilized to create a variety of delicious entrée classics that are sure to satisfy any meat lover’s palate. The possibilities for creating delicious entrée classics are endless.
    [/av_textblock]
    [/av_one_fourth]

    [av_one_fourth min_height='av-equal-height-column' vertical_alignment='av-align-top' margin='40px' margin_sync='true' padding='40px' padding_sync='true' background='bg_color' background_color='#f2f2f2']
    [av_textblock]
    <h4 style=”text-align: center;”>Senior Living</h4>
    [/av_textblock]
    [av_image src='https://cdnbeefperforms.ca/wp-content/uploads/2024/05/CDNB_Culinary_Planner_Senior_Living_Interactive_F-pdf-796x1030.jpg' attachment='25511' attachment_size='large' align='center' overlay_opacity='0.4' overlay_color='#000000' overlay_text_color='#ffffff' animation='fade-in']
    [/av_image]
    [av_button label='View Now' link='manually,https://cdnbeefperforms.ca/wp-content/uploads/2024/05/RS12961_Menu_Planner_Senior_Living_Interactive_F_LowRes.pdf' link_target='_blank' size='large' position='center' color='black' custom_bg='#444444' custom_font='#ffffff']
    [av_textblock]
    Entrées for seniors using beef cuts offer a wide range of options that are both nutritious and appetizing. These entrees can provide the necessary nutrients for seniors while catering to their specific dietary needs and preferences.
    [/av_textblock]
    [/av_one_fourth]

    [/av_section]

    [av_section min_height='custom' min_height_pc='25' min_height_px='300px' padding='default' custom_margin='0px' custom_margin_sync='true' color='main_color' background='bg_color' custom_bg='#f2f2f2' src='https://cdnbeefperforms.ca/wp-content/uploads/2023/12/RS12752_RS11619_Tuscan-inspired-Grilled-Steak-1500x430.jpg' attachment='25111' attachment_size='featured' attach='scroll' position='center right' repeat='stretch' overlay_enable='aviaTBoverlay_enable' overlay_opacity='0.5' overlay_color='#000000' shadow='no-border-styling' bottom_border='no-border-styling']

    [av_one_half first vertical_alignment='av-align-middle' space='3']
    [av_heading heading='VIDEO' tag='h1' style='blockquote modern-quote modern-centered' subheading_active='subheading_below' color='custom-color-heading' custom_font='#ffffff' padding='10']
    <div style=”font-size:24px;”>CANADA PRIME GRADE BEEF</div><div style=”font-size:24px;padding-top:10px;”>MASTER CHEF</div>
    [/av_heading]
    [/av_one_half]

    [av_one_half]
    [av_textblock]
    <div style=”border:solid 5px #f5f7f7; padding: 56.25% 0 0 0; position: relative;”>
    <iframe style=”position: absolute; top: 0; left: 0; width: 100%; height: 100%;” title=”Canada Prime Grade Beef – Master Chef” src=”https://player.vimeo.com/video/1074398616?badge=0&autopause=0&player_id=0&app_id=58479&#8243; frameborder=”0″></iframe>
    </div>
    [/av_textblock]
    [/av_one_half]

    [/av_section]

    [av_section padding='default' custom_margin='0px' custom_margin_sync='true' color='main_color' background='bg_color' custom_bg='#f2f2f2' shadow='no-border-styling' bottom_border='no-border-styling']

    [av_two_fifth first margin='0px' margin_sync='true' padding='40px' padding_sync='true' background='bg_color' background_color='#f2f2f2']
    [av_image src='https://cdnbeefperforms.ca/wp-content/uploads/2024/03/RS12896_9582_2024_CB_Foodservice_Merch_Poster_F-1-pdf-scaled.jpg' attachment='25327' attachment_size='full' align='center' overlay_opacity='0.4' overlay_color='#000000' overlay_text_color='#ffffff' animation='fade-in']
    [/av_image]
    [av_button label='View PDF' link='manually,https://cdnbeefperforms.ca/wp-content/uploads/2024/03/RS12896_9582_2024_CB_Foodservice_Merch_Poster_F-1.pdf' link_target='_blank' size='large' position='center' color='black' custom_bg='#444444' custom_font='#ffffff']
    [/av_two_fifth]

    [av_three_fifth margin='0px' margin_sync='true' padding='40px' padding_sync='true' background='bg_color' background_color='#f2f2f2']
    [av_textblock]
    <h4 style=”text-align: center;”>Foodservice Beef Merchandising Guide Poster</h4>
    [/av_textblock]
    [av_textblock]
    <p style=”text-align: center;”>Educate your front and back of house staff about the versatility of Canadian Beef with the new Foodservice Merchandising Poster, powered by the Canadian Beef Information Gateway. Users can scan QR codes to learn how to merchandise each foodservice-specific beef subprimal through videos, photographs, and more. Each subprimal also has product specifications to ensure informed purchasing, and commercial recipes to inspire your team to do more with Canadian Beef. Users can also access information about the Canadian Beef Advantage, including our gate-to-plate virtual tours, enabling further discussions about the unique qualities of Canadian Beef to customers.</p>
    [/av_textblock]
    [av_textblock]
    [gravityform id=”39″ title=”true” description=”false” ajax=”true”]
    [/av_textblock]
    [/av_three_fifth]

    [/av_section]

    Hey ti2media,
    Try adding this snippet to your child theme functions.php:

    function add_sticky_info_box() {
        ?>
        <style>
            .sticky-info-box {
                position: fixed;
                bottom: 120px;
                right: 20px;
                width: 300px;
                height: 300px;
                background: #ffffff;
                border: 1px solid #ddd;
                border-radius: 8px;
                box-shadow: 0 4px 12px rgba(0,0,0,0.15);
                z-index: 9999;
                display: flex;
                flex-direction: column;
                padding: 20px;
                box-sizing: border-box;
                transition: opacity 0.3s ease;
            }
            
            .sticky-info-box.hidden {
                display: none;
            }
            
            .sticky-info-box-header {
                display: flex;
                justify-content: space-between;
                align-items: flex-start;
                margin-bottom: 15px;
            }
            
            .sticky-info-box-title {
                font-size: 20px;
                font-weight: bold;
                color: #333;
                margin: 0;
                flex: 1;
            }
            
            .sticky-info-box-close {
                background: none;
                border: none;
                font-size: 24px;
                color: #999;
                cursor: pointer;
                padding: 0;
                width: 30px;
                height: 30px;
                display: flex;
                align-items: center;
                justify-content: center;
                transition: color 0.2s ease;
            }
            
            .sticky-info-box-close:hover {
                color: #333;
            }
            
            .sticky-info-box-message {
                flex: 1;
                color: #666;
                font-size: 14px;
                line-height: 1.6;
                margin-bottom: 20px;
                overflow-y: auto;
            }
            
            .sticky-info-box-button {
                background: #0073aa;
                color: white;
                border: none;
                padding: 12px 24px;
                border-radius: 4px;
                font-size: 16px;
                cursor: pointer;
                text-decoration: none;
                display: inline-block;
                text-align: center;
                transition: background 0.2s ease;
            }
            
            .sticky-info-box-button:hover {
                background: #005a87;
            }
            
            .sticky-info-toggle {
                position: fixed;
                bottom: 120px;
                right: 50px;
                width: 50px;
                height: 50px;
                background: #0073aa;
                color: white;
                border: none;
                border-radius: 50%;
                font-size: 24px;
                cursor: pointer;
                box-shadow: 0 4px 12px rgba(0,0,0,0.15);
                z-index: 9998;
                display: none;
                align-items: center;
                justify-content: center;
                transition: background 0.2s ease;
            }
            
            .sticky-info-toggle:hover {
                background: #005a87;
            }
            
            .sticky-info-toggle.visible {
                display: flex;
            }
        </style>
        
        <div class="sticky-info-box" id="stickyInfoBox">
            <div class="sticky-info-box-header">
                <h3 class="sticky-info-box-title">Important Information</h3>
                <button class="sticky-info-box-close" id="closeInfoBox" aria-label="Close">×</button>
            </div>
            <div class="sticky-info-box-message">
                <p>This is your information box! You can customize this message to display any content you'd like to share with your visitors.</p>
            </div>
            <a href="/your-page-url" class="sticky-info-box-button">Learn More</a>
        </div>
        
        <button class="sticky-info-toggle" id="infoToggle" aria-label="Show information">ℹ</button>
        
        <script>
            (function() {
                var infoBox = document.getElementById('stickyInfoBox');
                var closeBtn = document.getElementById('closeInfoBox');
                var toggleBtn = document.getElementById('infoToggle');
                
                // Close the info box
                closeBtn.addEventListener('click', function() {
                    infoBox.classList.add('hidden');
                    toggleBtn.classList.add('visible');
                });
                
                // Show the info box again
                toggleBtn.addEventListener('click', function() {
                    infoBox.classList.remove('hidden');
                    toggleBtn.classList.remove('visible');
                });
            })();
        </script>
        <?php
    }
    add_action('wp_footer', 'add_sticky_info_box');
    

    Then adjust the title, message, buttone text & link to suit. You can also adjust the CSS to change colors, etc.
    It places the box & info button 120px from the bottom so they are above the scroll-top button, ratio than have them move if the scroll-top shows, which would not be so good.
    fIPHs99.md.png
    fIPJ6iv.md.png

    Best regards,
    Mike

    #1491451

    Hi Ismael,

    The fact that files are physically deleted is a problem. Honestly, it’s a bit frustrating, because if you guys don’t see any problem, we are stuck with a theme that will cause display issues when you least expect it.

    Since you’d like to see style issues, here’s the steps you need to follow. It can also be reproduce on the staging site:

    1) Activate WP Rocket (the cache plugin we use)

    2) Flush WP Rocket’s cache.

    3) Visit the homepage from an Incognito window. Everything looks good. Notice the backgrounds and the file: https://i.imgur.com/Za2PKtu.png

    4) Go to Theme Options > Performance and scroll down. You will see the option that says “Delete Old CSS And JS Files” is unchecked: https://i.imgur.com/saPibEH.png

    5) Toggle the option on and then off again so the button to save the changes becomes available: https://i.imgur.com/UKA29Ny.png

    6) Save the changes.

    7) At this point, the physical CSS files are deleted.

    8) Close the previous Incognito window and open a new one.

    9) Visit the homepage again. Styles are missing: https://i.imgur.com/oqqtgWN.png

    The reason is clear. Enfold is deleting the files the cached page still references to. I think you need to solve this in any way:
    – Either flush the cache of the most popular cache plugins automatically,
    – or make the checkbox “Delete Old CSS And JS Files” do what it’s supposed to do (if anyway they’re deleted, why does this checkbox exist?),
    – or provide a solution (a filter or something) so that we can flush the cache programmatically when the “Save the changes” button is pressed.

    Thank you,

    #1490822
    felix_frank
    Participant

    Hallo zusammen!

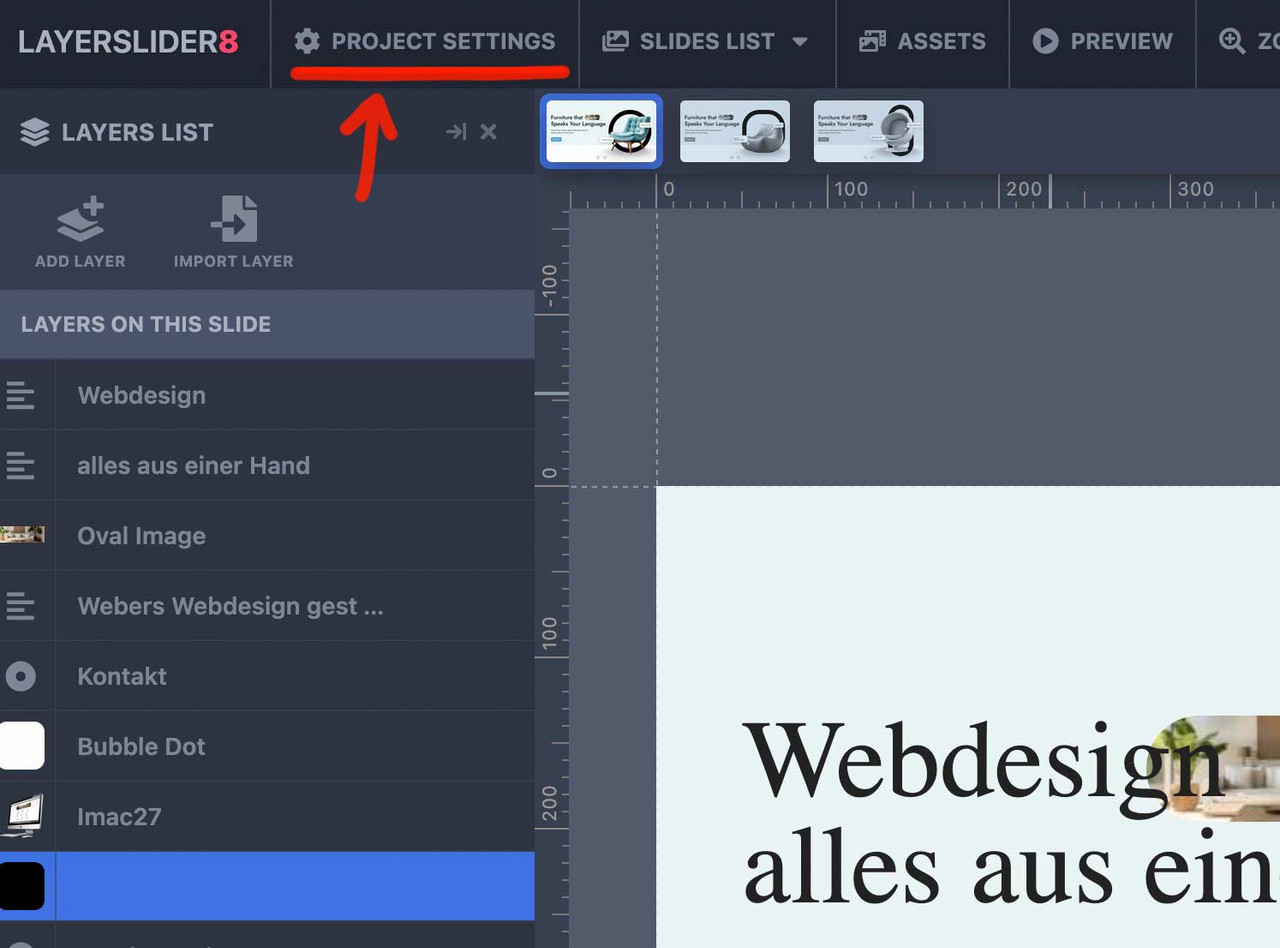
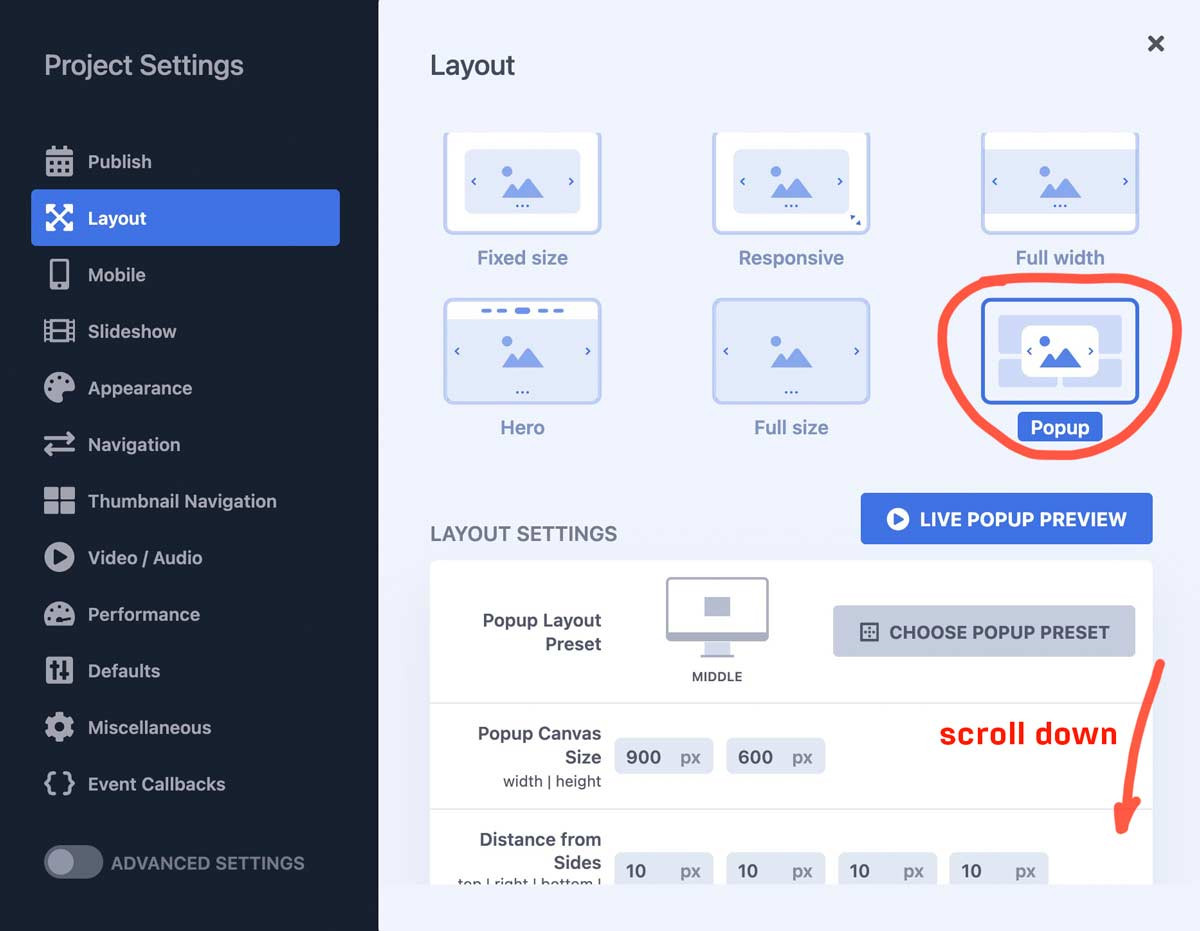
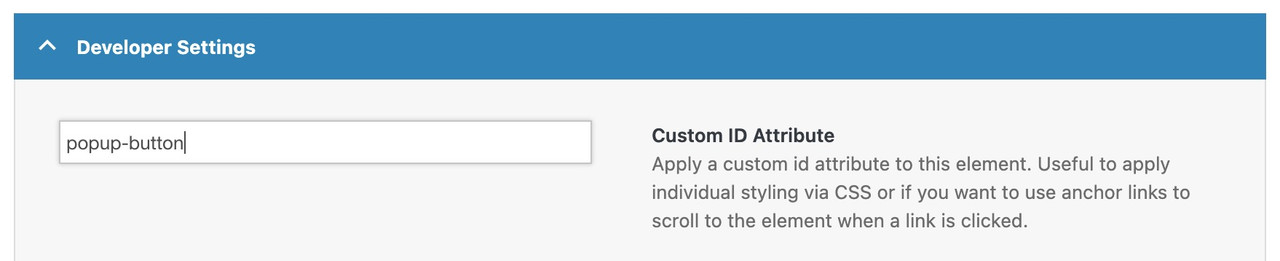
    Ich habe die Schritte wie in https://kriesi.at/support/topic/pop-up-lightbox/#post-1429407 beschrieben umgesetzt und dann den Shortcode von einem Formular eingefügt. Mein Ziel ist es, ein Formular in einem Popup anzuzeigen, wenn man auf einen Button klickt.

    Also:

    
    function magnific_popup_with_no_scroll_and_button() { ?>
      <script>
    (function($) {
      $(window).on('load', function(){
    	$('.open-popup-button a').addClass('open-popup-link');
        $('.open-popup-link').addClass('no-scroll');
        $('.open-popup-link').magnificPopup({
          type:'inline',
          midClick: true,
          callbacks: {
            beforeOpen: function () {
              $('body').css("overflow-y", "hidden");
            },
            close: function() {
              $('body').css("overflow-y", "auto");
            },
          },
        });
      });
      })(jQuery);
    </script>
      <?php
    }
    add_action( 'wp_footer', 'magnific_popup_with_no_scroll_and_button', 99 );
    

    Das in die functions.php eingesetzt.

    Eine Code-Box mit folgendem Inhalt erstellt:

    
    <div id="open-popup" class="popup mfp-hide">
    <p>[av_layout_template template_id='popform']</p>
    </div>
    

    Und auch das im Quick-CSS hinzugefügt:

    
    .popup {
    position: relative;
    background: #FFF;
    padding: 20px;
    width: auto;
    max-width: 500px;
    margin: 20px auto;
    }
    

    Weil es nicht funktioniert hat habe ich auch das noch hinzugefügt:

    
    add_filter('avia_allow_shortcodes_in_codeblock', '__return_true');
    add_filter('avf_alb_support_modal_templates', '__return_true');
    

    Leider funktioniert es nicht. Es öffnet sich ein Modal aber darin steht nur der Shortcode. Ich bin ratlos. Kann mir bitte jemand dabei helfen das hinzubekommen.

    Link zur Testseite im PC.

    • This topic was modified 4 months, 3 weeks ago by felix_frank.
    • This topic was modified 4 months, 3 weeks ago by felix_frank.
    #1490338

    In reply to: .scroll-down-link

    hm – didn’t i mention a solution before ? …

    but take this instead from https://kriesi.at/support/topic/scroll-down-link/#post-1489662 – because we have choosen before this slightly rounded version :

    function avia_replace_default_icons($icons){
     $icons['svg__scrolldown'] =  array( 'font' =>'svg_entypo-fontello', 'icon' => 'down-open');
     $icons['svg__prev'] =  array( 'font' =>'svg_entypo-fontello', 'icon' => 'left-open');
     $icons['svg__next'] =  array( 'font' =>'svg_entypo-fontello', 'icon' => 'right-open');
     return $icons;
    }
    add_filter('avf_default_icons','avia_replace_default_icons', 10, 1);

    and try :

    #top .avia-post-nav {
      padding: 20px;
    }
    
    #top .avia-post-nav .label {
      position:absolute;
      top:50% !important;
      transform: translateY(-50%);
      height:48px;
      margin-top:0;
    }
    
    .avia-post-nav .label.avia-svg-icon svg:first-child {
      fill: #FFF;
      height:48px;
      width: auto;
    }

    btw: you can have on opend slide-out a different fill color:

    #top .avia-post-nav:hover .label.avia-svg-icon svg:first-child {
      fill: #eee
    }
    #1489608

    In reply to: Multiple shop pages

    This removes the products from the shop list… but not from the categories:

    View post on imgur.com

    I would want to remove the category from just the main shop page. I can use a page number identifier and remove it with CSS right?

    It also makes the SHOP page… 2 pages… instead of just one. Which isn’t ideal, I would prefer that people keep scrolling, rather than have to press next page

    -Also, what about my other question from above? Regarding a different banner for each shop page?

    -Also, another question, is there a way to control which categories Start out Open… vs Closed on the Shop pages?
    Like on the Main Shop Page… I want to Give people the option to search by Liquor Type. I don’t want the subcategories below it (like tequila, vodka, etc) to show up automatically, I’d like it to remain closed until a visitor clicks it?

    Another weird thing, when I add in the Spirits Category, the system for whatever reason pushes it to the top:

    View post on imgur.com

    Even though alphabetically it should be below. I have no idea why thats happening

    • This reply was modified 5 months, 3 weeks ago by Dzimnikov.
    • This reply was modified 5 months, 3 weeks ago by Dzimnikov.
    • This reply was modified 5 months, 3 weeks ago by Dzimnikov.
    #1489029

    Hey oburlin,
    For the image caption, you will note in the element that it’s placement is in the overlay:
    Screen Shot 2025-09-06 at 7.14.36 AM
    To move to the lower part of the image, I see that you have added this custom css:

    .av-image-caption-overlay {
        background: none repeat scroll 0 0 rgba(0, 0, 0, 0) !important;
        bottom: 0px !important;
        color: black !important;
        height: auto !important;
        left: 50% !important;
        transform: translate(-50%) !important;
        width: auto !important;
    }

    Resulting in this:
    Screen Shot 2025-09-06 at 7.18.09 AM
    To make it one line try removing width: auto !important; from your css.
    Then you would see:
    Screen Shot 2025-09-06 at 7.20.28 AM
    If you want the caption below the image, try this css instead:

    #top .av-image-caption-overlay {
        height: auto;
        width: 100%;
        left: 0px;
        bottom: 0px;
        transform: translateY(100%);
    }
    #top .av-overlay-hover-deactivate .avia-image-overlay-wrap:hover .av-caption-image-overlay-bg {
        opacity: 0.4 !important;
    }
    #top .avia-image-container .av-caption-image-overlay-bg {
        opacity: 0.4;
        background-color: transparent;
    }
    #top .avia-image-container .av-image-caption-overlay-center {
        color: #000;
    }

    resulting in this:
    Screen Shot 2025-09-06 at 7.31.39 AM

    Best regards,
    Mike

    #1487582

    Hey Russell,

    Thanks for reaching out again.

    We can now see the video and can confirm that the scroll animations in the old site can be recreated with Enfold. You can apply these animations to Column elements, and they should be automatically triggered on scroll. You can also utilize the Layer Slider plugin, which is natively included in the theme, to create hero sections or sliders.

    Unfortunately, presale questions are one-time and can’t be continued like forum discussions. You will need to acquire a theme license and then use the purchase code to register an account on the forum.

    https://kriesi.at/support/register/

    Once registered, you can open a thread using this form: https://kriesi.at/support/forum/enfold/#new-post

    Let us know if there’s anything else we can help with.

    Best regards,

    Previous Reply:
    ============================================================================================================
    Thank you for your interest in Enfold.

    The videos are not accessible, so we’re not able to view them. In any case, the theme comes with built-in demo content, so you don’t need to start from scratch. You can simply import a demo and then incorporate your existing designs, images, and content to match what you have in mind. It’s very user-friendly, with plenty of customization options and a powerful Advanced Layout Builder where most of the content creation and site building will take place.

    If you have any questions or need help with development, feel free to reach out to us here in the forum — we’re happy to help.

    You can preview the available theme demos below.

    https://kriesi.at/themes/enfold-overview/

    To help you get started, please check out the documentation.

    https://kriesi.at/documentation/enfold/

    Let us know if you have any more questions.
    ============================================================================================================

    Best regards,
    Ismael

    #1487366

    Hi,

    Thank you for the update.

    You can add this css code to reverse the burger menu animation from left to right.

    .html_av-overlay-side .av-burger-overlay-scroll {
        width: 500px;
        transform: translateX(-500px);
        left: 0;
        right: auto;
    }
    

    For the home page, you can try this css code to completely hide the header.

    .home #header 
        display: none;
    }

    Best regards,
    Ismael

    #1486105

    Hi,
    Thanks for your help Guenni007, but in my test it seems that only targeting the ID “#av_section_1” didn’t help, I tried adjusting to const container = document.querySelector('#av_section_1 .av-parallax-object'); to target the text in the parallax but as you pointed out it was jerky for the speed needed.
    With trial and error and AI I found that this javascript & css works well for desktop & mobile and smooths out most all the jerk from the text and background image.
    Try adding this code to the end of your child theme functions.php file in Appearance ▸ Editor:

    function move_text_in_parallax_down_on_scroll() { ?>
      <script>
      document.addEventListener("DOMContentLoaded", function () {
      const el = document.querySelector("#av_section_1 .av-parallax-object");
      const bg = document.querySelector("#av_section_1 .av-parallax");
    
      if (!el || !bg) return;
    
      const isMobile = window.innerWidth < 768;
    
      const textSpeed = isMobile ? 0.9 : 0.7;
      const bgSpeed = isMobile ? 0.3 : 0.2;
    
      let currentYText = 0;
      let currentYBg = 0;
    
      const updateParallax = () => {
        const scrollY = window.scrollY || window.pageYOffset;
    
        // Text transform
        const targetYText = scrollY * textSpeed;
        currentYText += (targetYText - currentYText) * 0.05;
        el.style.transform = translateY(${currentYText}px);
    
        // Background transform
        const targetYBg = scrollY * bgSpeed;
        currentYBg += (targetYBg - currentYBg) * 0.05;
        bg.style.transform = translateY(${currentYBg}px); // GPU accelerated
    
        requestAnimationFrame(updateParallax);
      };
    
      requestAnimationFrame(updateParallax);
    });
      </script>
      <style>
      #av_section_1 .av-parallax-object {
      position: relative;
      top: 0;
      left: 0;
      will-change: transform;
      backface-visibility: hidden;
      transform: translateZ(0);
    }
    #av_section_1 {
      position: relative;
      overflow: hidden;
    }
    #av_section_1 .av-parallax {
      background-attachment: scroll !important; /* disables fixed scroll handling */
      background-position: center center !important;
      transform: none !important;
      will-change: auto !important;
    }  
      </style>
      <?php
    }
    add_action( 'wp_footer', 'move_text_in_parallax_down_on_scroll', 99 );

    If you are not using a child theme you could use the WP Code plugin then add a new snippet, in the top right corner use the PHP snippet as the code type:
    use wpcode php snippet and activate
    and ensure that it is activated, then add the above code and save.

    Best regards,
    Mike

    #1485303
    jedediahzilberberg
    Participant

    Recently on my site, after updating to Enfold 7.1 (WP 6.8.1), I am seeing p tags getting added automatically. This should not happen. How do I stop this from happening? Here are 2 examples of this happening:

    <p class=”ai-optimize-89″></p>

    <p class=”ai-optimize-96″>
    <style type=”text/css” data-created_by=”avia_inline_auto” id=”style-css-av-2w1fh1-60a2143162635ac4b509f8d4973bd200″>
    .avia-section.av-2w1fh1-60a2143162635ac4b509f8d4973bd200{
    background-repeat:no-repeat;
    background-image:var(–wpr-bg-d2d137c8-5f7d-4d64-9d8d-23b56da50b14);
    background-position:0% 0%;
    background-attachment:scroll;
    }
    </style>
    </p>

    #1484536

    Thank you. I am working on setting up staging so I can convert to the child theme.

    IN THE MEANTIME.. I noticed my other website does not have the font so big, and after all this, I remember years ago I wanted the images bigger, so you gave me this code to put in the QUICK CSS…

    THERE ARE A FEW THINGS YOU GAVE ME IN HERE. CAN WE CHANGE THE PART FOR THE MAGAZINE TO HAVE A SMALLER FONT SIZE USING THIS CODE?

    I am giving you the whole section because I don’t know for sure which part is magazine and which is something else.

    THANK YOU IN ADVANCE FOR HELPING !!!

    THIS IS EVERYTHING IN THE QUICK CSS:
    p strong{
    color:#000!important;
    }

    #top .av-caption-style-overlay .av-masonry-entry .av-masonry-entry-title {
    color: white!important;
    }

    .av-magazine-thumbnail {
    min-height: auto;
    }

    #top .av-caption-style-overlay .av-masonry-entry .av-masonry-entry-title {
    color: white!important;
    }

    .av-magazine-thumbnail {
    min-height: auto;
    }
    div .slideshow_caption h2 {
    text-transform: none;
    }

    .av-magazine-thumbnail {
    width: 135px;
    height: auto;
    }

    @media only screen and (min-width: 768px) and (max-width: 1024px) {
    h2.avia-caption-title {
    font-size: 30px !important;
    }
    .avia-caption-content p {
    font-size: 22px !important;
    line-height: 24px;
    }
    }

    @media only screen and (max-width: 767px) {
    h2.avia-caption-title {
    font-size: 20px !important;
    }
    .avia-caption-content p {
    font-size: 14px !important;
    line-height: 16px;
    }
    .slideshow_caption {
    padding-top: 20px !important;
    }
    }

    #header_meta .menu li a {
    color: #fff !important;
    }
    .av-burger-overlay-scroll #av-burger-menu-ul a {
    color: #fff;
    }

    .html_av-overlay-side #top #wrap_all .av-burger-overlay-scroll #av-burger-menu-ul a {
    color: #fff;
    }

    .html_av-overlay-side.av-burger-overlay-active #top .av-hamburger-inner, .html_av-overlay-side.av-burger-overlay-active #top .av-hamburger-inner::before, .html_av-overlay-side.av-burger-overlay-active #top .av-hamburger-inner::after {
    background-color: #fff;
    }

    #header_meta .sub_menu .menu li a {
    color: #030303 !important;
    }

    .avia_textblock a strong {
    color: blue !important;
    }

    #1484140

    In reply to: Lightbox settings

    Hello,
    for the thumbnail size i managed it, thanks

    But for the scroll, it doesn’t work for me with you code.

    i put this instead and it seams to be OK:

    .mfp-wrap.mfp-gallery.mfp-close-btn-in.mfp-auto-cursor.avia-popup.mfp-zoom-in.mfp-ready {
    top: 0 !important;
    position:fixed!important;
    }

    What do you think about it?

    #1483966

    Hi,
    I checked your page on my Android mobile device, but I don’t see that it is automatically scrolling, up or down, please explain further.

    Best regards,
    Mike

    #1483650

    Hey Tilman,

    Thank you for the inquiry.

    You can use the following css code to adjust the height of the burger menu items and the width of the overlay container.

    .html_av-overlay-side #top #wrap_all .av-burger-overlay li a {
        line-height: 2em;
        height: auto;
        padding: 15px 50px;
    }
    
    .html_av-overlay-side #top #wrap_all .av-burger-overlay-scroll {
        width: calc(100vw - 65%);
    }

    Best regards,
    Ismael

    #1483649

    Hey Tilman,

    Thank you for the inquiry.

    You can use the following css code to adjust the height of the burger menu items and the width of the overlay container.

    .html_av-overlay-side #top #wrap_all .av-burger-overlay li a {
        line-height: 2em;
        height: auto;
        padding: 15px 50px;
    }
    
    .html_av-overlay-side #top #wrap_all .av-burger-overlay-scroll {
        width: calc(100vw - 65%);
    }

    Best regards,
    Ismael

    #1483535
    Zrated09
    Participant

    How do we make each section of a page automatically fit the whole screen vertically. Similar to your “One Page” Demo. But each page that we make, as you scroll down through the page, we want each section to fill the screen vertically so you have clear distinct sections that fill the screen.

    #1483319

    In reply to: Links Tab Section

    Hey Diana,

    Thank you for the inquiry.

    Are you trying to make the document automatically scroll and open the tabs when the links are used? If so, you can try adding this script in the functions.php file:

    add_action('wp_footer', function() {
        ?>
        <script>
        document.addEventListener('DOMContentLoaded', function() {
            (function($) {
                function scrollToTab(selector, eventType) {
                    $(selector).on(eventType, function(e) {
                        var hash = eventType === 'load' ? window.location.hash : $(this).attr('href').split('#')[1];
                        if (!hash) return;
                        var tab = $('.av-section-tab-title[href="#' + hash + '"]');
                        if (tab.length) {
                            var parent = tab.closest('.av-tab-section-outer-container');
                            var pos = parent.offset();
                            tab.trigger('click');
                            setTimeout(function() {
                                $(window).scrollTop(pos.top - 100);
                            }, 100);
                        }
                    });
                }
                scrollToTab('.avia-buttonrow-wrap a', 'click');
                scrollToTab(window, 'load');
            })(jQuery);
        });
        </script>
        <?php
    });
    

    Best regards,
    Ismael

    #1483010
    lee-annm
    Participant

    Hey there my home page is automatically scrolling on mobile – this doesn’t happen on other pages. Please help!

    #1480695

    Hi,

    We added the changes in the functions.php file to prevent the scroll. Regarding the sender form, please contact the plugin developers.

    function inline_popup_enabler(){ ?>
        <script>
        (function($){
            $(window).on('load', function() {
    			$('.inline_popup').addClass('no-scroll');
                $('.inline_popup').magnificPopup({
                    type: 'inline',
                    midClick: true,
                    callbacks: {
    					beforeOpen: function () {
    					  $('body').css("overflow-y", "hidden");
    					},
    					close: function() {
    					  $('body').css("overflow-y", "auto");
    					},
                        open: function() {
                            (function (s, e, n, d, er) {
                                s['Sender'] = er;
                                s[er] = s[er] || function () {
                                    (s[er].q = s[er].q || []).push(arguments);
                                }, s[er].l = 1 * new Date();
                                var a = e.createElement(n),
                                    m = e.getElementsByTagName(n)[0];
                                a.async = 1;
                                a.src = d;
                                m.parentNode.insertBefore(a, m);
                            })(window, document, 'script', 'https://cdn.sender.net/accounts_resources/universal.js', 'sender');
                            
    						if ($('.sender-form-field iframe').length > 0) {
    							console.log("sender form initialized");
    						} else {
    							sender('4f4c8522254761');
    						}   
                        }
                    }
                });
            });
        })(jQuery);
        </script>
    <?php }
    add_action('wp_footer', 'inline_popup_enabler');
    

    Best regards,
    Ismael

    #1480327

    The form shows up without the plugin, but it makes the page scroll to the top when I open it.
    I see a problem also if I click on the link and then close it, if I click on it again the form doesn’t show up.

    /*sizing for popup tilmeld form*/
    @media only screen and (min-width: 768px) { 
    #top .mfp-inline-holder .mfp-content {
    width: 50%!important;
    }}
    
    /*@media only screen and (max-width: 768px) { 
    #top .mfp-iframe-scaler {
        height: 90vh;
    }}*/
    @media only screen and (min-width: 768px) { 
    #top .mfp-iframe-scaler {
        width: 60%;
        margin: 0 auto;
    }}

    Is there a way to center align the form in the popup if I wanted the whole thing centered?

    View post on imgur.com


    or else make the popup narrower so it doesn’t look like this on larger screens?

    View post on imgur.com

    The plugin is what was giving me the widget that I use in the iframe link in the active footer, which is disabled now.
    thanks for the help
    Nancy

    • This reply was modified 11 months, 4 weeks ago by Munford.
    • This reply was modified 11 months, 4 weeks ago by Munford.
    • This reply was modified 11 months, 4 weeks ago by Munford.
    • This reply was modified 11 months, 4 weeks ago by Munford.
    • This reply was modified 11 months, 4 weeks ago by Munford.
    • This reply was modified 11 months, 4 weeks ago by Munford.
Viewing 30 results - 1 through 30 (of 1,190 total)