-
AuthorPosts
-
June 8, 2020 at 9:16 am #1220396
Hi!
What’s the best solution to add a graphic divider that overlaps a header image and the section below it?Like on this site:
https://www.inlite.se/Thank you!
June 8, 2020 at 11:13 am #1220431on the site you linked to – it is done via insertion of a svg file in a pseudo container ( :before )
but you have then an img svg ( a background-image : … svg )
i prefer to have real inline svg on that – because we can do even animated svgs as divider ( see footer ) and you can have fast influence on the background-color of non-transparent part by css with fill color.https://webers-testseite.de/pureinstall/fullwidth-slider/
here is nearly the same svg as on your example page:
on the most svg-dividers there is allways a transparent side and a side where a background-color is forming the border to the other section.
https://webers-testseite.de/pureinstall/wp-content/uploads/waves-2.svg
The gray is just a background for contrast reasons and shows you the transparent part of the svg.
Look now to your example page: The image on top has the transparent side of the divider.
the white non-transparent part of the divider goes to the section with white background.See here the code for that svg:
<?xml version="1.0" encoding="utf-8"?>
<svg id="Waves" data-name="waves" xmlns="http://www.w3.org/2000/svg" viewBox="0 0 1200 106.24" width="100%" height="200px" preserveAspectRatio="none">
	<style>
		#Waves{background-color: #aaa}
		.bottom-bg{fill:#fff;}
		.color-1{fill:#339996; opacity:0.15;}
		.color-2{fill:#6faeb0; opacity:0.3;}
	</style>
	<title>waves</title>
	<rect class="bottom-bg" y="29.37" width="1199" height="76.87"/>
	<path class="color-1" d="M591.67,80.53l24.89,2A3705.31,3705.31,0,0,0,1200,82.26v2.53A3705.31,3705.31,0,0,1,616.56,85l-24.89-2A3704.3,3704.3,0,0,0,76.38,78.51L0,83.16V80.63L76.38,76A3704.3,3704.3,0,0,1,591.67,80.53Z" transform="translate(0 -1)"/>
	<path class="bottom-bg" d="M607.82,14.52,583,16.85A3116.84,3116.84,0,0,1,0,16.57V45.95a3116.84,3116.84,0,0,0,583,.28l24.87-2.32a3115.7,3115.7,0,0,1,514.86-5.4L1199,44V14.64l-76.32-5.52A3115.7,3115.7,0,0,0,607.82,14.52Z" transform="translate(0 -1)"/>
	<path class="color-2" d="M608.33,14.52l-24.89,2.32A3122,3122,0,0,1,0,16.57V45.95a3122,3122,0,0,0,583.44.28l24.89-2.32a3120.89,3120.89,0,0,1,515.29-5.4L1200,44V14.64l-76.38-5.52A3120.89,3120.89,0,0,0,608.33,14.52Z" transform="translate(0 -1)"/>
	<path class="color-2" d="M608.33,14.52l-24.89,2.32A3122,3122,0,0,1,0,16.57V44L76.38,38.5a3120.89,3120.89,0,0,1,515.29,5.4l24.89,2.32A3122,3122,0,0,0,1200,45.95V14.64l-76.38-5.52A3120.89,3120.89,0,0,0,608.33,14.52Z" transform="translate(0 -1)"/>
</svg>
it is nearly the same structure as a html page.
You can have styles in it etc. pp.
You see the class : bottom-bg if you must have a section following with blue background – just redefine the fill color to blue on quick css – thats all.
So you can use one svg file to have as divider for different sections.June 8, 2020 at 11:33 am #1220435now – if you got an example page where you like to insert this – i will show you how to do that. It is easier to have more information about the place where the divider should go to.
June 8, 2020 at 11:48 am #1220438Thank you so much for responding, really appreciate it. How is that code inserted on the page ?
The page I want to add it to is here:
I want to divider between the header image and the white section below it.
June 8, 2020 at 3:17 pm #1220492The easier way – but not so mighty as the other possibility.
Upload to your media library that svg: https://webers-testseite.de/wp-content/uploads/waves.svgput in your quick css:
#start::before {
    content: "";
    background-image: url(/wp-content/uploads/waves.svg); /**** be carefull if you have the installation in a subfolder - maybe better an absolute path ***/
    background-repeat: no-repeat;
    background-size: 100vw 200px;
    background-position: left bottom !important;
    width: 100%;
    height: 100%;
    position: absolute;
    z-index: 50;
}
disadvantage of this method: if you now had a following section with a background-color, you could not change the white in svg by css.
June 8, 2020 at 3:28 pm #1220499For this way you had to know something about svg ( and how to prepare the svg code for appending / prepending it )
please give two custom class to the section #start : divider waves
(You will see later why these classes are useful) – just copy/paste and put this in the custom class field.put this to your child-theme functions.php
function insert_dividers(){
?>
<script>
(function($){
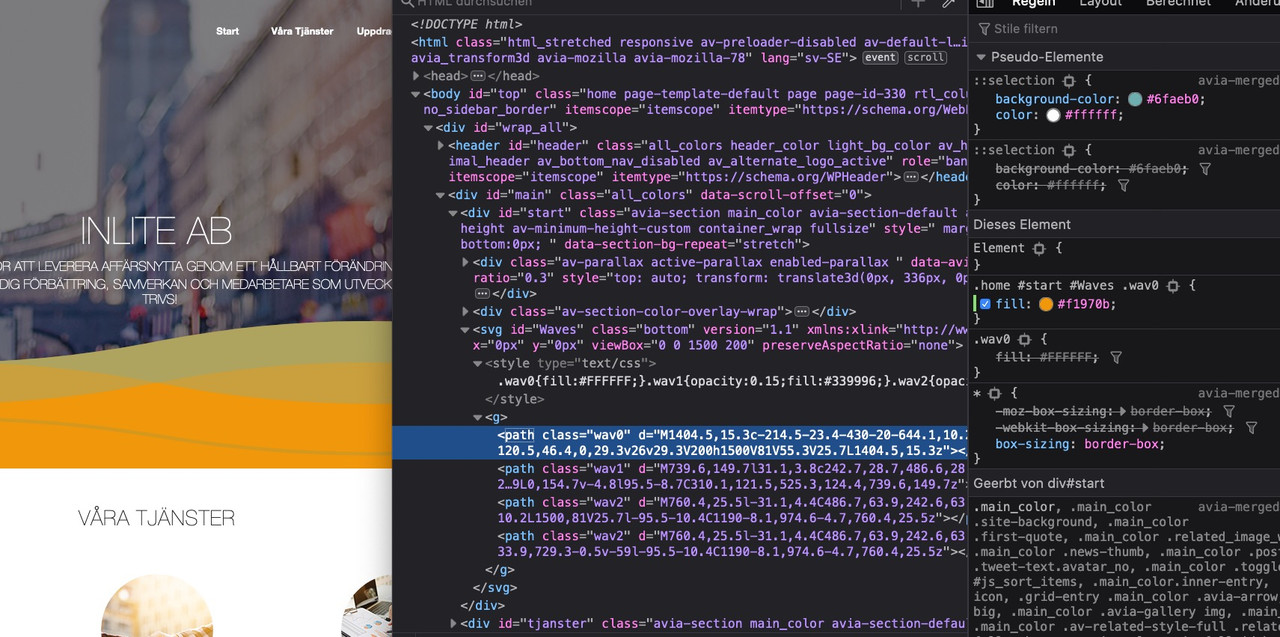
	$('.avia-section.divider.waves').append('<svg version="1.1" id="Waves" class="bottom" xmlns:xlink="http://www.w3.org/1999/xlink" x="0px" y="0px" viewBox="0 0 1500 200" preserveAspectRatio="none"><style type="text/css">.wav0{fill:#FFFFFF;}.wav1{opacity:0.15;fill:#339996;}.wav2{opacity:0.3;fill:#6FAEB0;}</style><g><path class="wav0" d="M1404.5,15.3c-214.5-23.4-430-20-644.1,10.2l-31.1,4.4C609.1,46.8,488.5,55.2,367.8,55.3h-5.4 C241.5,55.1,120.5,46.4,0,29.3v26v29.3V200h1500V81V55.3V25.7L1404.5,15.3z"/><path class="wav1" d="M739.6,149.7l31.1,3.8c242.7,28.7,486.6,28.5,729.3-0.5v4.8c-242.7,29-486.6,29.1-729.3,0.4l-31.1-3.8 C525.3,129,310,126.2,95.5,145.9L0,154.7v-4.8l95.5-8.7C310.1,121.5,525.3,124.4,739.6,149.7z"/><path class="wav2" d="M760.4,25.5l-31.1,4.4C486.7,63.9,242.6,63.8,0,29.3v55.3c242.6,34.5,486.7,34.6,729.3,0.5l31.1-4.4 c214.2-30.1,429.6-33.5,644.1-10.2L1500,81V25.7l-95.5-10.4C1190-8.1,974.6-4.7,760.4,25.5z"/><path class="wav2" d="M760.4,25.5l-31.1,4.4C486.7,63.9,242.6,63.8,0,29.3V81l95.5-10.4c214.5-23.4,430-20,644.1,10.2l31.1,4.4 c242.6,34.1,486.7,33.9,729.3-0.5v-59l-95.5-10.4C1190-8.1,974.6-4.7,760.4,25.5z"/></g></svg>');
})(jQuery);
</script>
<?php
}
add_action('wp_footer', 'insert_dividers');
and this to your quick css:
.avia-section.divider {
  position: relative !important;
}

svg#Waves.bottom {
    position: absolute;
    bottom: -3px !important;
    z-index: 50;
    height: 200px;
    width: 100vw;
}
So – for what do we need these classes?
now every color-section with these classes gets the divider.
The first is to initialize the svg insertion – the second gives the svg data.
i have on my installations approx 15 different svg datas. they have all some names like waves, waves2, mountains, clouds etc. pp.
the second class is for what to insert as a divider.I have always a pair for divider top position and bottom position.
The one are inserted via append (bottom position) the others are inserted via prepend:
$('.avia-section.divider.waves').prepend('<svg version="1.1" id="Waves" class="top" …June 8, 2020 at 3:36 pm #1220502Seriously, man, that’s awesome!
Thank you for taking the time to show me this! I really appreciate it!I follower the last post, so did not upload the svg to me locally, is it good to have the svg locally on the server if the link is broken in the future ? Or where is linked to now ?
I tested it on this installation.
Again thank you!
June 8, 2020 at 3:49 pm #1220506June 8, 2020 at 3:55 pm #1220508Elementor or Divi uses svgs that plays only with opacity and one group color – the group color is then the background-color of the following section:
something like this:<?xml version="1.0" encoding="utf-8"?> <svg version="1.1" id="Gebirge" class="bottom" xmlns="http://www.w3.org/2000/svg" xmlns:xlink="http://www.w3.org/1999/xlink" width="100%" height="300px" x="0px" y="0px" viewBox="0 0 1500 300" preserveAspectRatio="none"> <g fill="#900"> <path d="M0,100L200,0l735,200l365-15l200-85v200H0V100z" fill-opacity=".5"/> <path d="M0,195l165-60l370,50l400-55l400,95l165-30v105H0V195z" fill-opacity="1"/> </g> </svg>looks this way

that red color is then only in opacities present and on the one side it is with opacity:1 to give the border to the next secction.
June 9, 2020 at 12:53 am #1220693Thank you! Really appreciate it!
June 9, 2020 at 8:34 am #1220751 -
AuthorPosts
- You must be logged in to reply to this topic.

