
-
AuthorPosts
-
December 1, 2019 at 7:13 pm #1161657
Hello!
I am trying to create a 4-column pricing table using the table element. Basically the 1st column has rows for the description of the ‘features’ and columns 2, 3 & 4 are used for different pricing levels.
In each of the rows under columns 2, 3 & 4, I want to put a small pic of a check mark or an X to indicate that the feature is included under a pricing level.
Is it possible to insert pics into cell (rows/columns) using the table element?
If not, any suggestions using a different element?
December 2, 2019 at 12:05 am #1161690Hey JeffBianchi,
I recommend using css like this:#av_section_2 > div > div > div > div > div > div:nth-child(1) > ul > li:nth-child(3):before { content: "\e812"; /*check mark*/ font-family: entypo-fontello; color: green; position: relative; padding-right: 11px; margin-left: -20px; } #av_section_2 > div > div > div > div > div > div:nth-child(1) > ul > li:nth-child(4):before { content: "\e813"; /*X mark*/ font-family: entypo-fontello; color: red; position: relative; padding-right: 11px; margin-left: -20px; }result
getting the sectors for the css might be a little tricky, please let us know if you would like to know how to do this.Best regards,
MikeDecember 2, 2019 at 6:14 am #1161740Yes, can you give me instructions on how to do this?
December 2, 2019 at 12:15 pm #1161821Hi,
In the css above the first line before the:beforeis the selector, so for example#av_section_2 > div > div > div > div > div > div:nth-child(1) > ul > li:nth-child(3)
the easiest way to get this is to right-click on the area in your browser and choose “inspect”
(in this example I’m using Chrome, but most browsers are the same)
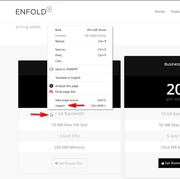
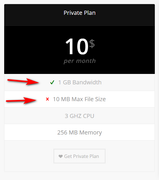
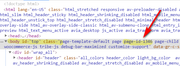
then in the inspector the section you clicked on should be highlighted, if not then just look for the<li>you wanted, you can see the text for the section:1 GB Bandwidth
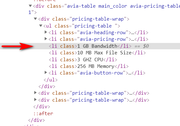
then right-click on that line and choose “Copy > Copy Selector”
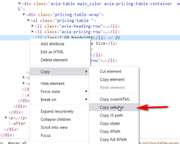
then paste the code into a plain text document, and add the rest of the css for either the check mark or the X:before { content: "\e813"; /*X mark*/ font-family: entypo-fontello; color: red; position: relative; padding-right: 11px; margin-left: -20px; }so it looks like the full css from my original reply, then just do that for each one. After you do a few it will seem easy.
Now to ensure this css only works on the one page and doesn’t conflict with other pages, go back to your inspector and look at the top of the page for<body id="top" class="and find the page ID
then add it to the front of your selector with a space like this:
#top.page-id-1346so your result will be:#top.page-id-1346 #av_section_2 > div > div > div > div > div > div:nth-child(1) > ul > li:nth-child(4):before { content: "\e813"; /*X mark*/ font-family: entypo-fontello; color: red; position: relative; padding-right: 11px; margin-left: -20px; }and that is it, after applying the css to your Quick CSS, Please clear your browser cache and check.
Best regards,
Mike -
AuthorPosts
- You must be logged in to reply to this topic.